 Select your AI SDK:
 Or invoke via `curl`:
```shell theme={null}
curl localhost:8080/agent/run --json '"What is the weather in Detroit?"'
```
Output: `The weather in Detroit is currently 17°C with misty conditions.`.
Or invoke via `curl`:
```shell theme={null}
curl localhost:8080/agent/run --json '"What is the weather in Detroit?"'
```
Output: `The weather in Detroit is currently 17°C with misty conditions.`.

 This was a mimicked failure. To fix the problem, remove the line `failOnDenver` from the `fetchWeather` function in the `utils.ts` file:
```ts {"CODE_LOAD::https://raw.githubusercontent.com/restatedev/ai-examples/refs/heads/main/vercel-ai/template/src/utils/weather.ts#weather"} theme={null}
export async function fetchWeather(city: string) {
failOnDenver(city);
const output = await fetchWeatherFromAPI(city);
return parseWeatherResponse(output);
}
```
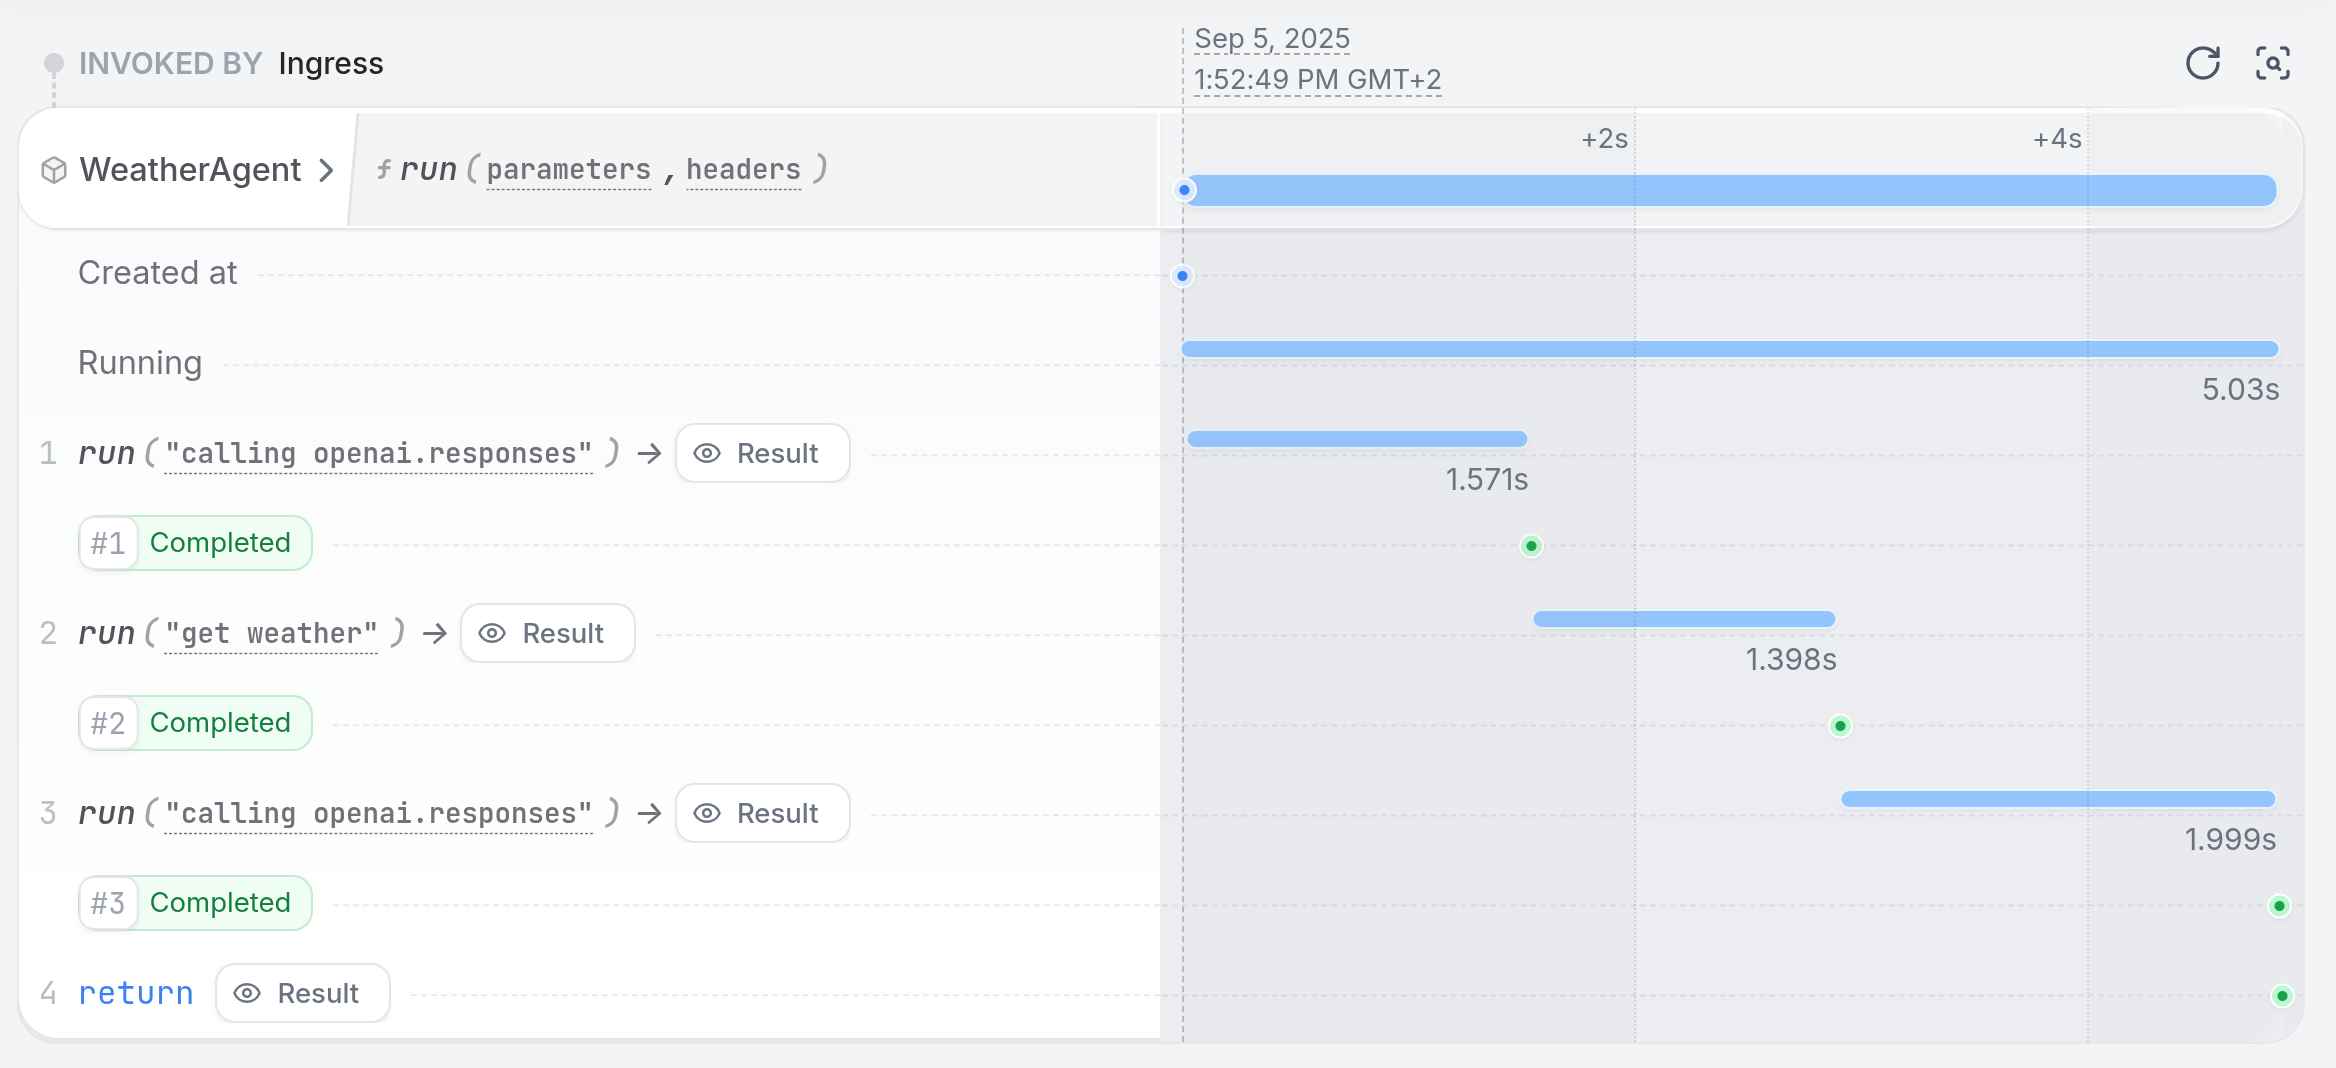
Once you restart the service, the agent resumes at the weather tool call and successfully completes the request.
Or invoke via `curl`:
```shell theme={null}
curl localhost:8080/agent/run --json '"What is the weather in Detroit?"'
```
Output: `The weather in Detroit is currently 17°C with misty conditions.`
This was a mimicked failure. To fix the problem, remove the line `failOnDenver` from the `fetchWeather` function in the `utils.ts` file:
```ts {"CODE_LOAD::https://raw.githubusercontent.com/restatedev/ai-examples/refs/heads/main/vercel-ai/template/src/utils/weather.ts#weather"} theme={null}
export async function fetchWeather(city: string) {
failOnDenver(city);
const output = await fetchWeatherFromAPI(city);
return parseWeatherResponse(output);
}
```
Once you restart the service, the agent resumes at the weather tool call and successfully completes the request.
Or invoke via `curl`:
```shell theme={null}
curl localhost:8080/agent/run --json '"What is the weather in Detroit?"'
```
Output: `The weather in Detroit is currently 17°C with misty conditions.`

 This was a mimicked failure. To fix the problem, remove the line `fail_on_denver` from the `fetch_weather` function in the `utils.py` file:
```python {"CODE_LOAD::https://raw.githubusercontent.com/restatedev/ai-examples/refs/heads/main/openai-agents/template/utils/utils.py#weather"} theme={null}
async def fetch_weather(city: str) -> WeatherResponse:
fail_on_denver(city)
weather_data = await call_weather_api(city)
return parse_weather_data(weather_data)
```
Once you restart the service, the agent resumes at the weather tool call and successfully completes the request.
This was a mimicked failure. To fix the problem, remove the line `fail_on_denver` from the `fetch_weather` function in the `utils.py` file:
```python {"CODE_LOAD::https://raw.githubusercontent.com/restatedev/ai-examples/refs/heads/main/openai-agents/template/utils/utils.py#weather"} theme={null}
async def fetch_weather(city: str) -> WeatherResponse:
fail_on_denver(city)
weather_data = await call_weather_api(city)
return parse_weather_data(weather_data)
```
Once you restart the service, the agent resumes at the weather tool call and successfully completes the request.
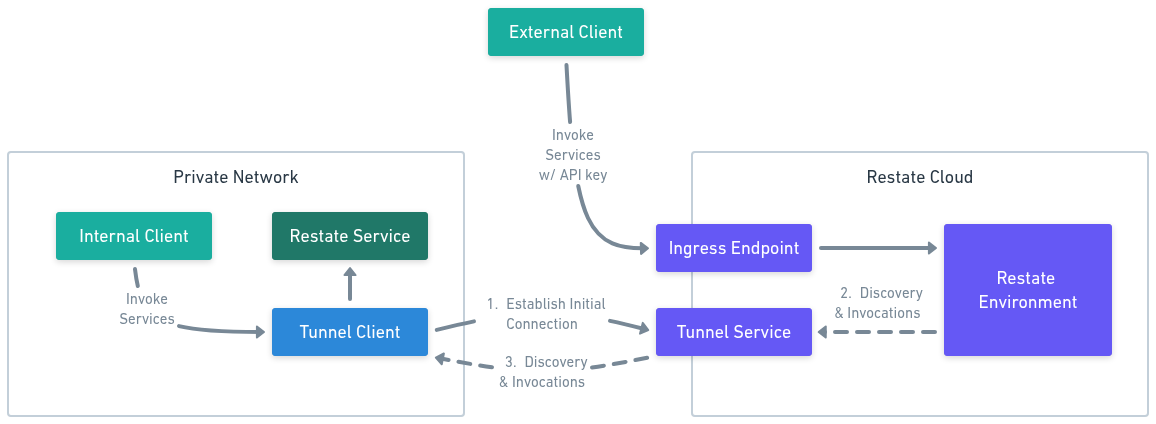 ## Connecting AWS Lambda services
To invoke services running on AWS Lambda, Restate Cloud needs to assume an AWS
identity in the same account that the Lambda is deployed to. Create a new role
that has permission to invoke your Lambda handlers, and give it the following
trust policy.
## Connecting AWS Lambda services
To invoke services running on AWS Lambda, Restate Cloud needs to assume an AWS
identity in the same account that the Lambda is deployed to. Create a new role
that has permission to invoke your Lambda handlers, and give it the following
trust policy.
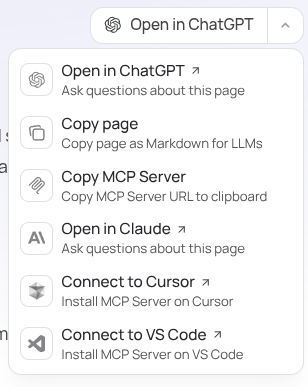 You can use this to quickly hydrate your AI chat with the content of the current page, or to add the Restate docs MCP server to Cursor, or VSCode.
## Restate Docs as MCP server
The Restate documentation is available as an MCP server, which you can add to Cursor or other AI coding agents that support MCP.
You can either use the shortcuts in the [contextual menu](/develop/ai-assistant#contextual-menu) or follow the following guidelines:
You can use this to quickly hydrate your AI chat with the content of the current page, or to add the Restate docs MCP server to Cursor, or VSCode.
## Restate Docs as MCP server
The Restate documentation is available as an MCP server, which you can add to Cursor or other AI coding agents that support MCP.
You can either use the shortcuts in the [contextual menu](/develop/ai-assistant#contextual-menu) or follow the following guidelines:
 ## Attaching to invocations
Attach to ongoing invocations to retrieve their results:
## Attaching to invocations
Attach to ongoing invocations to retrieve their results:
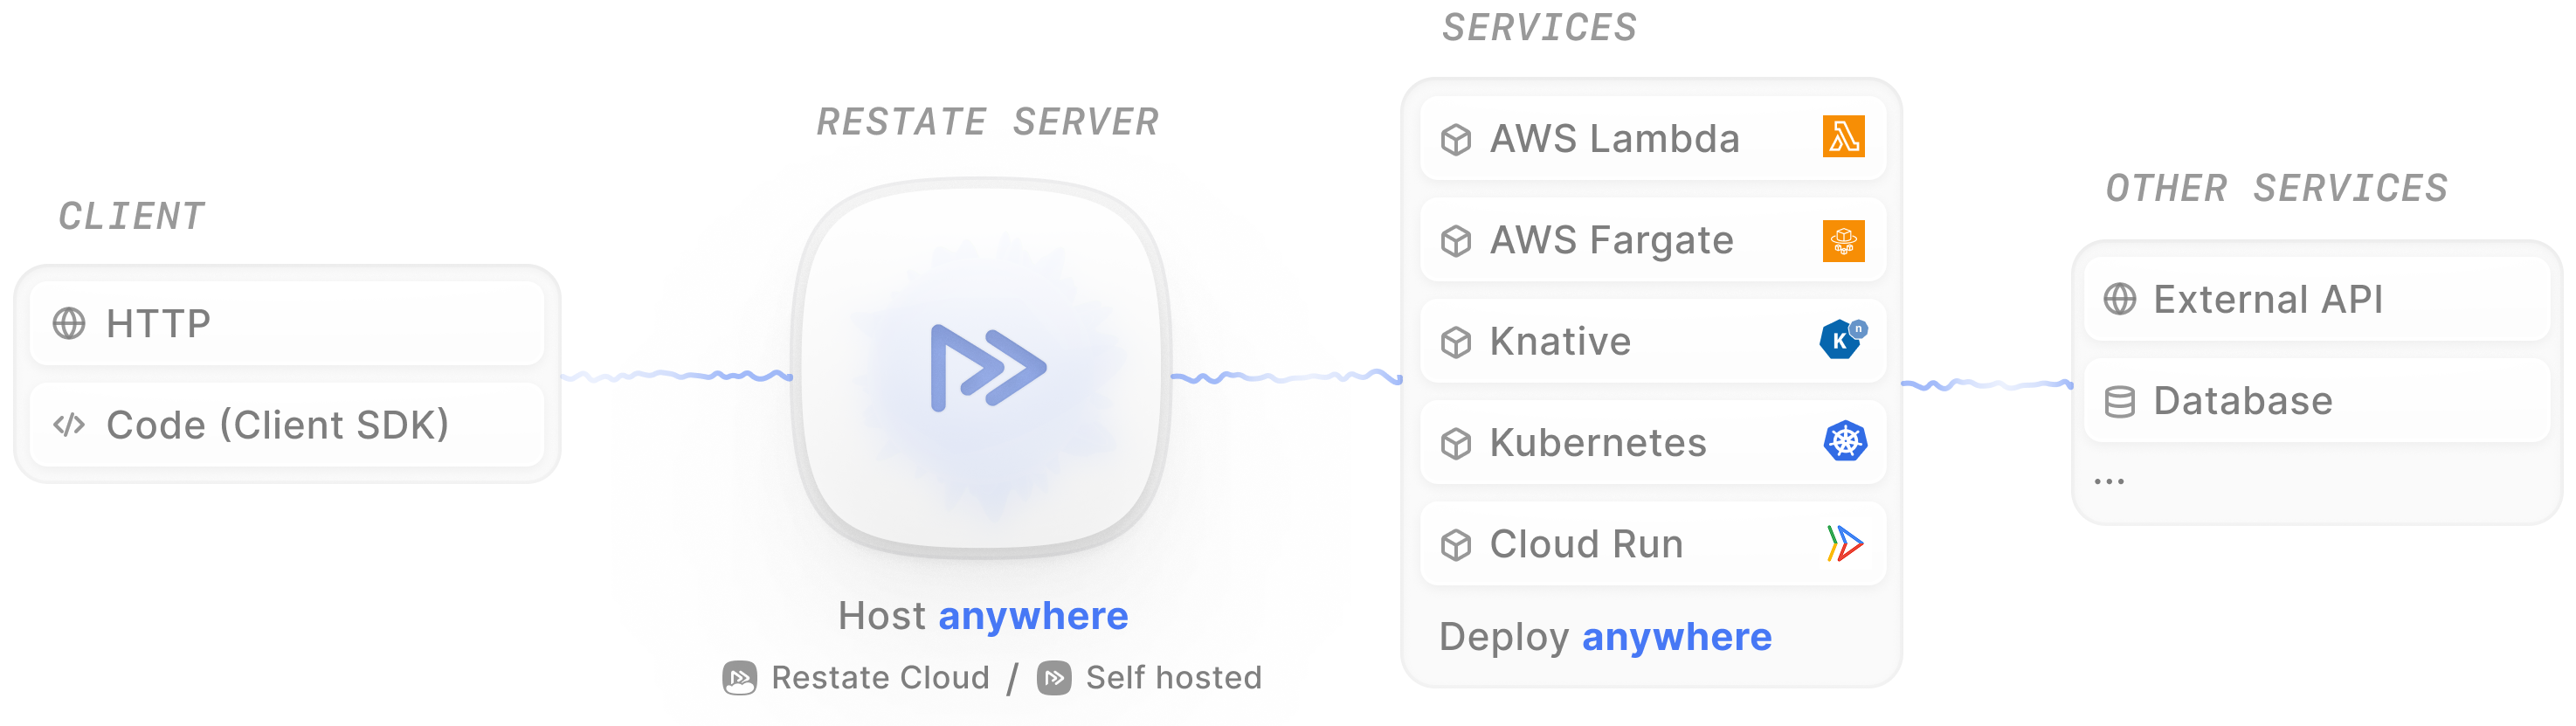
 ### Restate Services
Your business logic lives in **services**: regular applications that embed the Restate SDK. Services contain **handlers** (durable functions) that process requests and execute business logic.
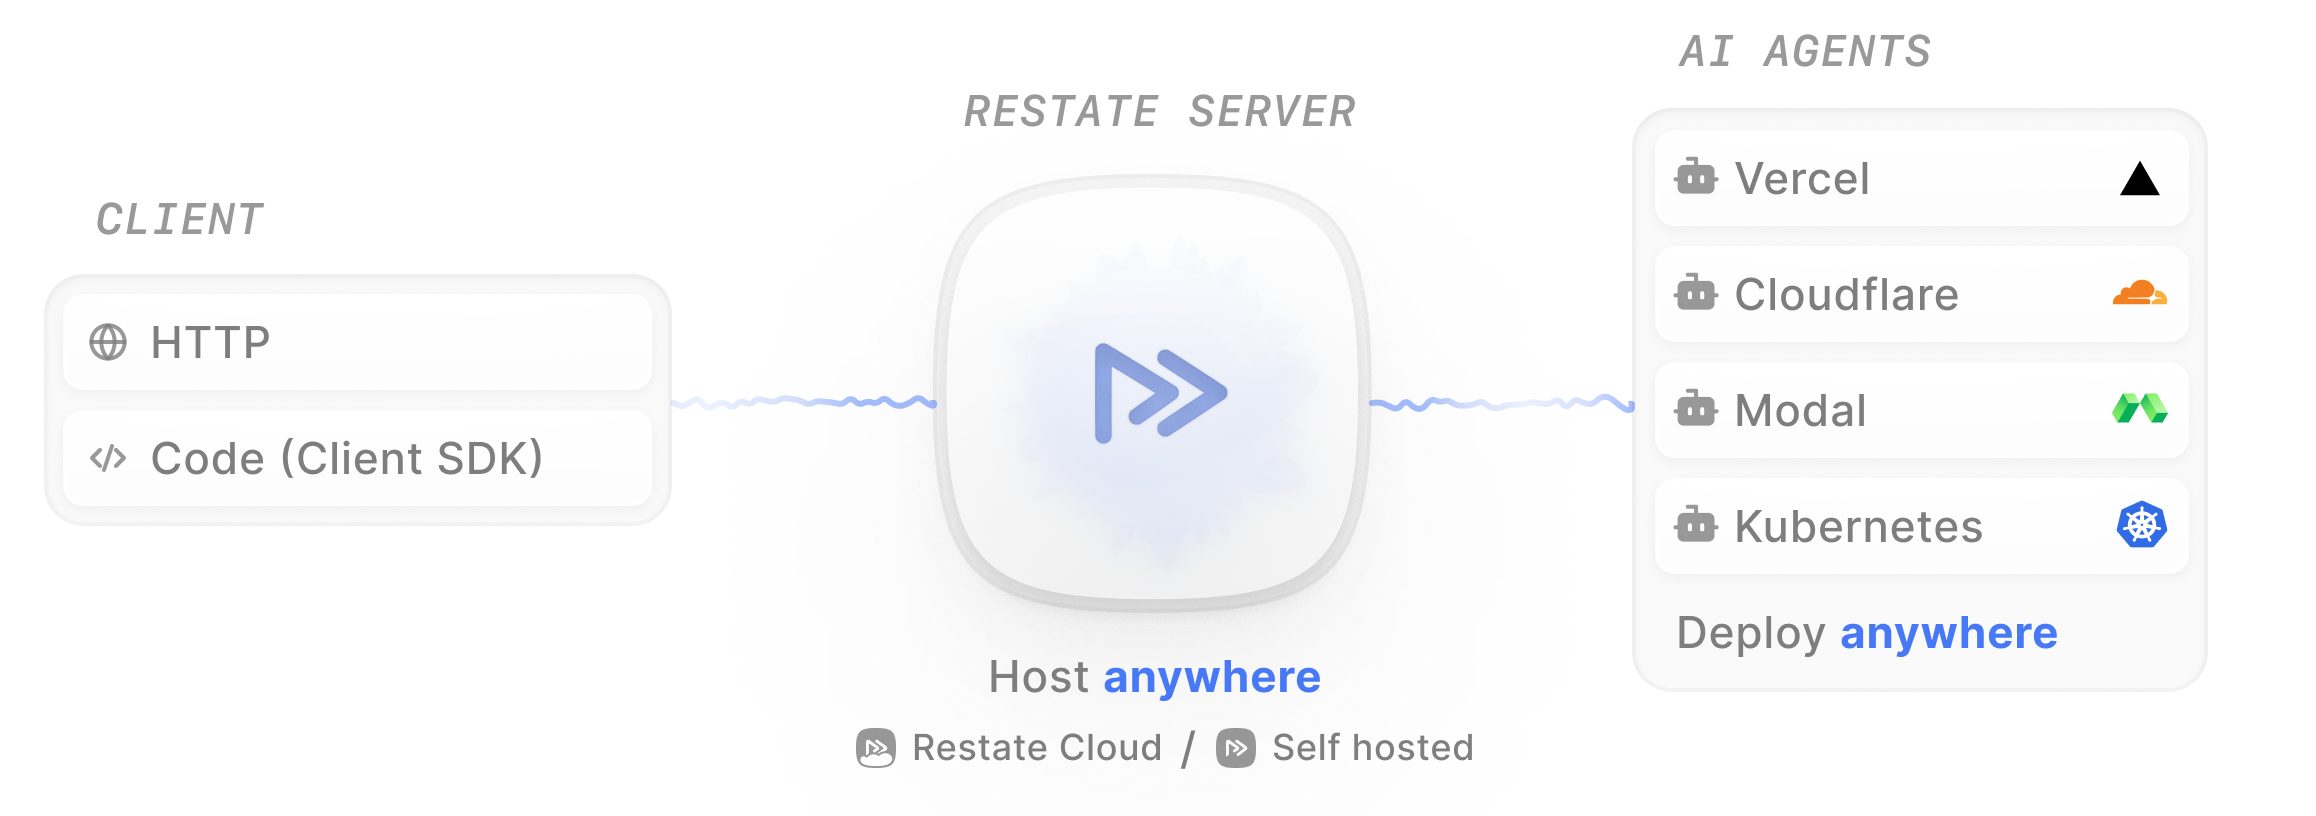
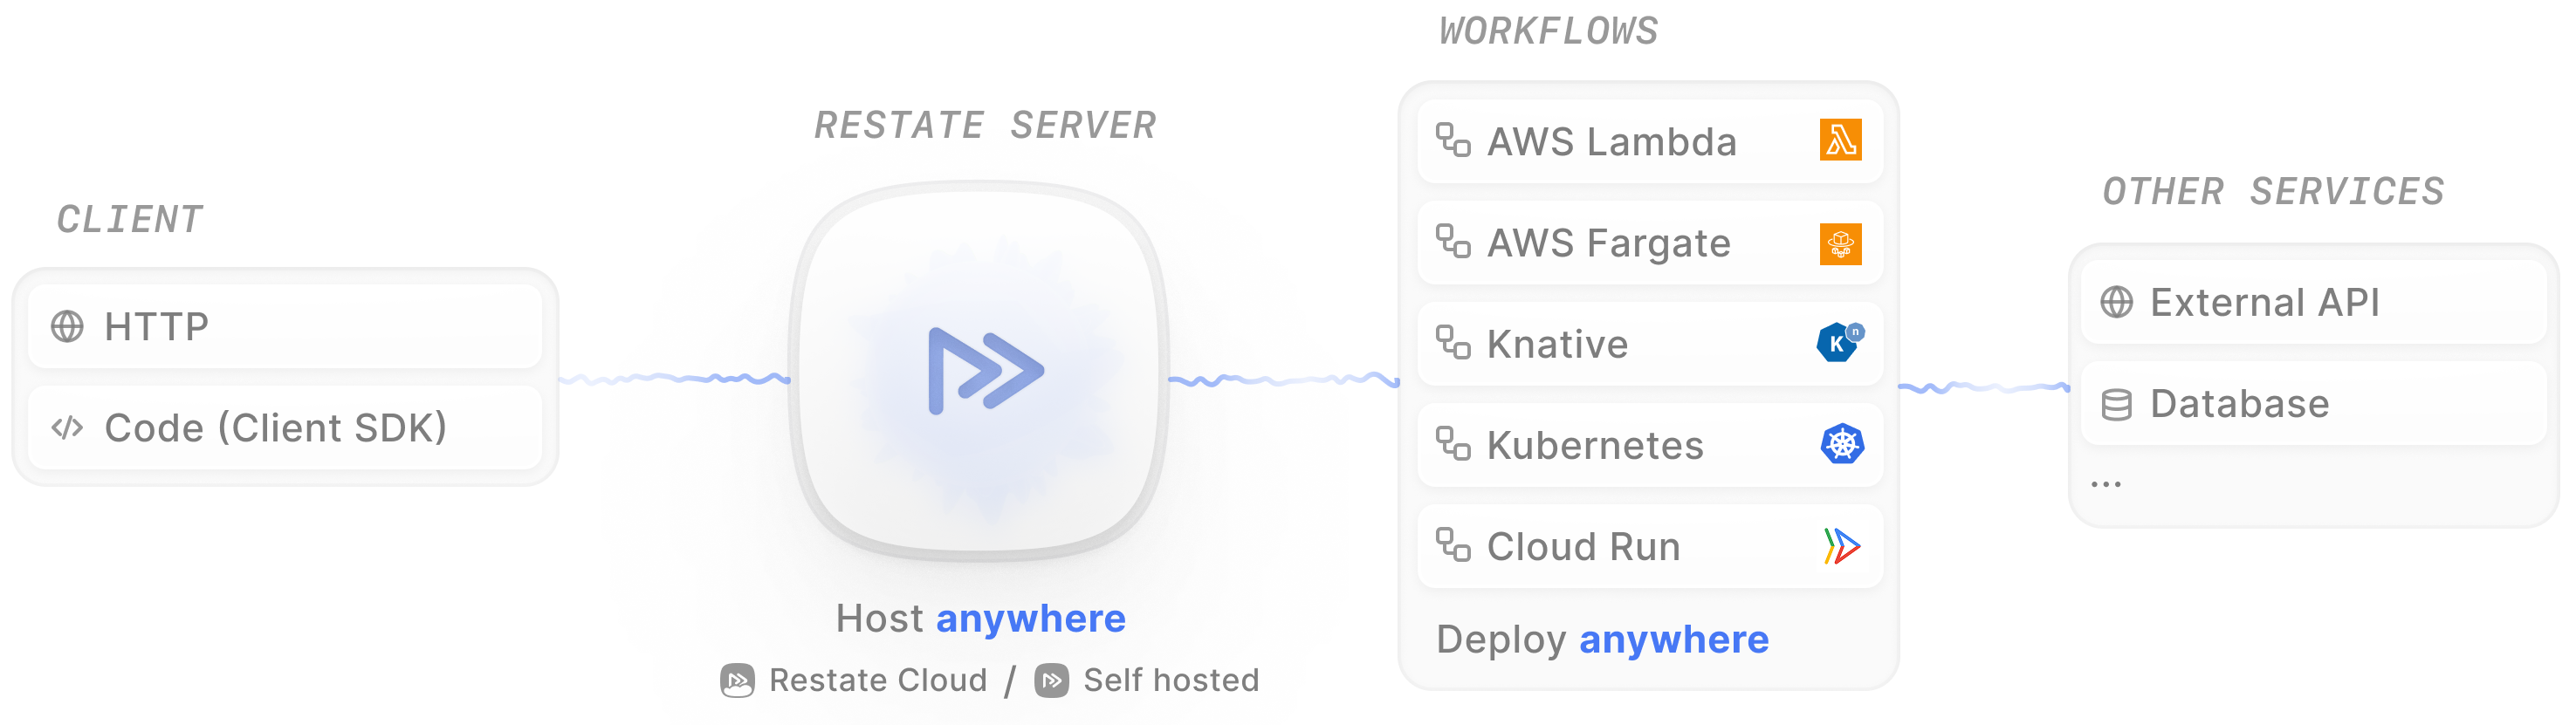
* **Deploy anywhere**: Services run in your infrastructure as containers, serverless functions, VMs, or Kubernetes pods
* **Familiar programming model**: Services look and feel like normal applications with added reliability by using the Restate SDK. Restate has SDKs for TypeScript, Java, Kotlin, Python, Go, and Rust.
### Restate Server
The **Restate Server** sits in front of your services, similar to a reverse proxy or message broker. It handles incoming requests, manages service discovery, and provides durable execution capabilities.
The server is a single binary written in Rust with a stream-processing architecture for **low latency and high throughput**.
It can be deployed in a high-availability cluster or as a single-node instance.
### Restate Services
Your business logic lives in **services**: regular applications that embed the Restate SDK. Services contain **handlers** (durable functions) that process requests and execute business logic.
* **Deploy anywhere**: Services run in your infrastructure as containers, serverless functions, VMs, or Kubernetes pods
* **Familiar programming model**: Services look and feel like normal applications with added reliability by using the Restate SDK. Restate has SDKs for TypeScript, Java, Kotlin, Python, Go, and Rust.
### Restate Server
The **Restate Server** sits in front of your services, similar to a reverse proxy or message broker. It handles incoming requests, manages service discovery, and provides durable execution capabilities.
The server is a single binary written in Rust with a stream-processing architecture for **low latency and high throughput**.
It can be deployed in a high-availability cluster or as a single-node instance.
 In this example, if sending the receipt fails, Restate automatically retries the function but skips the payment processing since it already completed successfully. Each step is recorded in the journal and won't repeat on retry.
 Restate proxies all communication towards and between services.
It provides a **resilient RPC framework**:
* Automatic retries and recovery: Failed calls are retried until they succeed
* No duplicates: Same call won’t execute twice
* Full observability: See all calls and call chains in the UI
* No message queues needed: Restate handles message delivery
## Consistent State
The Restate Server includes an embedded **key-value store** for persisting application state in Virtual Objects and Workflows.
Restate proxies all communication towards and between services.
It provides a **resilient RPC framework**:
* Automatic retries and recovery: Failed calls are retried until they succeed
* No duplicates: Same call won’t execute twice
* Full observability: See all calls and call chains in the UI
* No message queues needed: Restate handles message delivery
## Consistent State
The Restate Server includes an embedded **key-value store** for persisting application state in Virtual Objects and Workflows.
 Key characteristics:
* **Usage**: Implement consistent state machines, session state, or agent context and memory.
* **Scoped per entity**: Each Virtual Object and Workflow execution has its own isolated state.
* **Automatically journaled**: State updates are recorded alongside execution steps for consistency. State is never out of sync with the execution.
* **Single-writer guarantee**: Only one handler can modify state at a time, preventing race conditions.
* **Stateless services**: The Restate Server stores all state and execution history, delivering them with each request. Your services remain stateless, can scale horizontally, and run stateful logic even on serverless platforms.
Key characteristics:
* **Usage**: Implement consistent state machines, session state, or agent context and memory.
* **Scoped per entity**: Each Virtual Object and Workflow execution has its own isolated state.
* **Automatically journaled**: State updates are recorded alongside execution steps for consistency. State is never out of sync with the execution.
* **Single-writer guarantee**: Only one handler can modify state at a time, preventing race conditions.
* **Stateless services**: The Restate Server stores all state and execution history, delivering them with each request. Your services remain stateless, can scale horizontally, and run stateful logic even on serverless platforms.

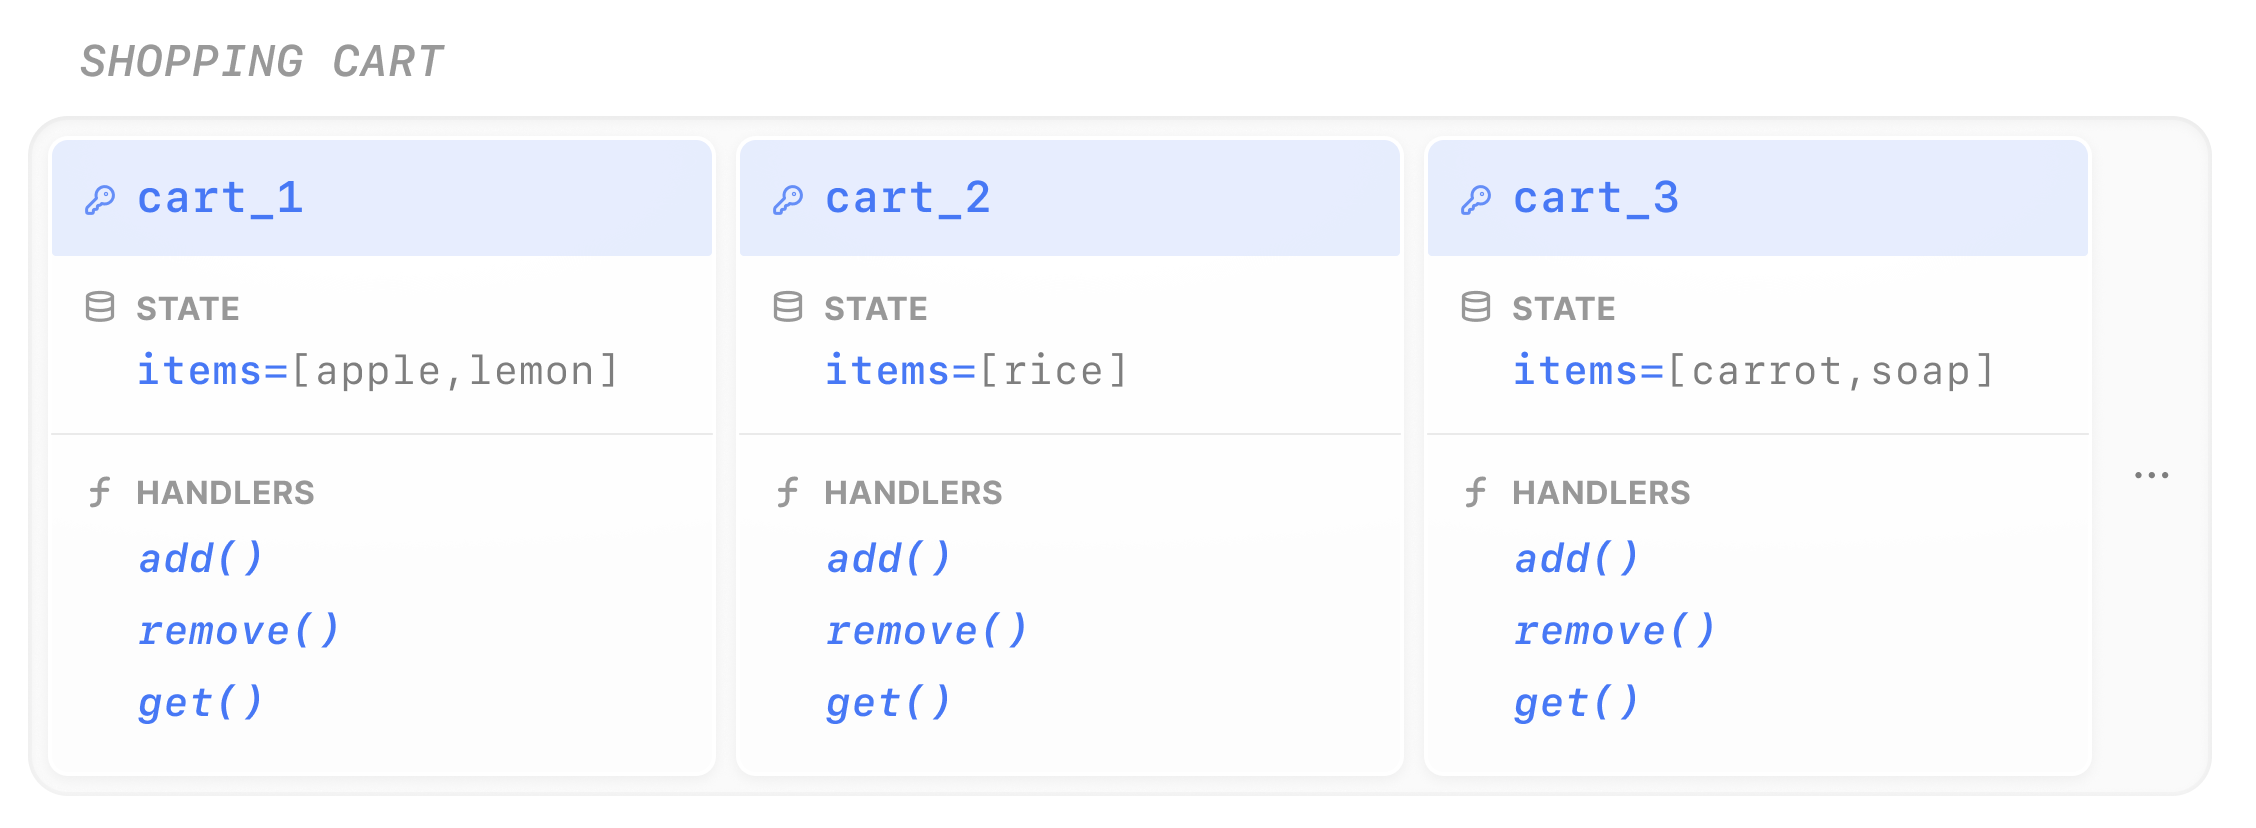
 **Use for:** Modeling entities like user accounts, shopping carts, chat sessions, AI agents, state machines, or any business entity needing persistent state.
## Workflow
Workflows orchestrate multi-step processes with guaranteed once-per-ID execution.
**Use for:** Modeling entities like user accounts, shopping carts, chat sessions, AI agents, state machines, or any business entity needing persistent state.
## Workflow
Workflows orchestrate multi-step processes with guaranteed once-per-ID execution.
 Bind both services to your endpoint, and register them.
Usage:
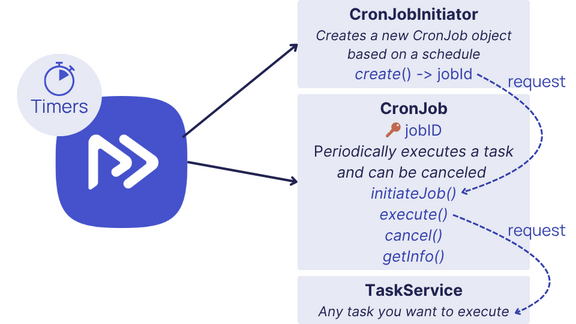
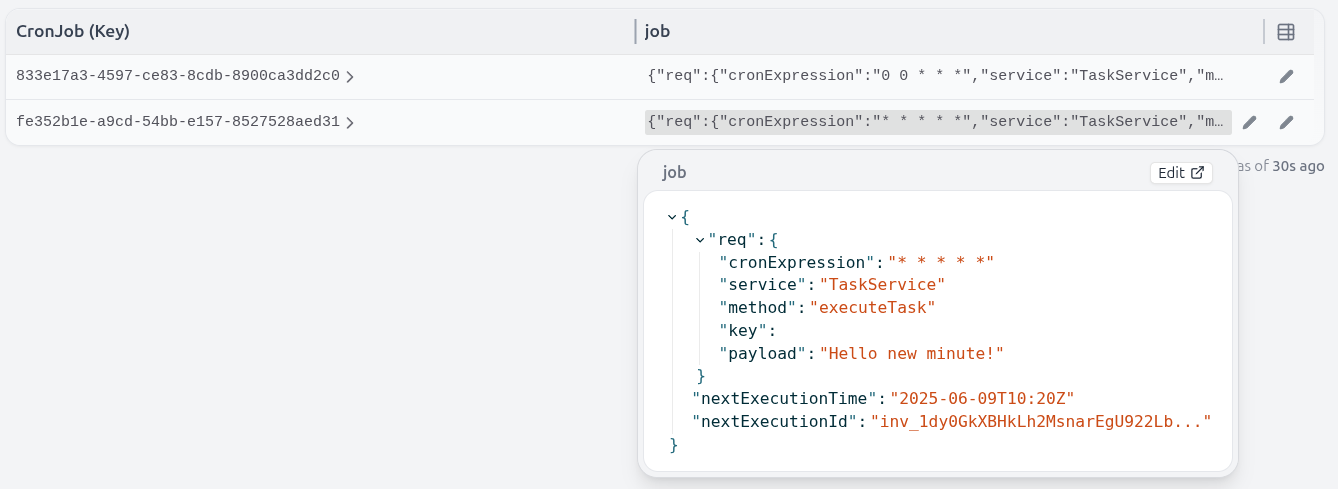
* Send requests to `CronJobInitiator.create()` to start new jobs with standard [cron expressions](https://www.baeldung.com/cron-expressions):
```json theme={null}
{
"cronExpression": "0 0 * * *", # E.g. run every day at midnight
"service": "TaskService", # Schedule any Restate handler
"method": "executeTask",
"key": "taskId", # Optional, Virtual Object key
"payload": "Hello midnight!"
}
```
* Each job gets a unique ID and runs as a CronJob Virtual Object.
* Jobs automatically reschedule themselves after each execution.
Bind both services to your endpoint, and register them.
Usage:
* Send requests to `CronJobInitiator.create()` to start new jobs with standard [cron expressions](https://www.baeldung.com/cron-expressions):
```json theme={null}
{
"cronExpression": "0 0 * * *", # E.g. run every day at midnight
"service": "TaskService", # Schedule any Restate handler
"method": "executeTask",
"key": "taskId", # Optional, Virtual Object key
"payload": "Hello midnight!"
}
```
* Each job gets a unique ID and runs as a CronJob Virtual Object.
* Jobs automatically reschedule themselves after each execution.

 You can kill and restart any of the services or the Restate Server, and the scheduled tasks will still be there.
 ## How does Restate help?
* Restate persists all incoming events, and ensures that they are **processed exactly once**, across failures and restarts. Restate guarantees your handler runs till completion.
* Let Restate **deduplicate** events on an [idempotency key](/invoke/http#invoke-a-handler-idempotently). If the sender of the event retries, Restate will not process the event again.
* Use any of Restate's [**durable SDK constructs**](/concepts/durable_building_blocks) when processing the events: durable calls/messaging to other services, durable timers, scheduling tasks, K/V state, concurrency guarantees etc.
* Any handler can be a durable webhook endpoint. **No need to do anything special or extra!**
Just point your webhook endpoint to your handler: `restate:8080/MyService/myHandler`.
## Example
This example processes webhook callbacks from a payment provider.
The payment provider notifies us about payment success or failure of invoices by sending webhook events to our handler.
The handler then routes the event to the correct processor via a one-way message.
## How does Restate help?
* Restate persists all incoming events, and ensures that they are **processed exactly once**, across failures and restarts. Restate guarantees your handler runs till completion.
* Let Restate **deduplicate** events on an [idempotency key](/invoke/http#invoke-a-handler-idempotently). If the sender of the event retries, Restate will not process the event again.
* Use any of Restate's [**durable SDK constructs**](/concepts/durable_building_blocks) when processing the events: durable calls/messaging to other services, durable timers, scheduling tasks, K/V state, concurrency guarantees etc.
* Any handler can be a durable webhook endpoint. **No need to do anything special or extra!**
Just point your webhook endpoint to your handler: `restate:8080/MyService/myHandler`.
## Example
This example processes webhook callbacks from a payment provider.
The payment provider notifies us about payment success or failure of invoices by sending webhook events to our handler.
The handler then routes the event to the correct processor via a one-way message.
 ## How does Restate help?
* Restate lets you schedule the tasks asynchronously and guarantees that all tasks will run, with **retries and recovery** on failures.
* Restate **turns Promises/Futures into durable, distributed constructs** that are persisted in Restate and can be recovered and awaited on another process.
* You can deploy the subtask executors on **serverless** infrastructure, like AWS Lambda, to let them scale automatically. The main task, that is idle while waiting on the subtasks, gets suspended until it can make progress.
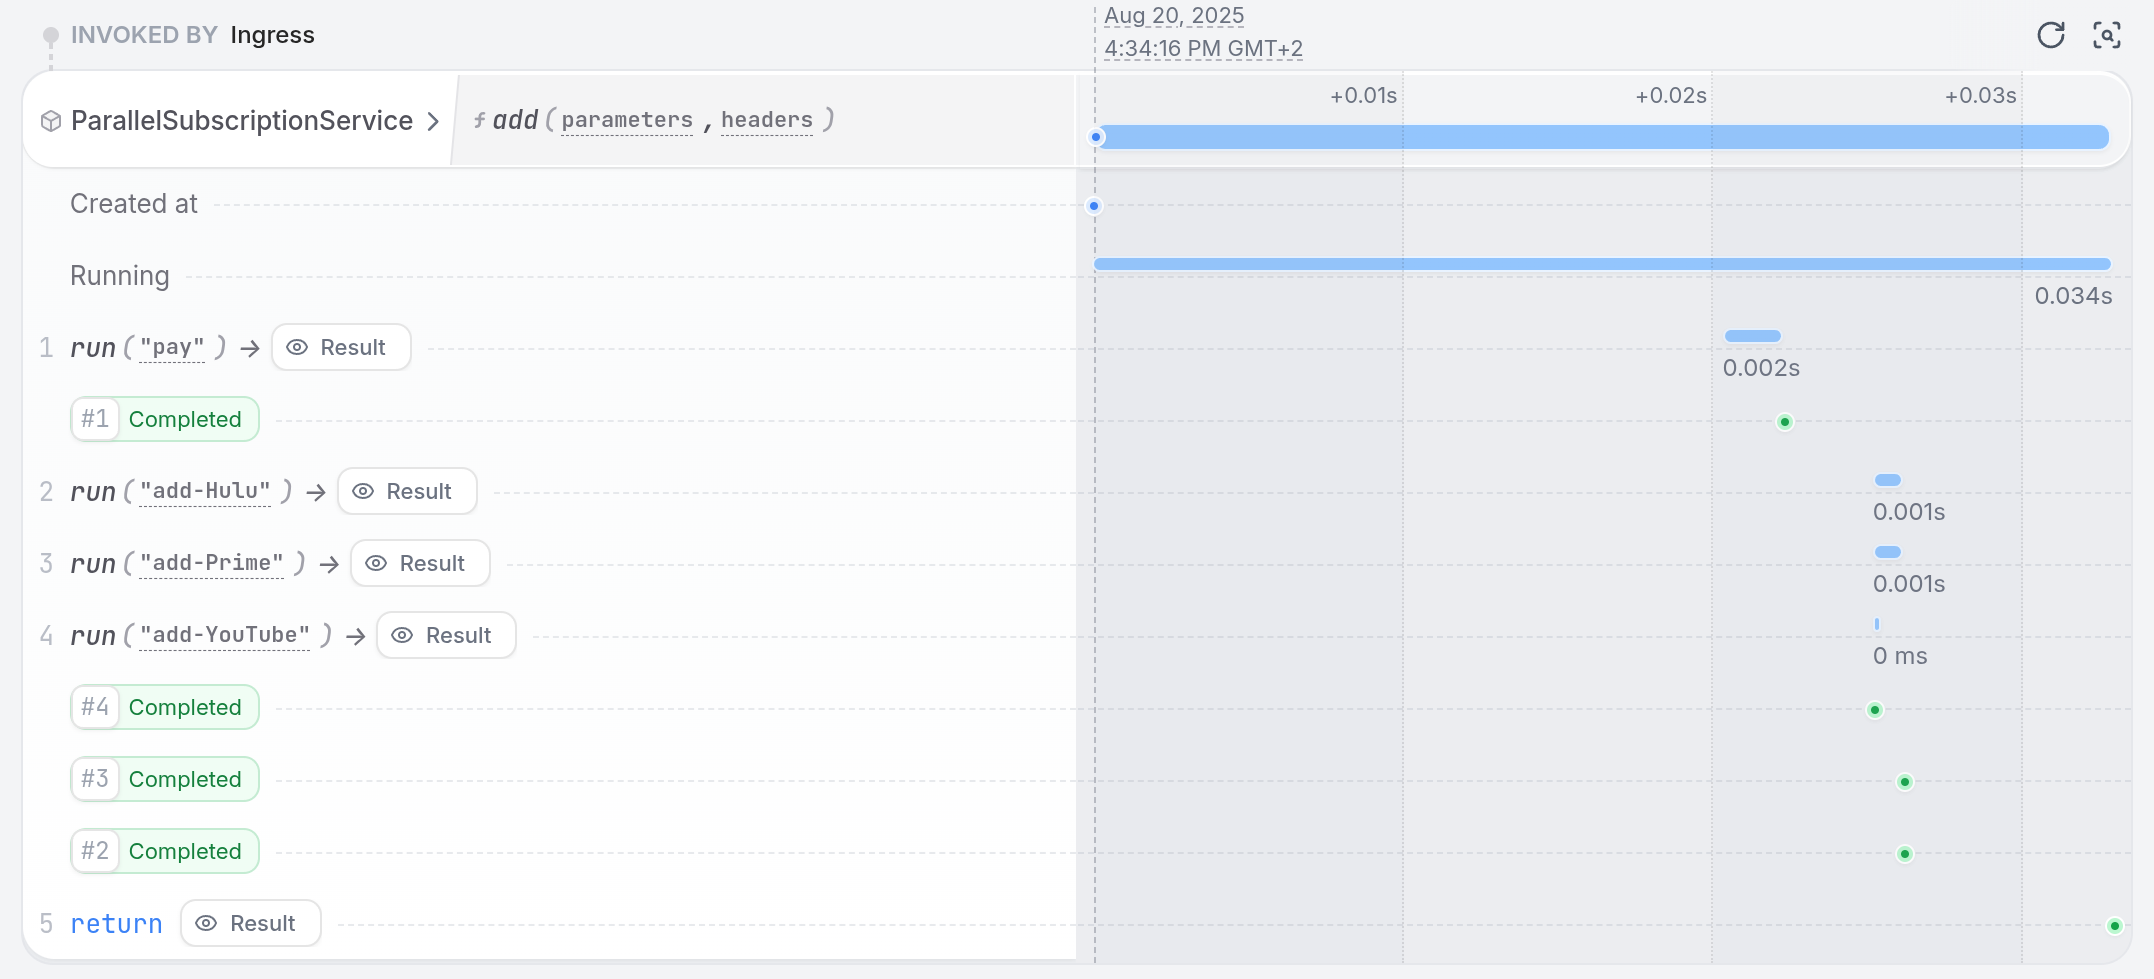
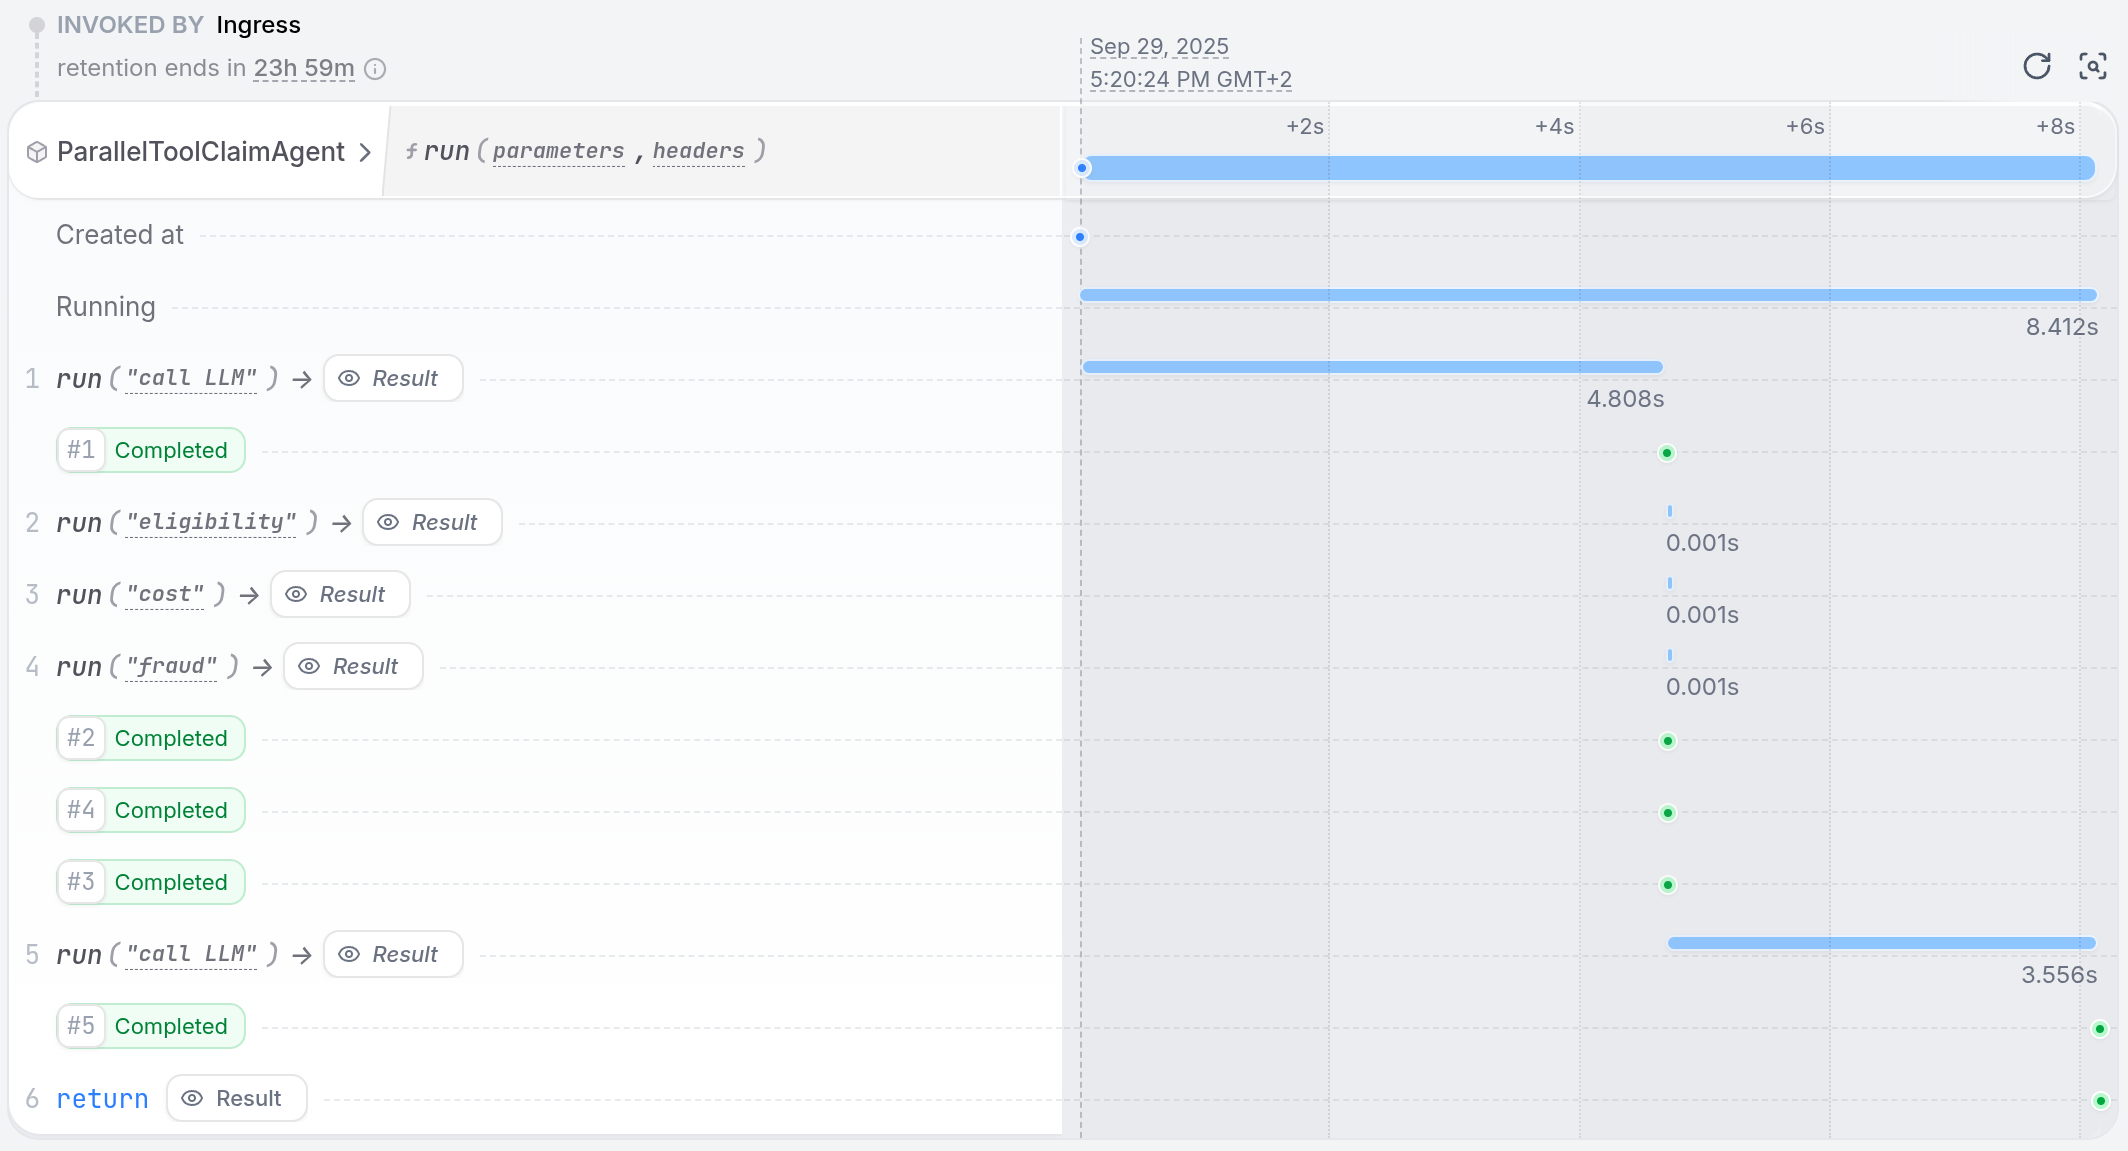
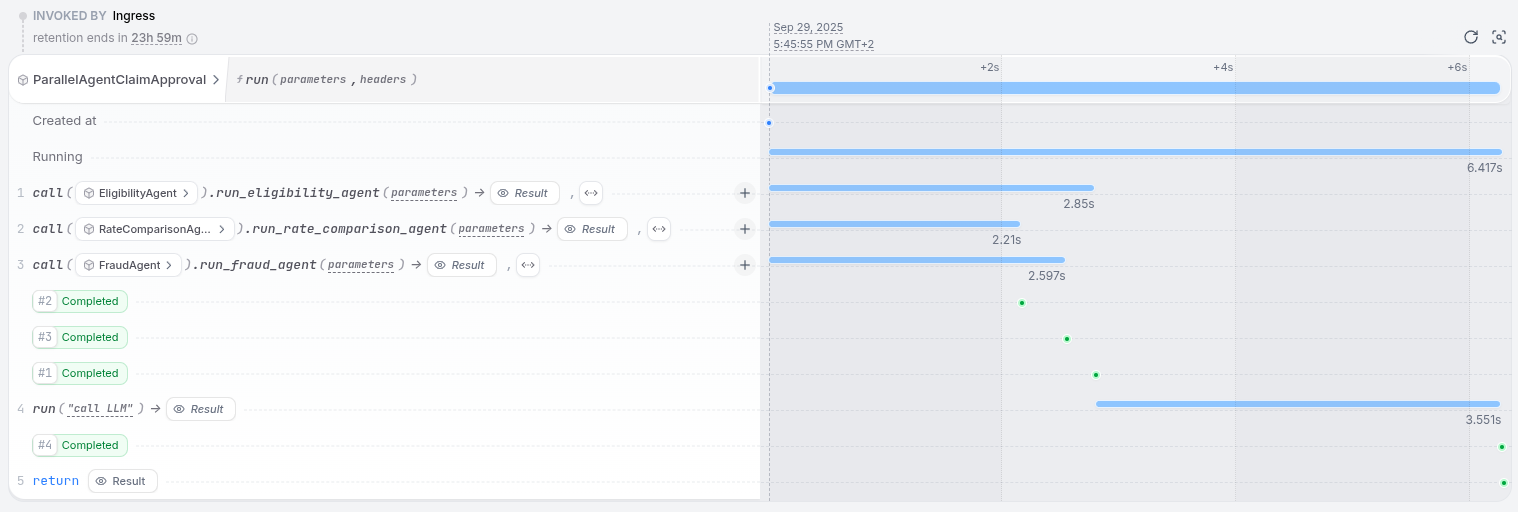
**Fan out**: You can fan out tasks with Restate by creating a handler that processes a single subtask,
and then scheduling it repeatedly from another handler.
**Fan in**: You can fan in the results of the subtasks by using Restate's Promise Combinators to wait for all promises to resolve.
## Example
The example implements a worker service:
1. It splits a task into subtasks.
2. It schedules all the subtasks. Each subtask results in a promise that gets added to a list.
3. The result is gathered by waiting for all promises to resolve.
You can run this on FaaS infrastructure, like AWS Lambda, and it will scale automatically.
The `run` handler will then suspend while it waits for all subtasks to finish.
Restate will then resume the handler when all subtasks are done.
## How does Restate help?
* Restate lets you schedule the tasks asynchronously and guarantees that all tasks will run, with **retries and recovery** on failures.
* Restate **turns Promises/Futures into durable, distributed constructs** that are persisted in Restate and can be recovered and awaited on another process.
* You can deploy the subtask executors on **serverless** infrastructure, like AWS Lambda, to let them scale automatically. The main task, that is idle while waiting on the subtasks, gets suspended until it can make progress.
**Fan out**: You can fan out tasks with Restate by creating a handler that processes a single subtask,
and then scheduling it repeatedly from another handler.
**Fan in**: You can fan in the results of the subtasks by using Restate's Promise Combinators to wait for all promises to resolve.
## Example
The example implements a worker service:
1. It splits a task into subtasks.
2. It schedules all the subtasks. Each subtask results in a promise that gets added to a list.
3. The result is gathered by waiting for all promises to resolve.
You can run this on FaaS infrastructure, like AWS Lambda, and it will scale automatically.
The `run` handler will then suspend while it waits for all subtasks to finish.
Restate will then resume the handler when all subtasks are done.
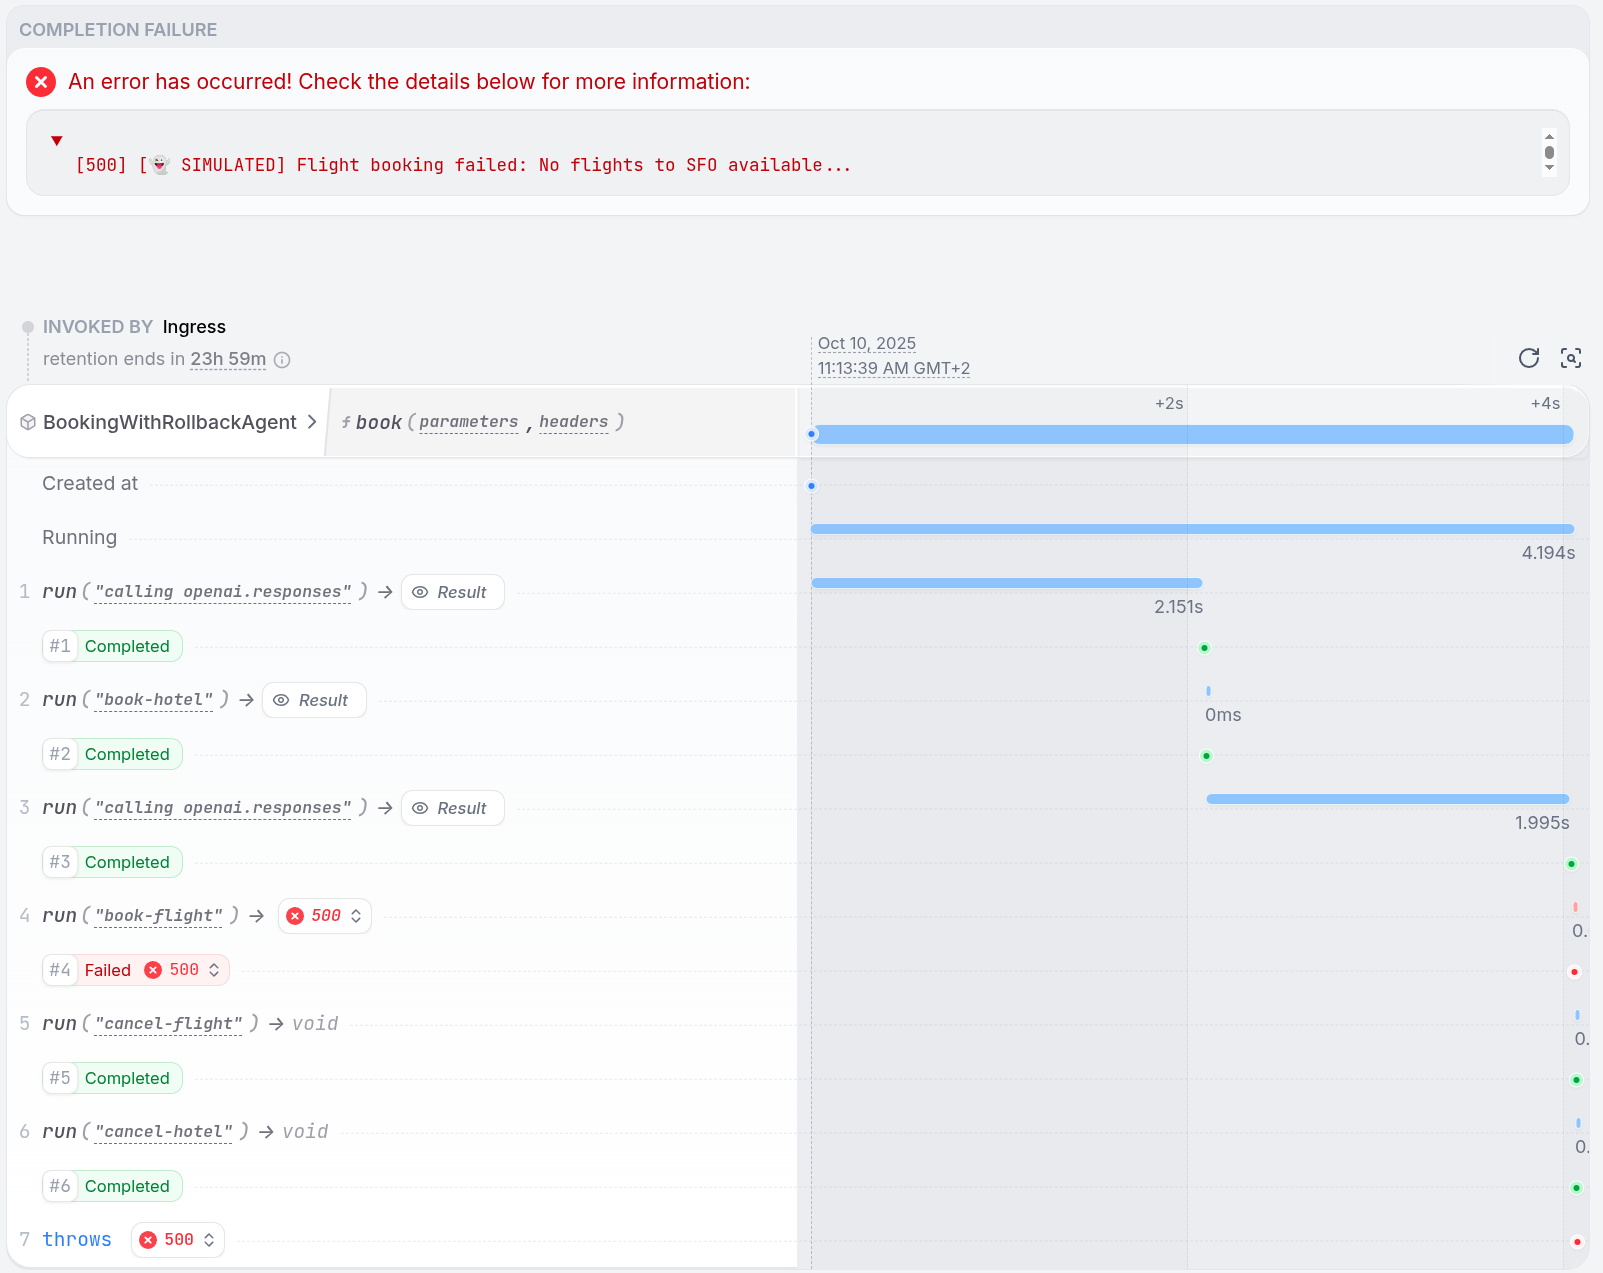
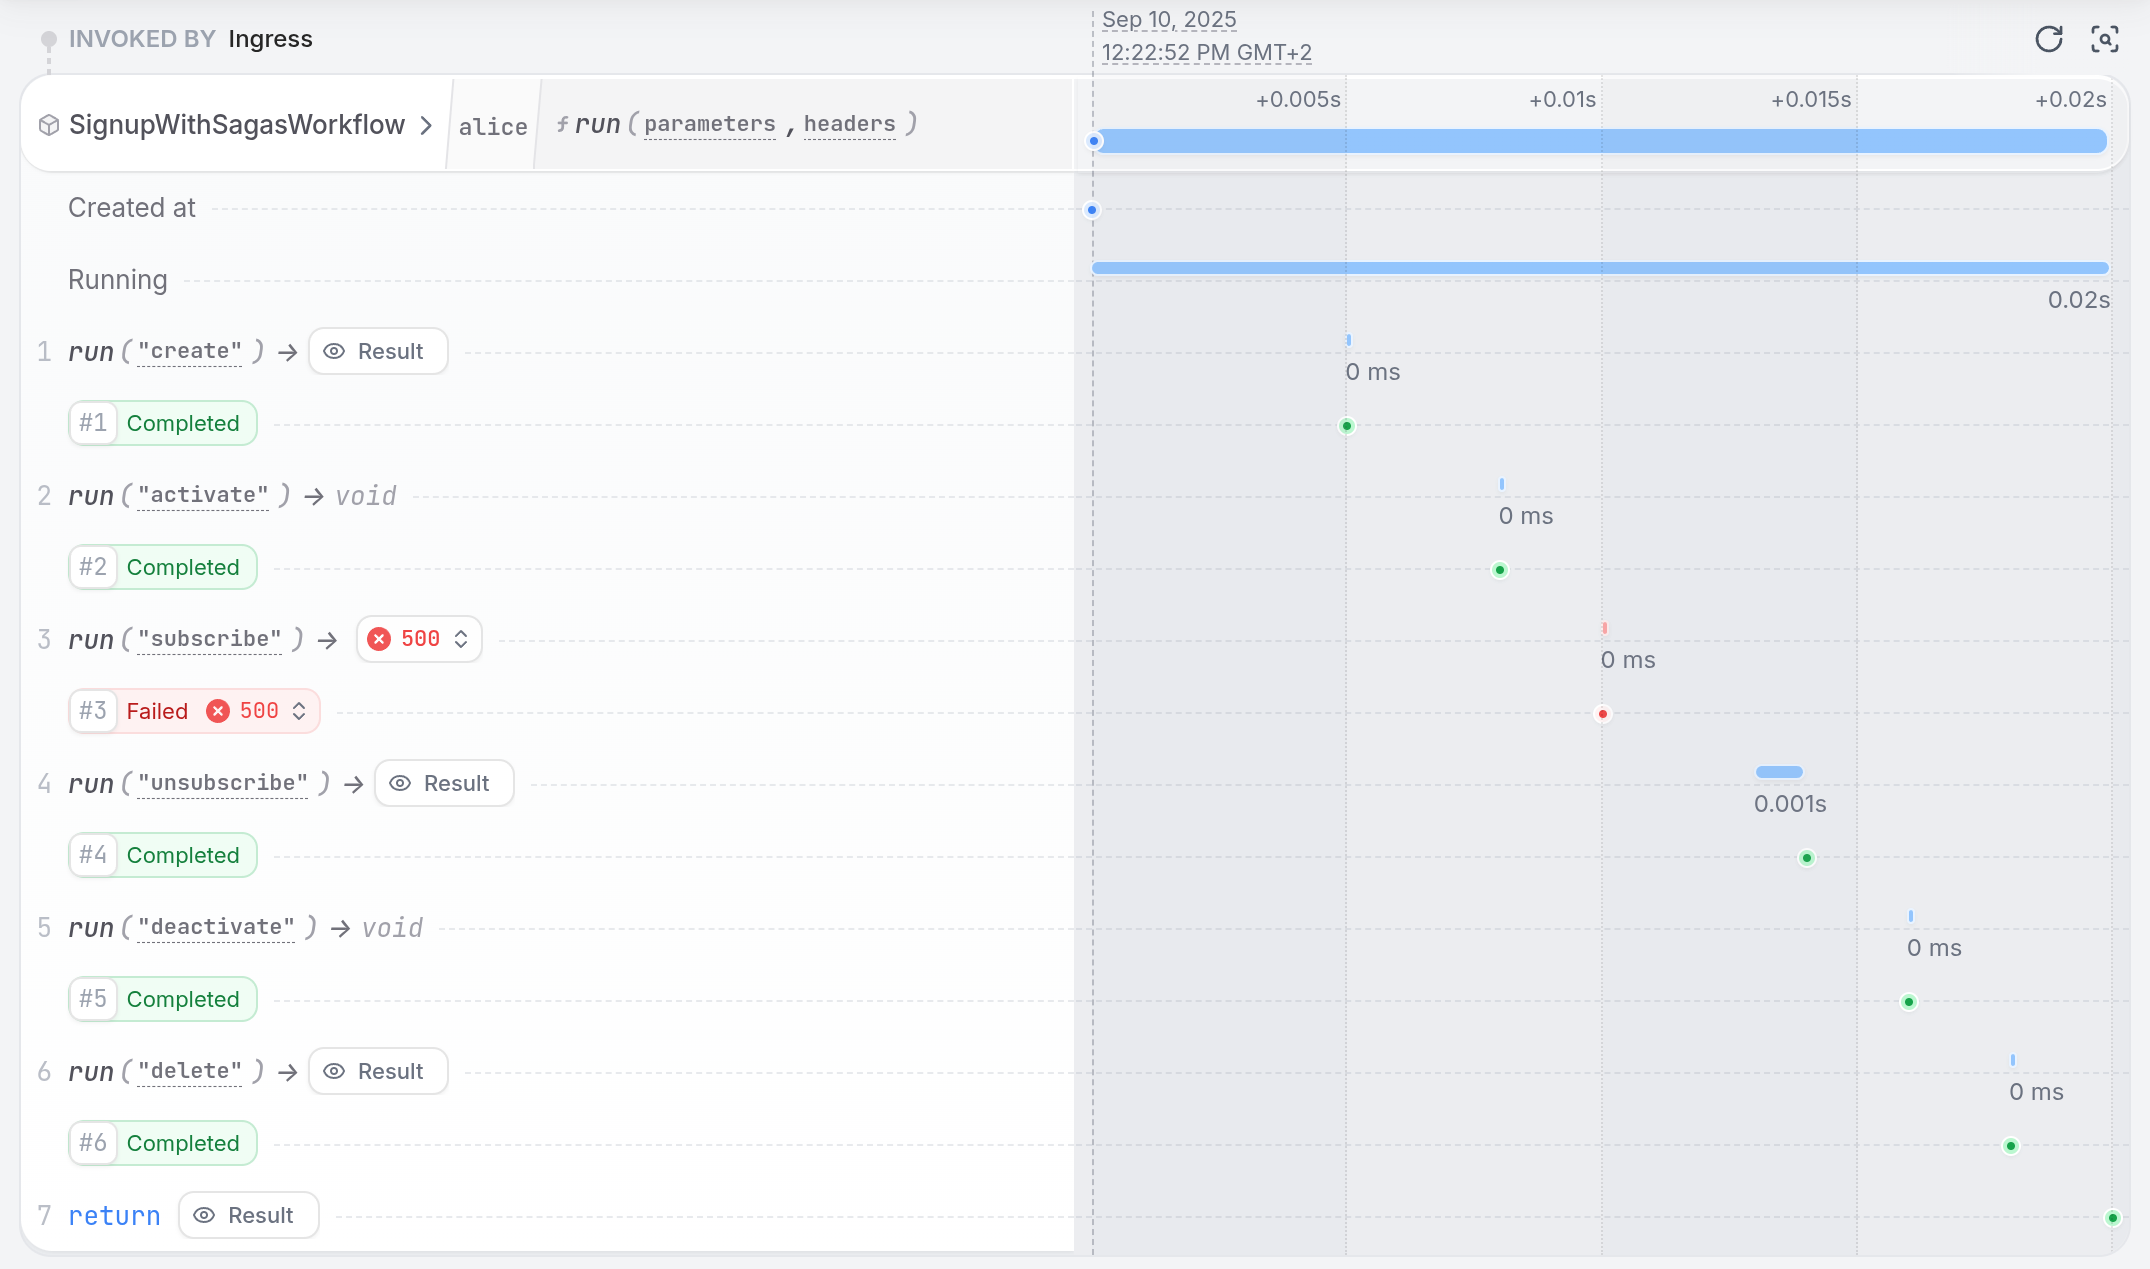
 ## Example
A travel booking workflow: book a flight, rent a car, then book a hotel. If any step fails (e.g. hotel full), we roll back previous steps to maintain consistency.
## Example
A travel booking workflow: book a flight, rent a car, then book a hotel. If any step fails (e.g. hotel full), we roll back previous steps to maintain consistency.
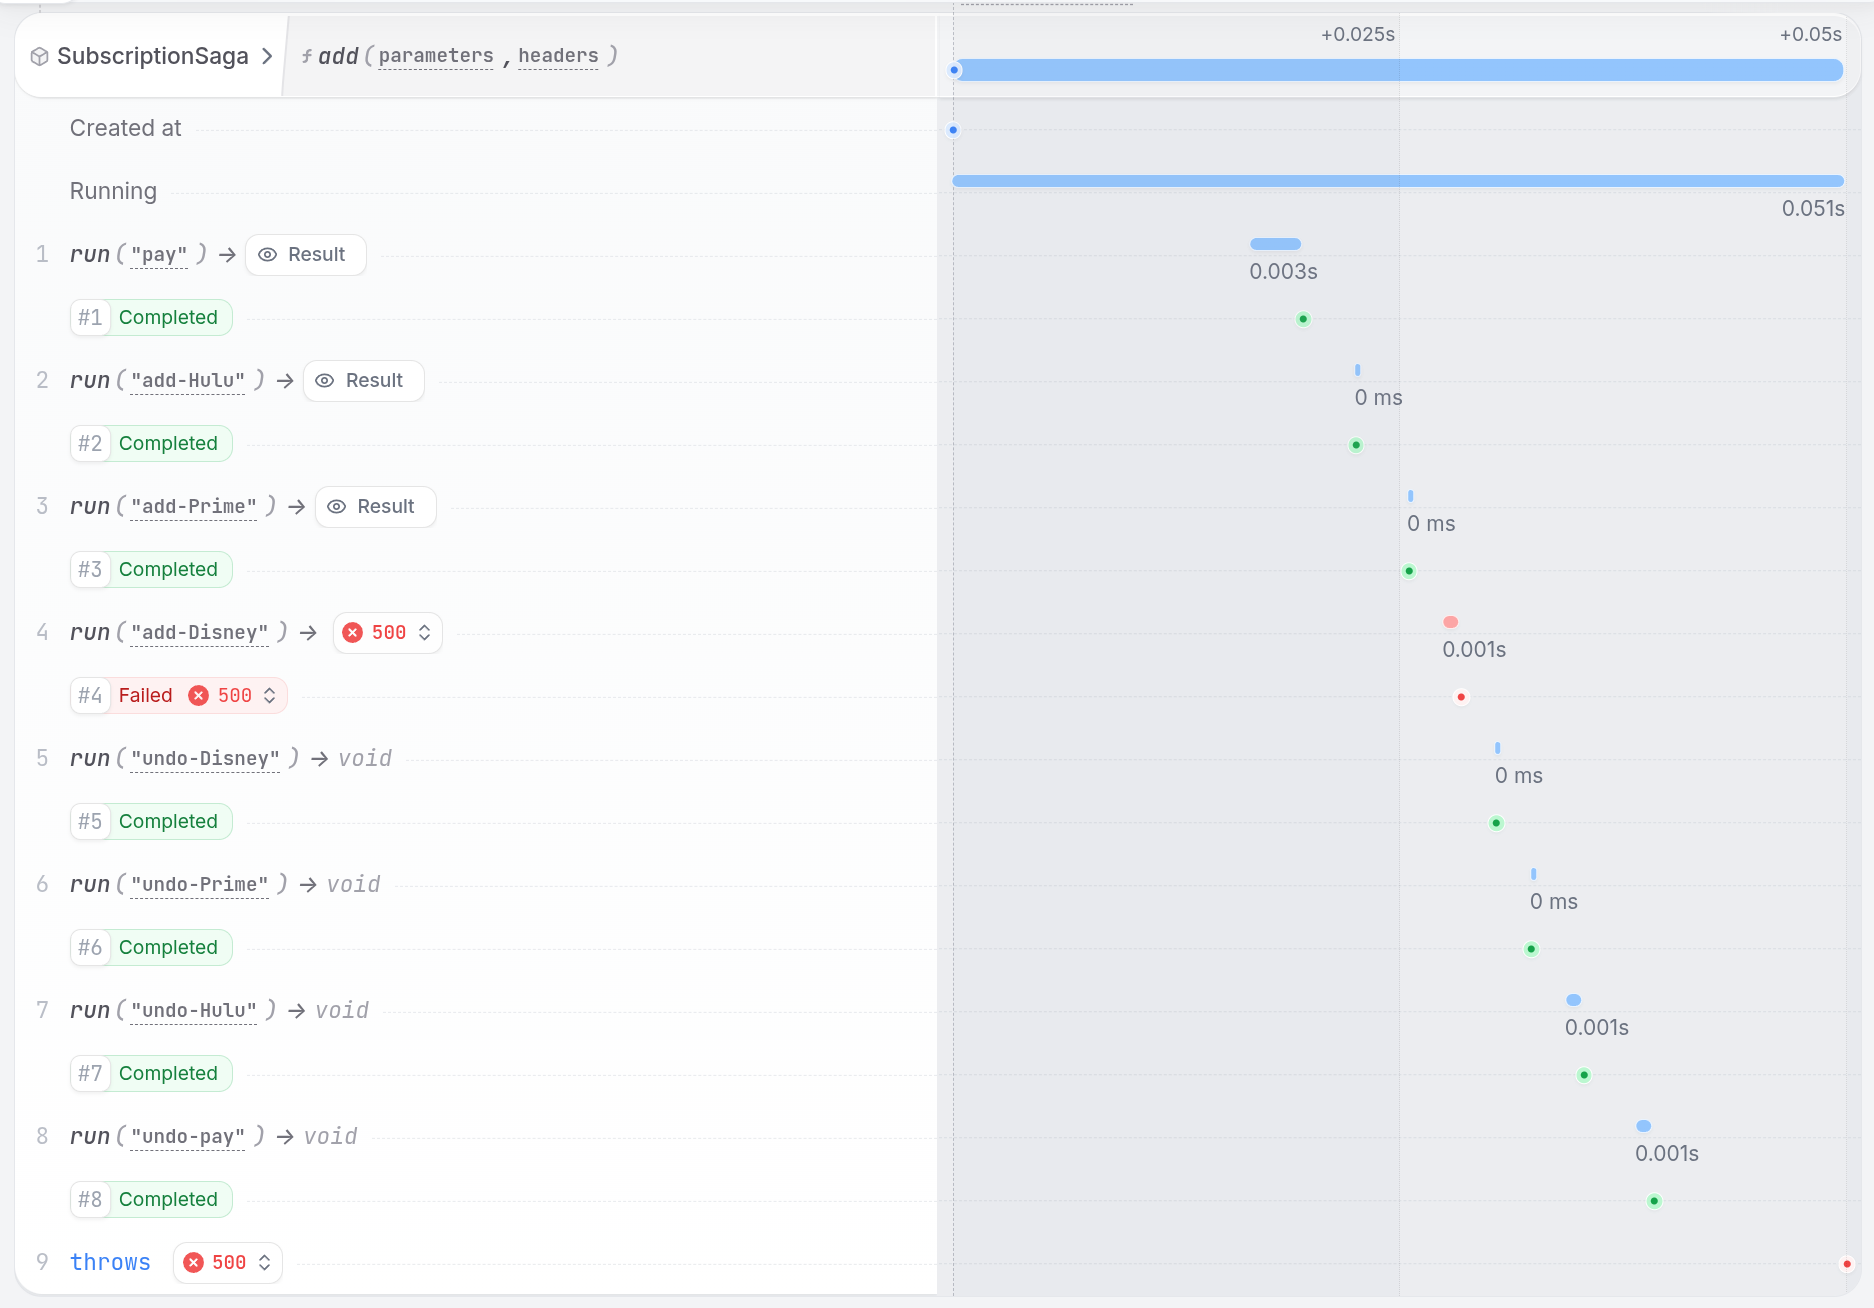
 **Implementation:**
* Wrap business logic in a try-block, throw terminal errors for compensation cases
* Add compensations to a list for each step
* In catch block, run compensations in reverse order and rethrow
Note: Golang uses `defer` for compensations.
**Implementation:**
* Wrap business logic in a try-block, throw terminal errors for compensation cases
* Add compensations to a list for each step
* In catch block, run compensations in reverse order and rethrow
Note: Golang uses `defer` for compensations.

 Select your SDK:
 Or invoke via `curl`:
```shell theme={null}
curl localhost:8080/Greeter/greet --json '{"name": "Sarah"}'
```
Expected output: `You said hi to Sarah!`
Or invoke via `curl`:
```shell theme={null}
curl localhost:8080/Greeter/greet --json '{"name": "Sarah"}'
```
Expected output: `You said hi to Sarah!`
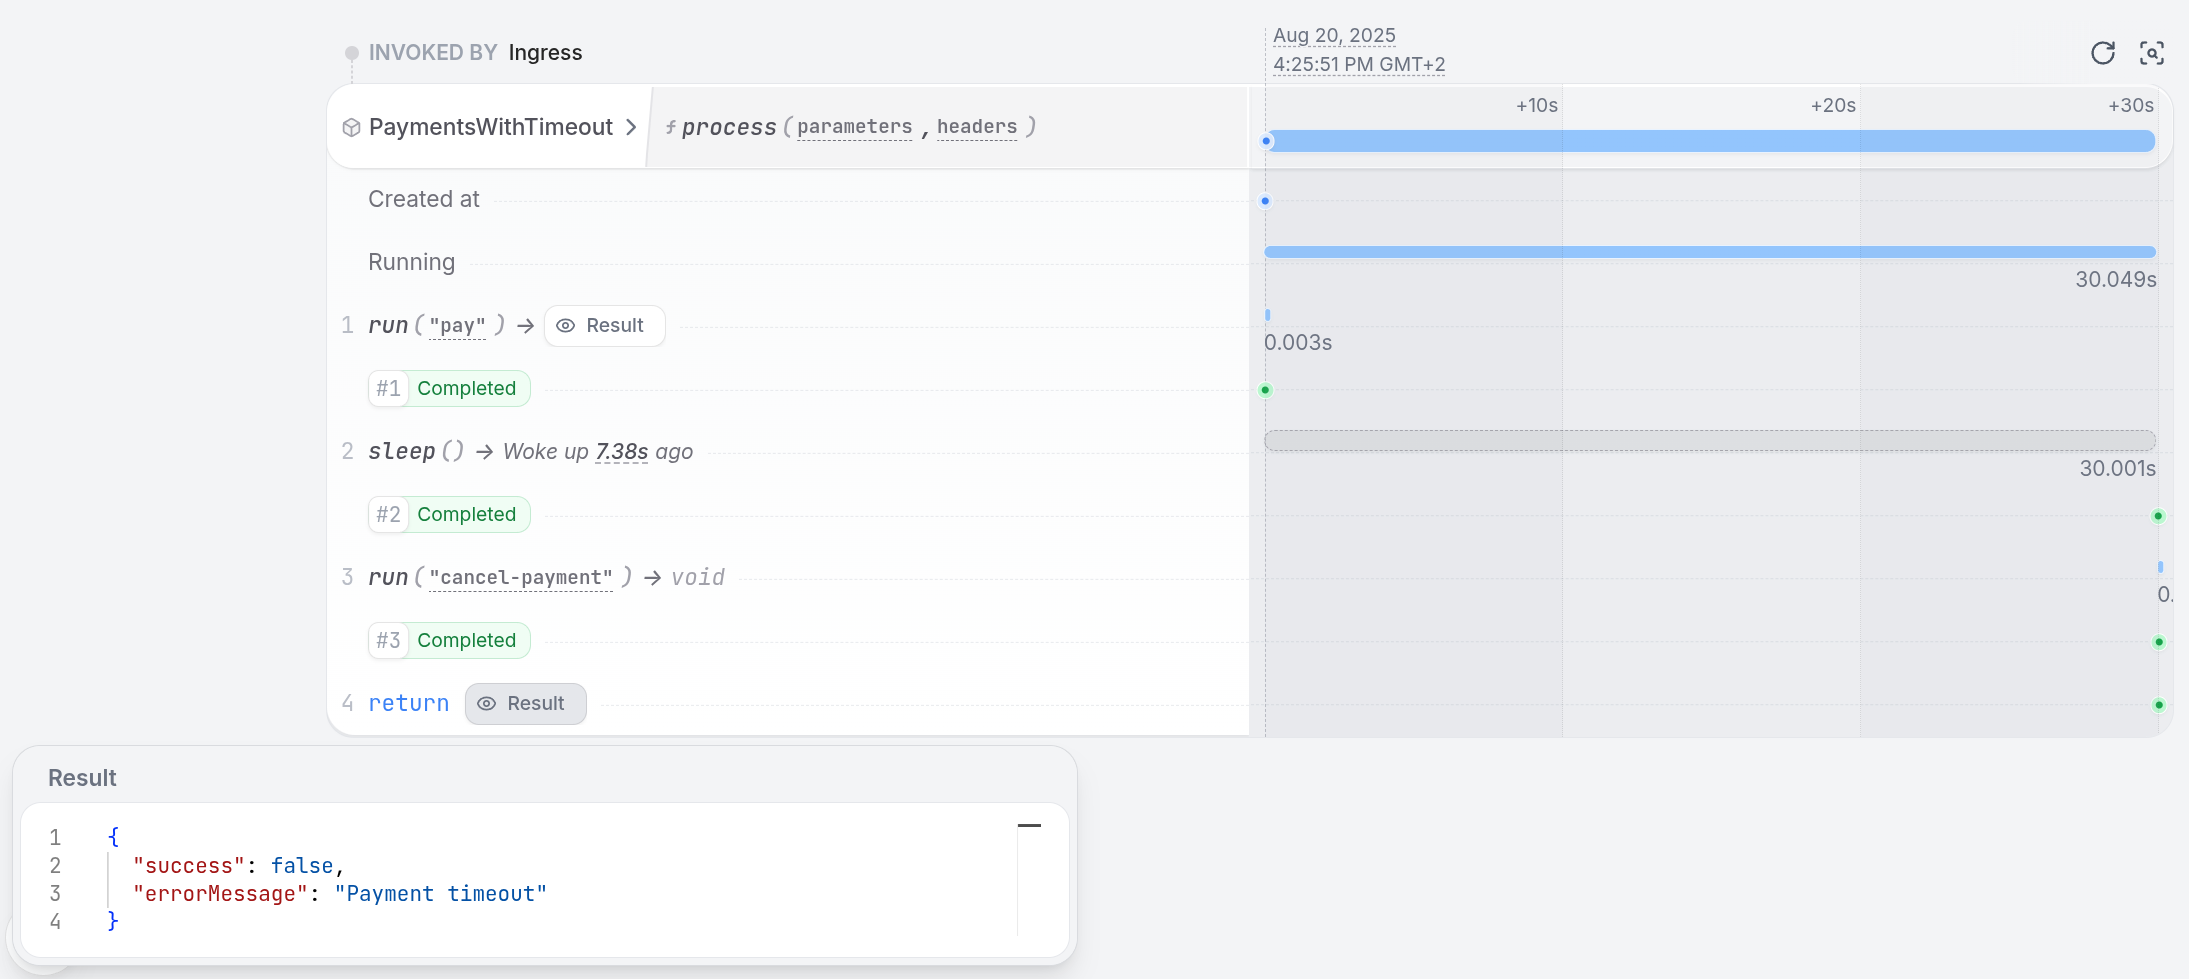
 Even the sleep is durable and tracked by Restate.
If you kill/restart the service halfway through, the sleep will only last for what remained.
Even the sleep is durable and tracked by Restate.
If you kill/restart the service halfway through, the sleep will only last for what remained.
 ## Components
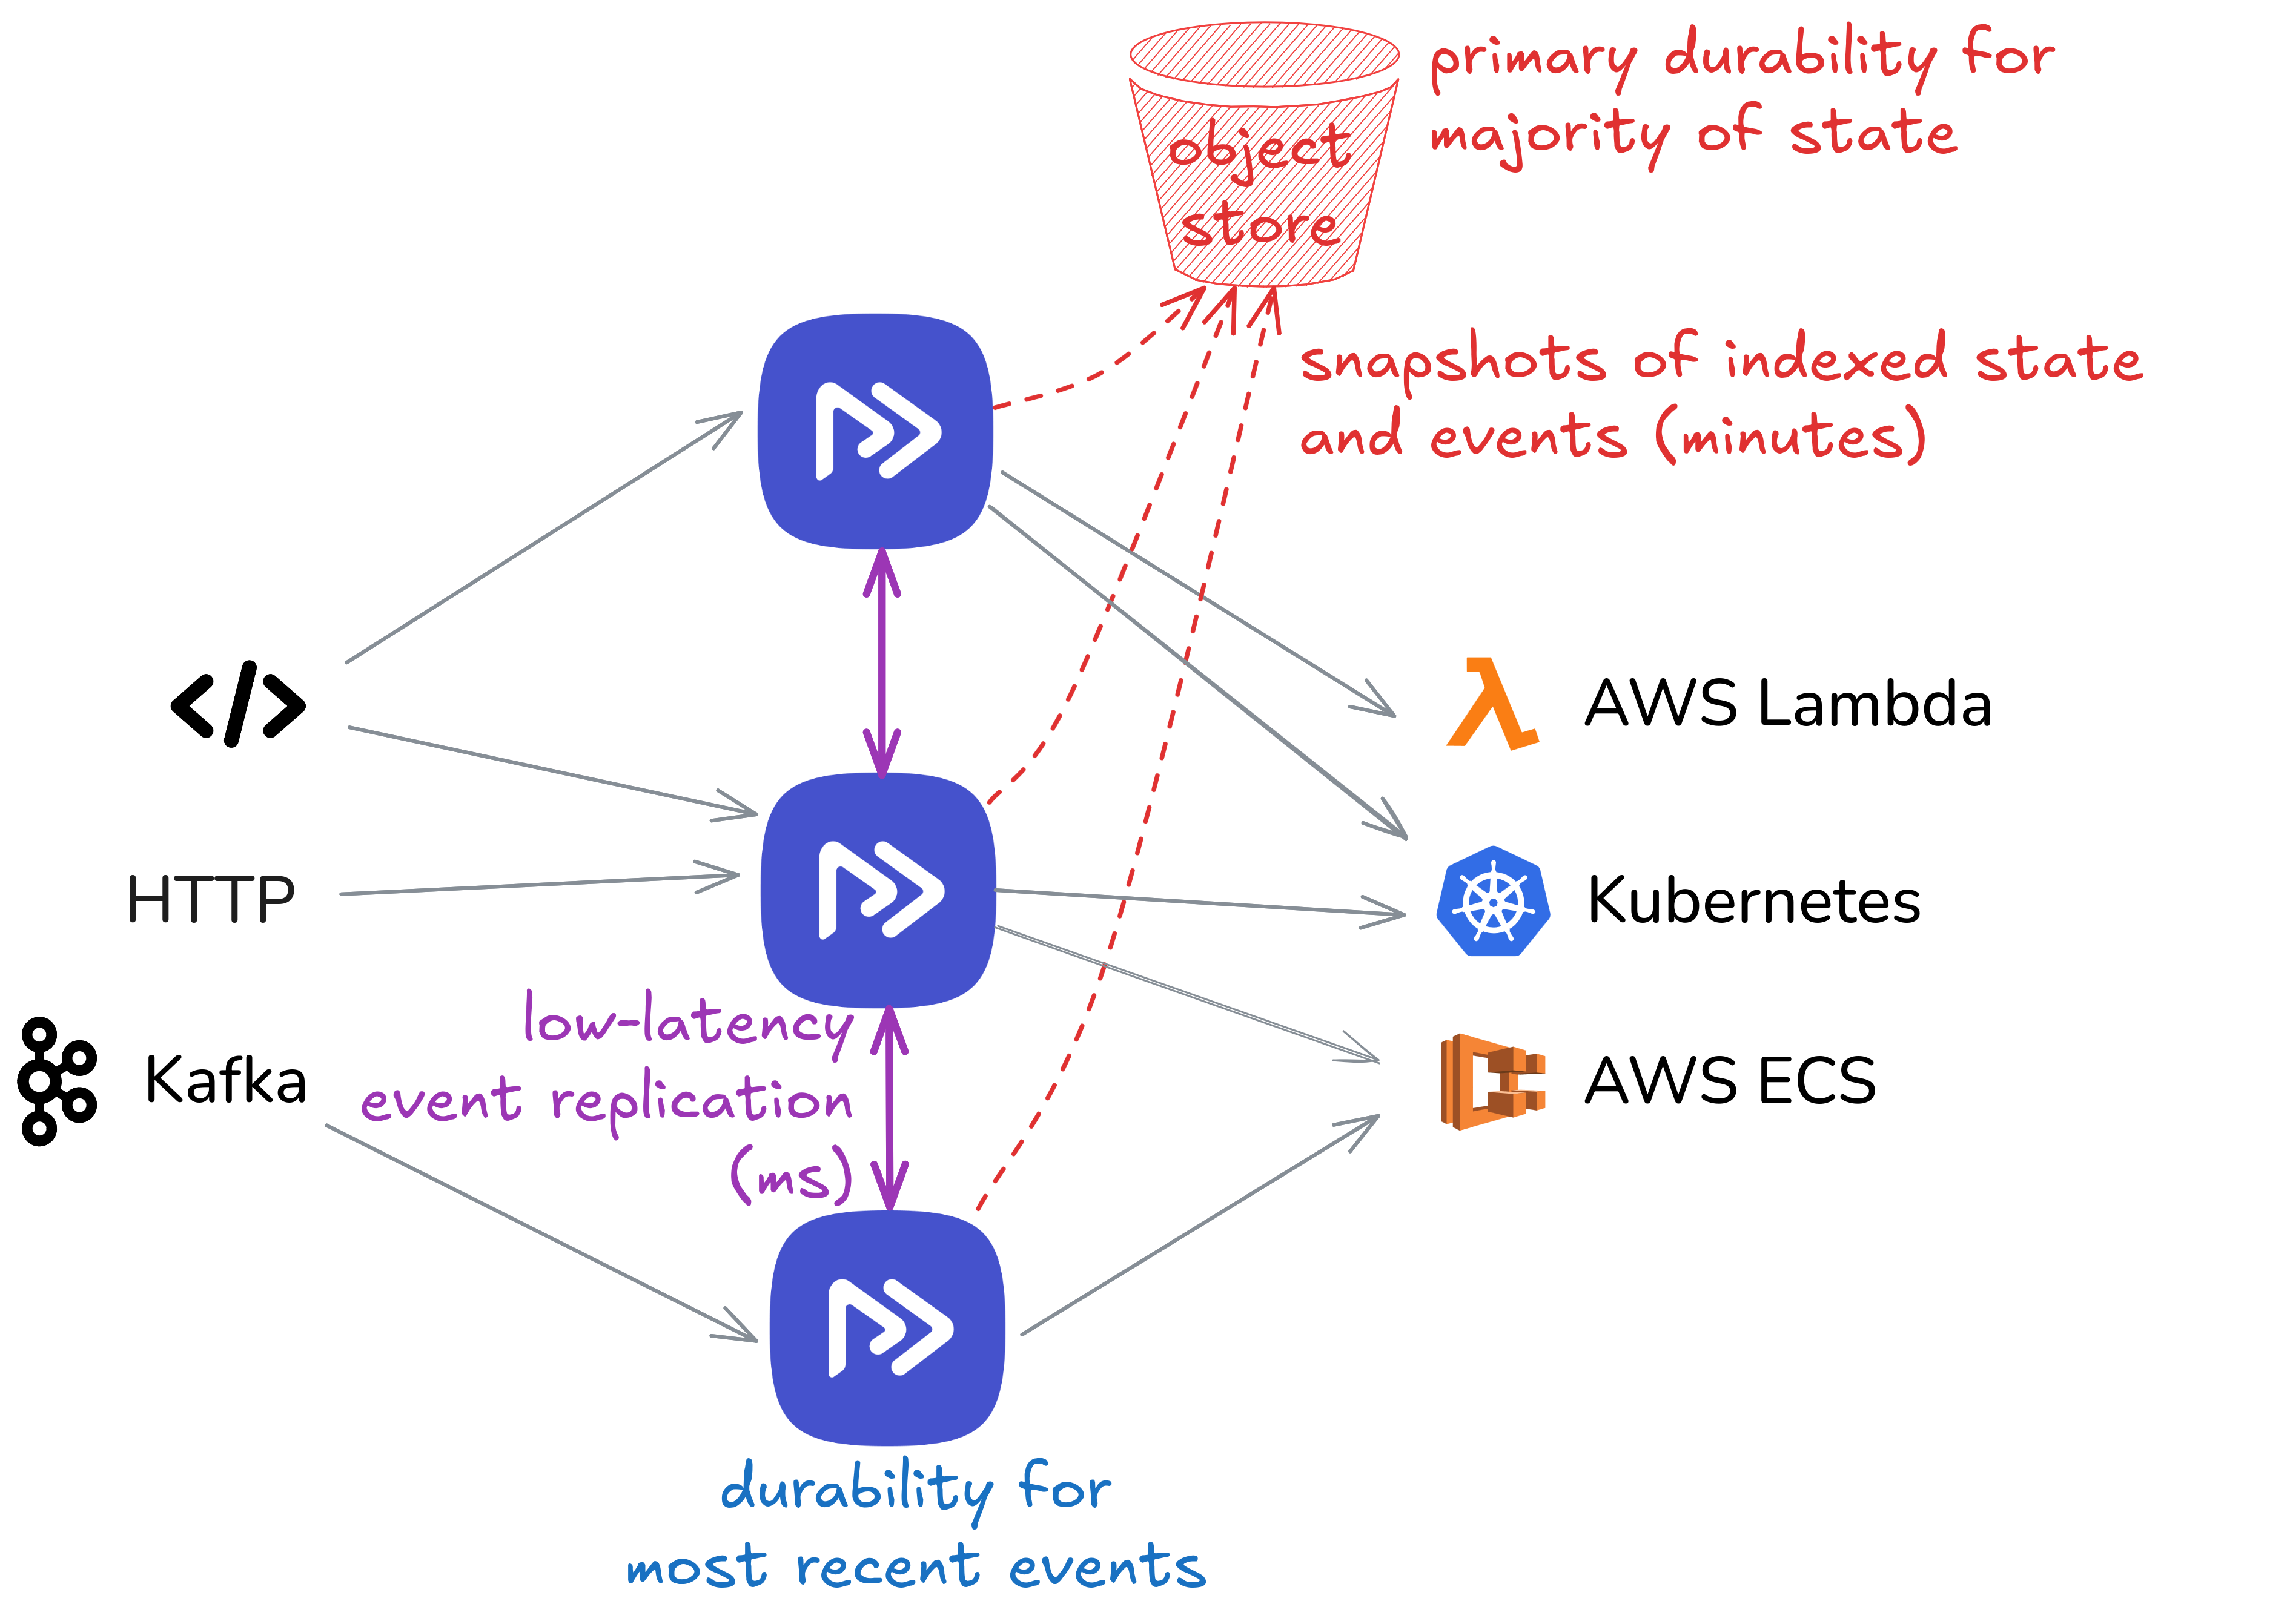
At a high level, Restate interposes a log-first runtime between clients and your handlers, with clear separation of ingress, durability, execution, and control.
## Components
At a high level, Restate interposes a log-first runtime between clients and your handlers, with clear separation of ingress, durability, execution, and control.
 ### Ingress
Ingress is the front door for client and internal calls, identifies the target service/handler and partition (via workflow ID, virtual-object key, or idempotency key), and forwards the call to the current leader of that partition. Ingress is leader-aware; when leadership changes due to failover or rebalancing, routing updates automatically without client involvement.
### Durable Log (“Bifrost”)
The log is the primary durability layer. Each partition has a single sequencer/leader that orders events and replicates them to peer replicas on other Restate nodes. A write is committed when a quorum of replicas acknowledges the append. Restate uses a segmented virtual log: the active segment receives appends; reconfiguration seals the active segment and atomically publishes a new segment as the head. Segmentation enables clean and fast leadership changes, placement updates, and other reconfiguration without copying data.
### Partition Processor
Every partition has one processor leader (and optional followers). The processor tails the log, invokes your handler code via a bidirectional stream, and maintains a materialized state cache in an embedded RocksDB. This cache holds journals, idempotency metadata, key-scoped state for virtual objects, and timer indices—everything required for low-latency execution. Followers track the same state and can become leader quickly on failure.
### Control Plane
The control plane holds cluster metadata (configurations, partition placement, epochs, segment descriptors) behind a consensus interface (built-in Raft). A cluster controller manages log nodes and processors and initiates failover when health checks fail. Strong consensus is confined to this metadata layer, and the data path “borrows” consensus in the form of a leader/epoch configuration which the control plane revokes and re-assignes upon failover, rebalancing, and other reconfigurations.
## Durability and storage model
The system treats the replicated log as ground truth and uses S3-backed snapshots to bound recovery time without introducing a second source of truth.
### Ingress
Ingress is the front door for client and internal calls, identifies the target service/handler and partition (via workflow ID, virtual-object key, or idempotency key), and forwards the call to the current leader of that partition. Ingress is leader-aware; when leadership changes due to failover or rebalancing, routing updates automatically without client involvement.
### Durable Log (“Bifrost”)
The log is the primary durability layer. Each partition has a single sequencer/leader that orders events and replicates them to peer replicas on other Restate nodes. A write is committed when a quorum of replicas acknowledges the append. Restate uses a segmented virtual log: the active segment receives appends; reconfiguration seals the active segment and atomically publishes a new segment as the head. Segmentation enables clean and fast leadership changes, placement updates, and other reconfiguration without copying data.
### Partition Processor
Every partition has one processor leader (and optional followers). The processor tails the log, invokes your handler code via a bidirectional stream, and maintains a materialized state cache in an embedded RocksDB. This cache holds journals, idempotency metadata, key-scoped state for virtual objects, and timer indices—everything required for low-latency execution. Followers track the same state and can become leader quickly on failure.
### Control Plane
The control plane holds cluster metadata (configurations, partition placement, epochs, segment descriptors) behind a consensus interface (built-in Raft). A cluster controller manages log nodes and processors and initiates failover when health checks fail. Strong consensus is confined to this metadata layer, and the data path “borrows” consensus in the form of a leader/epoch configuration which the control plane revokes and re-assignes upon failover, rebalancing, and other reconfigurations.
## Durability and storage model
The system treats the replicated log as ground truth and uses S3-backed snapshots to bound recovery time without introducing a second source of truth.
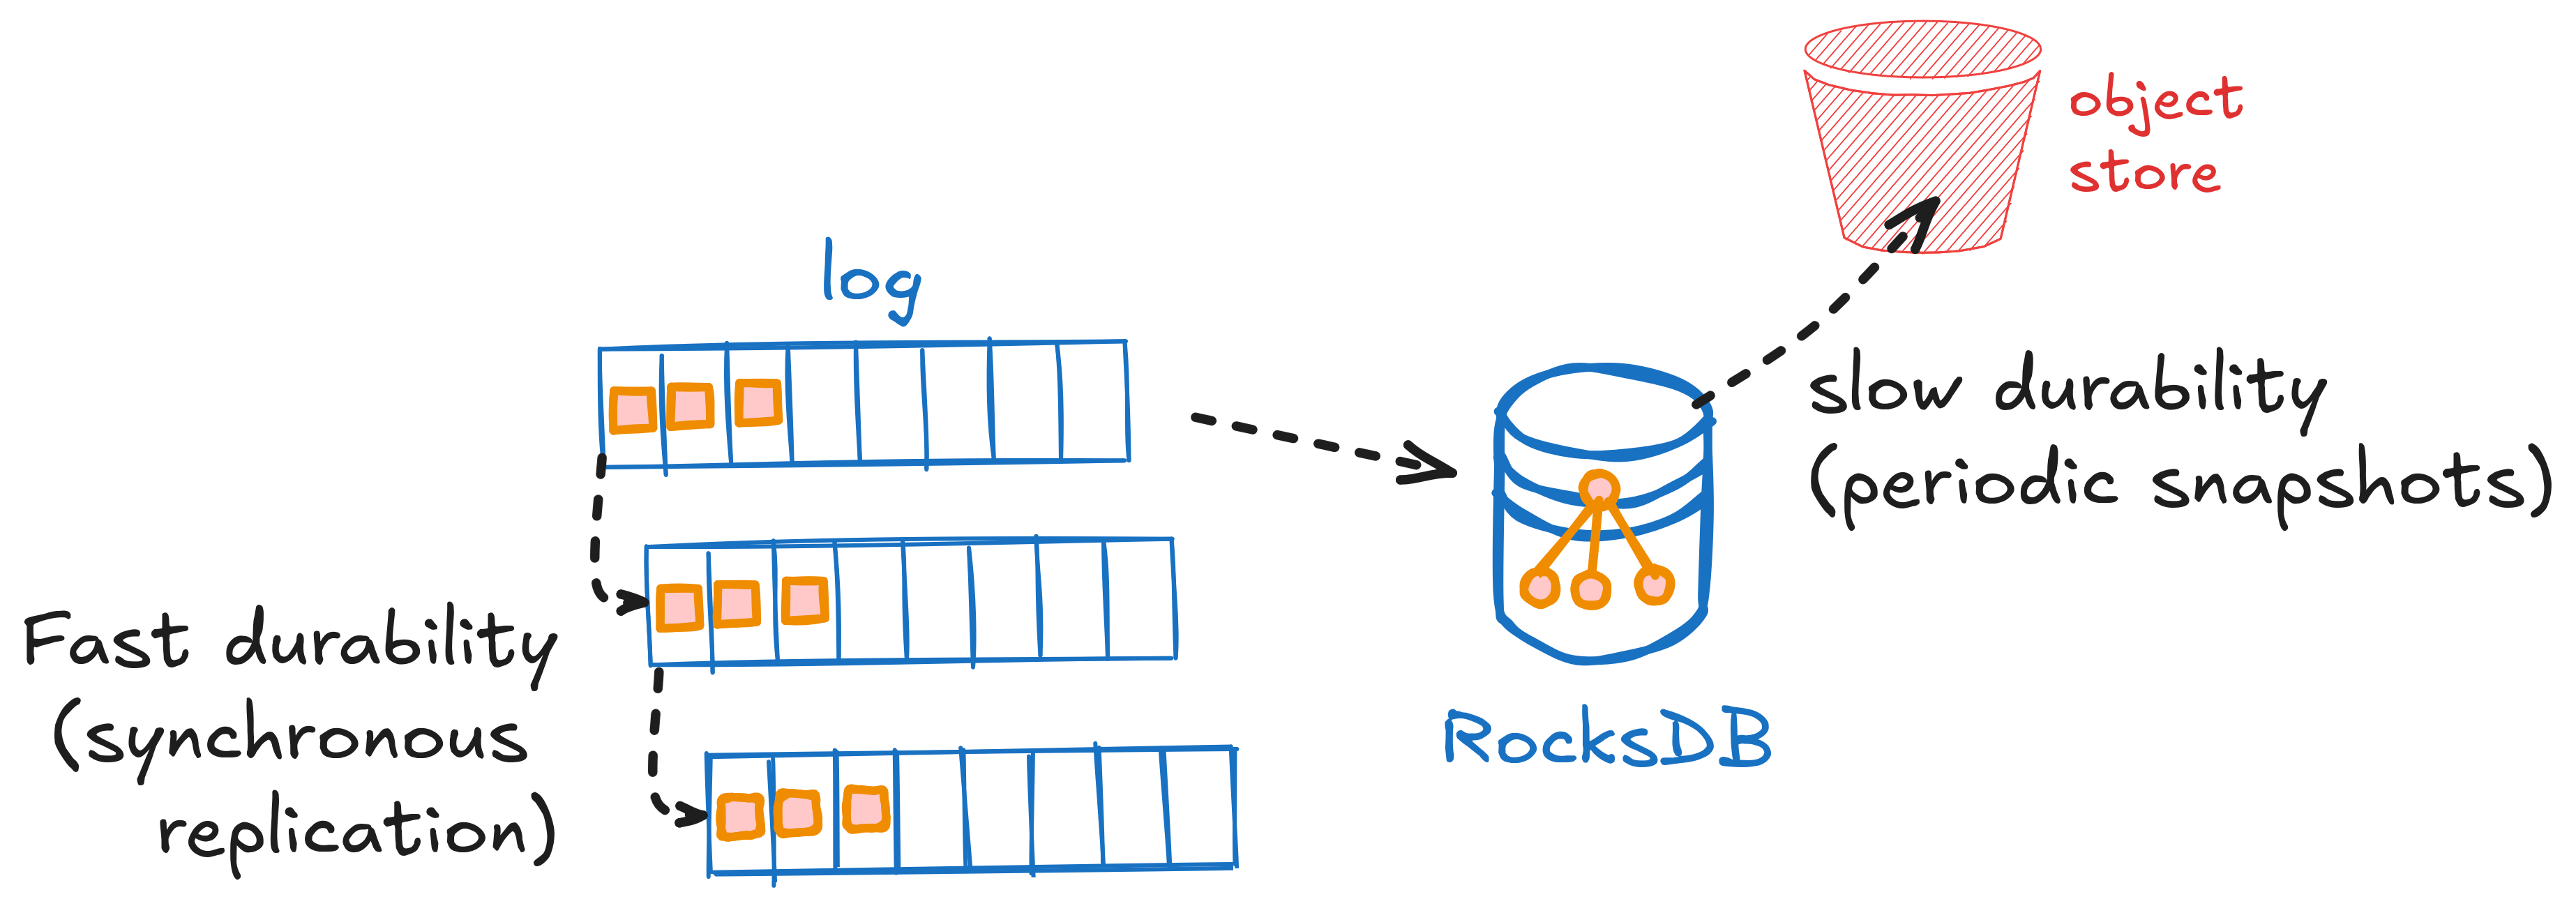 ### Hot-path durability
An operation “happens” when the partition leader appends its record to the log and receives quorum acks. That commit point defines the durable order of invocations, steps, state updates, messages, timers, and completions.
### Materializing state for fast access
The processor leader maintains a full cache of the partition’s materialized state in RocksDB for fast random reads and updates during execution. This cache is derivative—it can always be rebuilt from the log—and is not a second source of truth. In typical configurations, partitions also have processor followers, which maintain a materialization of the partition state, for fast failover.
### Recovery bounded by snapshots
Processors create periodic snapshots of RocksDB and upload them to S3 . On restart or takeover, a fresh partition processor can download the latest snapshot and replays the log suffix since the snapshot’s sequence number. After a snapshot is durably stored on S3, the log can trim entries up to the snapshot point to cap local storage and replay cost.
Partition processors pull the snapshots only when they were not previously leader or follower and need to bootstrap a new copy of the partition state.
### Hot-path durability
An operation “happens” when the partition leader appends its record to the log and receives quorum acks. That commit point defines the durable order of invocations, steps, state updates, messages, timers, and completions.
### Materializing state for fast access
The processor leader maintains a full cache of the partition’s materialized state in RocksDB for fast random reads and updates during execution. This cache is derivative—it can always be rebuilt from the log—and is not a second source of truth. In typical configurations, partitions also have processor followers, which maintain a materialization of the partition state, for fast failover.
### Recovery bounded by snapshots
Processors create periodic snapshots of RocksDB and upload them to S3 . On restart or takeover, a fresh partition processor can download the latest snapshot and replays the log suffix since the snapshot’s sequence number. After a snapshot is durably stored on S3, the log can trim entries up to the snapshot point to cap local storage and replay cost.
Partition processors pull the snapshots only when they were not previously leader or follower and need to bootstrap a new copy of the partition state.
 ## Partitioned scale-out and addressability
Restate scales by sharding orchestration and state by key, keeping hot paths partition-local and cross-partition work explicit.
## Partitioned scale-out and addressability
Restate scales by sharding orchestration and state by key, keeping hot paths partition-local and cross-partition work explicit.
 ### Keyed routing
Workflow IDs, virtual-object keys, or idempotency keys deterministically hash to a partition. Non-keyed invocations are placed for locality by the ingress. The invocation ID encodes the partition, enabling efficient subsequent routing and lookups.
### Co-sharding of orchestration and state
Each partition owns both orchestration (invocation lifecycle, journaling, timers) and the state cache for its keys. Steps, state updates, and timers for a key execute entirely within one partition—no cross-partition coordination is needed for the hot path.
### Cross-partition actions
When a handler targets a different key (e.g., sends a message or performs an RPC to another service keyed on a different partition), the event is recorded in the origin partition’s log and delivered exactly once to the destination partition via an internal shuffler. Delivery is addressed and deduplicated by sequence numbers; the receiving partition treats it as a normal log-first operation.
### Elastic operations
While the number of partitions is configured at cluster creation today, the addressing scheme and segment abstraction are designed so the system can migrate partitions or split key ranges in future versions without violating ordering or idempotency guarantees.
## Write path and step lifecycle
To make the mechanics concrete, the flow below traces an end-to-end invocation of processPayment keyed by idempotency key K.
### Keyed routing
Workflow IDs, virtual-object keys, or idempotency keys deterministically hash to a partition. Non-keyed invocations are placed for locality by the ingress. The invocation ID encodes the partition, enabling efficient subsequent routing and lookups.
### Co-sharding of orchestration and state
Each partition owns both orchestration (invocation lifecycle, journaling, timers) and the state cache for its keys. Steps, state updates, and timers for a key execute entirely within one partition—no cross-partition coordination is needed for the hot path.
### Cross-partition actions
When a handler targets a different key (e.g., sends a message or performs an RPC to another service keyed on a different partition), the event is recorded in the origin partition’s log and delivered exactly once to the destination partition via an internal shuffler. Delivery is addressed and deduplicated by sequence numbers; the receiving partition treats it as a normal log-first operation.
### Elastic operations
While the number of partitions is configured at cluster creation today, the addressing scheme and segment abstraction are designed so the system can migrate partitions or split key ranges in future versions without violating ordering or idempotency guarantees.
## Write path and step lifecycle
To make the mechanics concrete, the flow below traces an end-to-end invocation of processPayment keyed by idempotency key K.
 ### Processor failover
A follower (or a restarted processor) is promoted, obtains a new epoch, appends an epoch-bump record. The new leader ensures it can resume the log’s event stream (possibly restoring the latest S3 snapshot, if it was not previously a follower). Any late appends from superseded leaders or stale handler attempts (carrying lower epochs) are fenced at the epoch boundary and ignored.
### Routing continuity
Ingress consults the updated control-plane metadata and routes directly to the new leaders. Clients do not need to reconnect to different endpoints or re-negotiate sessions; failover is transparent at the API boundary.
## Nodes and roles
You'll see many mentions of the terms server and node throughout this documentation. Generally, we use the term "server" to refer to a running instance of the `restate-server` binary. This binary can host multiple functions. When you start a single-node Restate server, for example when doing some local development or testing, you are hosting all the essential features in a single process. These include accepting incoming requests, durably recording events, processing work (delegating invocations to services, handling key-value operations), as well as maintaining metadata used internally by the system.
At its simplest, running a cluster is not that different - multiple nodes cooperate to share the responsibilities we mentioned earlier. This is accomplished by having multiple copies of the server process running on separate machines, although it is possible to create test clusters on a single machine. **Nodes** are therefore distinct instances of the Restate server within a cluster.
Restate clusters are designed to scale out in support of large deployments. As you add more machines, it becomes wasteful to replicate all the functionality across all the machines in a cluster, since not all features need to scale out at the same rate. **Roles** control which features run on any given node, enabling specialization within the cluster.
Here is an overview of the different roles that can run on a node:
### Processor failover
A follower (or a restarted processor) is promoted, obtains a new epoch, appends an epoch-bump record. The new leader ensures it can resume the log’s event stream (possibly restoring the latest S3 snapshot, if it was not previously a follower). Any late appends from superseded leaders or stale handler attempts (carrying lower epochs) are fenced at the epoch boundary and ignored.
### Routing continuity
Ingress consults the updated control-plane metadata and routes directly to the new leaders. Clients do not need to reconnect to different endpoints or re-negotiate sessions; failover is transparent at the API boundary.
## Nodes and roles
You'll see many mentions of the terms server and node throughout this documentation. Generally, we use the term "server" to refer to a running instance of the `restate-server` binary. This binary can host multiple functions. When you start a single-node Restate server, for example when doing some local development or testing, you are hosting all the essential features in a single process. These include accepting incoming requests, durably recording events, processing work (delegating invocations to services, handling key-value operations), as well as maintaining metadata used internally by the system.
At its simplest, running a cluster is not that different - multiple nodes cooperate to share the responsibilities we mentioned earlier. This is accomplished by having multiple copies of the server process running on separate machines, although it is possible to create test clusters on a single machine. **Nodes** are therefore distinct instances of the Restate server within a cluster.
Restate clusters are designed to scale out in support of large deployments. As you add more machines, it becomes wasteful to replicate all the functionality across all the machines in a cluster, since not all features need to scale out at the same rate. **Roles** control which features run on any given node, enabling specialization within the cluster.
Here is an overview of the different roles that can run on a node:
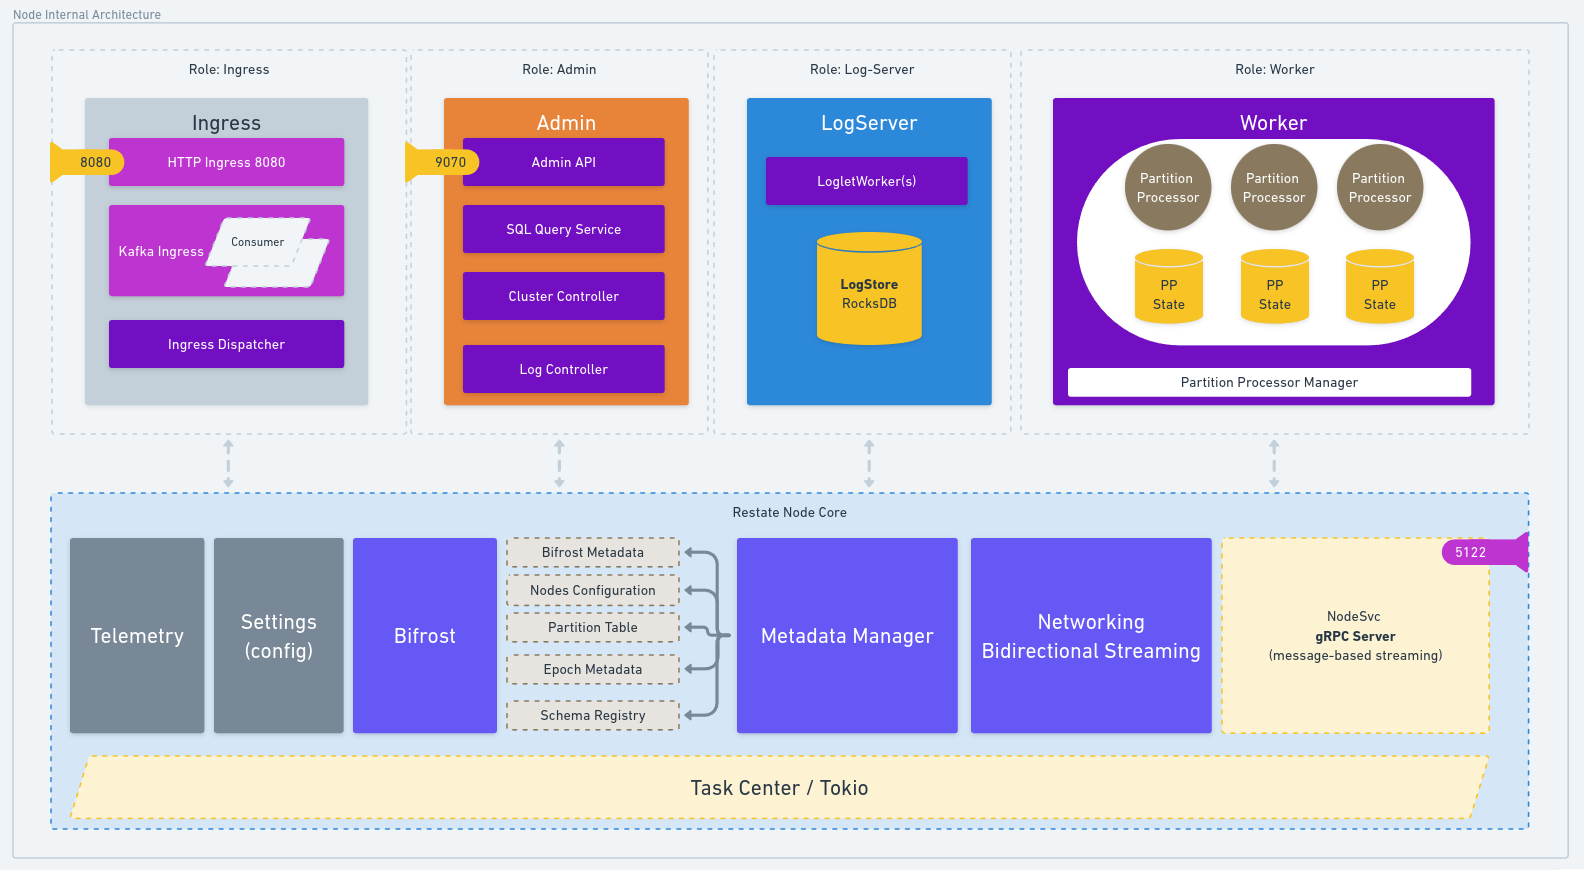 * Metadata server: the source of truth for cluster-wide information
* Ingress: the entry point for external requests
* Log server: responsible for durably persisting the log
* Worker: houses the partition processors
### Metadata store
The Restate metadata store is part of the control plane and is the internal source of truth for node membership and responsibilities. It is essential to the correctness of the overall system: In a cluster this service enables distributed consensus about other components' configuration. All nodes in a Restate cluster must be able to access the metadata store, though not all members of the cluster need to be part of hosting it. Restate includes a built-in Raft-based metadata store which is hosted on all nodes running the `metadata-server` role.
The metadata store is designed to support relatively low volumes of read and write operations (at least compared to other parts of Restate), with the highest level of integrity and availability.
### Ingress
External requests enter the Restate cluster via the HTTP ingress component, which runs on nodes assigned the `http-ingress` role. Compared to other roles, the HTTP ingress role does not involve long-lived state and it can move around relatively freely, since it only handles ongoing client connections.
### Log servers
Log server nodes running the `log-server` role are responsible for durably persisting the log. If the log is the equivalent of a WAL, then partition stores are the materializations that enable efficient reads of the events (invocation journals, key-value data) that have been recorded. Depending on the configured **log replication** requirements, Restate will replicate log records to multiple log servers to persist a given log, and this will change over time to support maintenance and resizing of the cluster.
### Workers
Nodes assigned the `worker` role run the partition processors, which are the Restate components responsible for maintaining the partition store.
Partition processors can operate in either leader or follower mode.
Only a single leader for a given partition can be active at a time, and this is the sole processor that handles invocations to deployed services.
Followers keep up with the log without taking action, and are ready to take over in the event that the partition's leader becomes unavailable.
The overall number of processors per partition is configurable via the **partition replication** configuration option.
* Metadata server: the source of truth for cluster-wide information
* Ingress: the entry point for external requests
* Log server: responsible for durably persisting the log
* Worker: houses the partition processors
### Metadata store
The Restate metadata store is part of the control plane and is the internal source of truth for node membership and responsibilities. It is essential to the correctness of the overall system: In a cluster this service enables distributed consensus about other components' configuration. All nodes in a Restate cluster must be able to access the metadata store, though not all members of the cluster need to be part of hosting it. Restate includes a built-in Raft-based metadata store which is hosted on all nodes running the `metadata-server` role.
The metadata store is designed to support relatively low volumes of read and write operations (at least compared to other parts of Restate), with the highest level of integrity and availability.
### Ingress
External requests enter the Restate cluster via the HTTP ingress component, which runs on nodes assigned the `http-ingress` role. Compared to other roles, the HTTP ingress role does not involve long-lived state and it can move around relatively freely, since it only handles ongoing client connections.
### Log servers
Log server nodes running the `log-server` role are responsible for durably persisting the log. If the log is the equivalent of a WAL, then partition stores are the materializations that enable efficient reads of the events (invocation journals, key-value data) that have been recorded. Depending on the configured **log replication** requirements, Restate will replicate log records to multiple log servers to persist a given log, and this will change over time to support maintenance and resizing of the cluster.
### Workers
Nodes assigned the `worker` role run the partition processors, which are the Restate components responsible for maintaining the partition store.
Partition processors can operate in either leader or follower mode.
Only a single leader for a given partition can be active at a time, and this is the sole processor that handles invocations to deployed services.
Followers keep up with the log without taking action, and are ready to take over in the event that the partition's leader becomes unavailable.
The overall number of processors per partition is configurable via the **partition replication** configuration option.
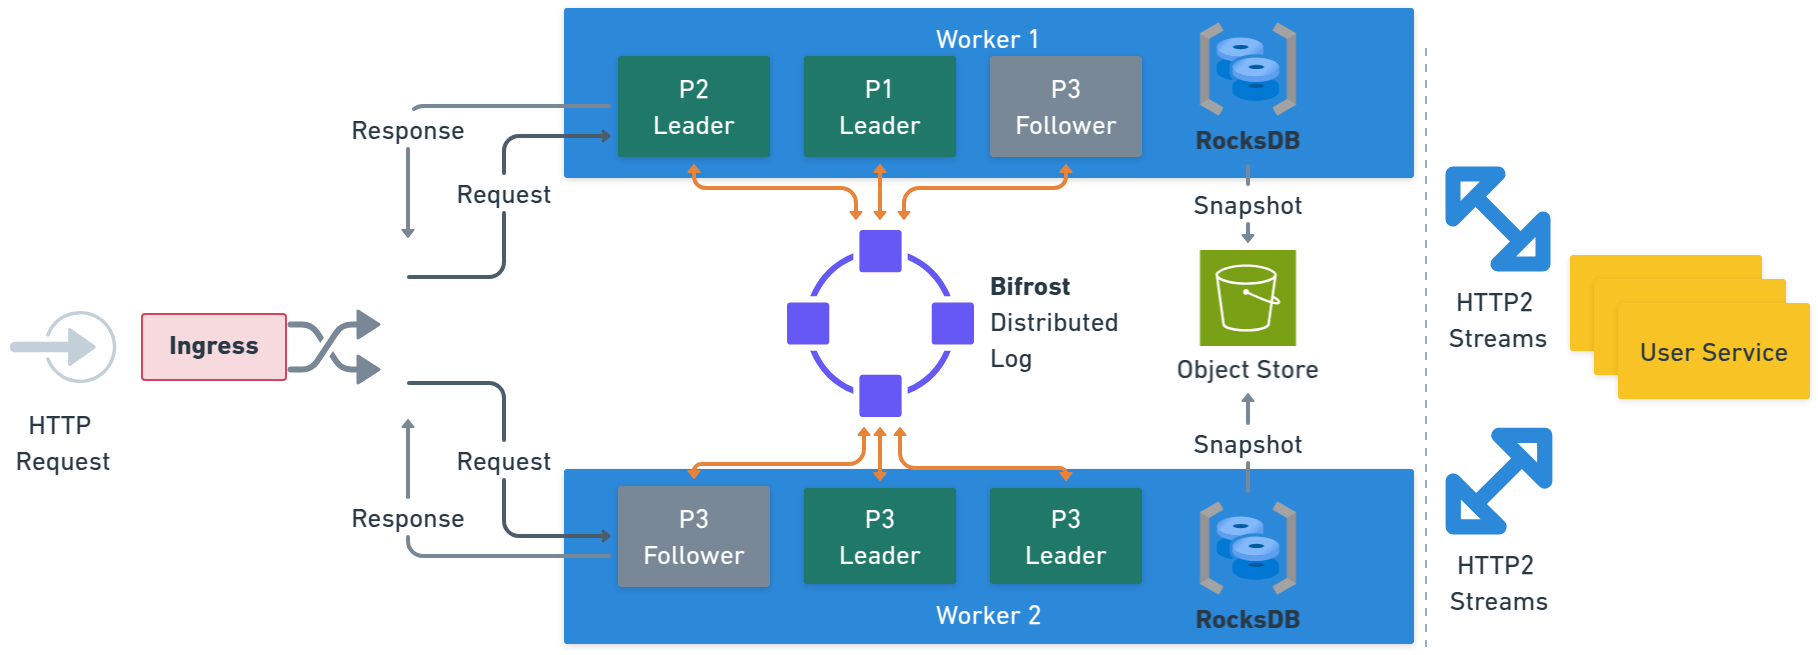 Partition processors replicate their state by following and applying the log for their partition.
If a processor needs to stop, for example for scheduled maintenance, it will typically catch up on the records it missed by reading them from the cluster's log servers once it comes back online.
Occasionally, a worker node might lose a disk - or you might need to grow your cluster by adding fresh nodes to it.
In these cases, it's far more efficient to obtain a **snapshot** of the partition state from a recent point in time than to replay all the missing log events.
Restate clusters can be configured to use an external **object store** as the snapshot repository, allowing partition processors to skip ahead in the log.
This also enables us to **trim logs** which might otherwise grow unboundedly.
## Other reading material
* [Blog post: Building a modern Durable Execution Engine from First Principles](https://restate.dev/blog/building-a-modern-durable-execution-engine-from-first-principles/)
* [Blog post: Distributed Restate - a first look](https://restate.dev/blog/distributed-restate-a-first-look/)
* [Blog post: Every System is a Log](https://restate.dev/blog/every-system-is-a-log-avoiding-coordination-in-distributed-applications/)
# CLI Configuration
Source: https://restate-6d46e1dc-update-go-sdk.mintlify.app/references/cli-config
Restate CLI configuration options.
You can use the CLI to interact with Restate, and manage your services, deployments and invocations.
Have a look at the [CLI installation docs](/installation).
There are 2 ways to configure the CLI: via environment variables or via a configuration file.
## Using environment variables
You can specify the following environment variables:
* `RESTATE_HOST`: The hostname/IP address of the server. Default is `localhost`.
* `RESTATE_HOST_SCHEME`: Default is `http`.
* `RESTATE_ADMIN_URL`: To specify the full URL of the admin server (scheme+host+port).
* `RESTATE_AUTH_TOKEN`: Set if authentication is required.
For example, to specify the hostname `myhost` and the host scheme `https`, pass environment variables as follows:
```shell theme={null}
RESTATE_HOST=myhost RESTATE_HOST_SCHEME=https restate
Partition processors replicate their state by following and applying the log for their partition.
If a processor needs to stop, for example for scheduled maintenance, it will typically catch up on the records it missed by reading them from the cluster's log servers once it comes back online.
Occasionally, a worker node might lose a disk - or you might need to grow your cluster by adding fresh nodes to it.
In these cases, it's far more efficient to obtain a **snapshot** of the partition state from a recent point in time than to replay all the missing log events.
Restate clusters can be configured to use an external **object store** as the snapshot repository, allowing partition processors to skip ahead in the log.
This also enables us to **trim logs** which might otherwise grow unboundedly.
## Other reading material
* [Blog post: Building a modern Durable Execution Engine from First Principles](https://restate.dev/blog/building-a-modern-durable-execution-engine-from-first-principles/)
* [Blog post: Distributed Restate - a first look](https://restate.dev/blog/distributed-restate-a-first-look/)
* [Blog post: Every System is a Log](https://restate.dev/blog/every-system-is-a-log-avoiding-coordination-in-distributed-applications/)
# CLI Configuration
Source: https://restate-6d46e1dc-update-go-sdk.mintlify.app/references/cli-config
Restate CLI configuration options.
You can use the CLI to interact with Restate, and manage your services, deployments and invocations.
Have a look at the [CLI installation docs](/installation).
There are 2 ways to configure the CLI: via environment variables or via a configuration file.
## Using environment variables
You can specify the following environment variables:
* `RESTATE_HOST`: The hostname/IP address of the server. Default is `localhost`.
* `RESTATE_HOST_SCHEME`: Default is `http`.
* `RESTATE_ADMIN_URL`: To specify the full URL of the admin server (scheme+host+port).
* `RESTATE_AUTH_TOKEN`: Set if authentication is required.
For example, to specify the hostname `myhost` and the host scheme `https`, pass environment variables as follows:
```shell theme={null}
RESTATE_HOST=myhost RESTATE_HOST_SCHEME=https restate  # Tracing
Source: https://restate-6d46e1dc-update-go-sdk.mintlify.app/server/monitoring/tracing
Export OTEL traces of your invocations.
Restate supports the following tracing features:
* Runtime execution tracing per invocation
* Exporting traces to OTLP-compatible systems (e.g. Jaeger)
* Correlating parent traces of incoming HTTP requests, using the [W3C TraceContext](https://github.com/w3c/trace-context) specification.
## Setting up OTLP exporter
Set up the [OTLP exporter](https://github.com/open-telemetry/opentelemetry-collector/blob/main/exporter/otlpexporter/README.md) by pointing the configuration entry `tracing-endpoint` to your trace collector.
By default, a `tracing-endpoint` using the `http://` or `https://` scheme will emit trace data in the OTLP/gRPC format.
Restate also supports the `otlp+http://` and `otlp+https://` schemes, to emit trace data in the OTLP/HTTP format.
Note that when using OTLP/HTTP, the `tracing-endpoint` URI usually needs to include an e.g. `/v1/traces` path.
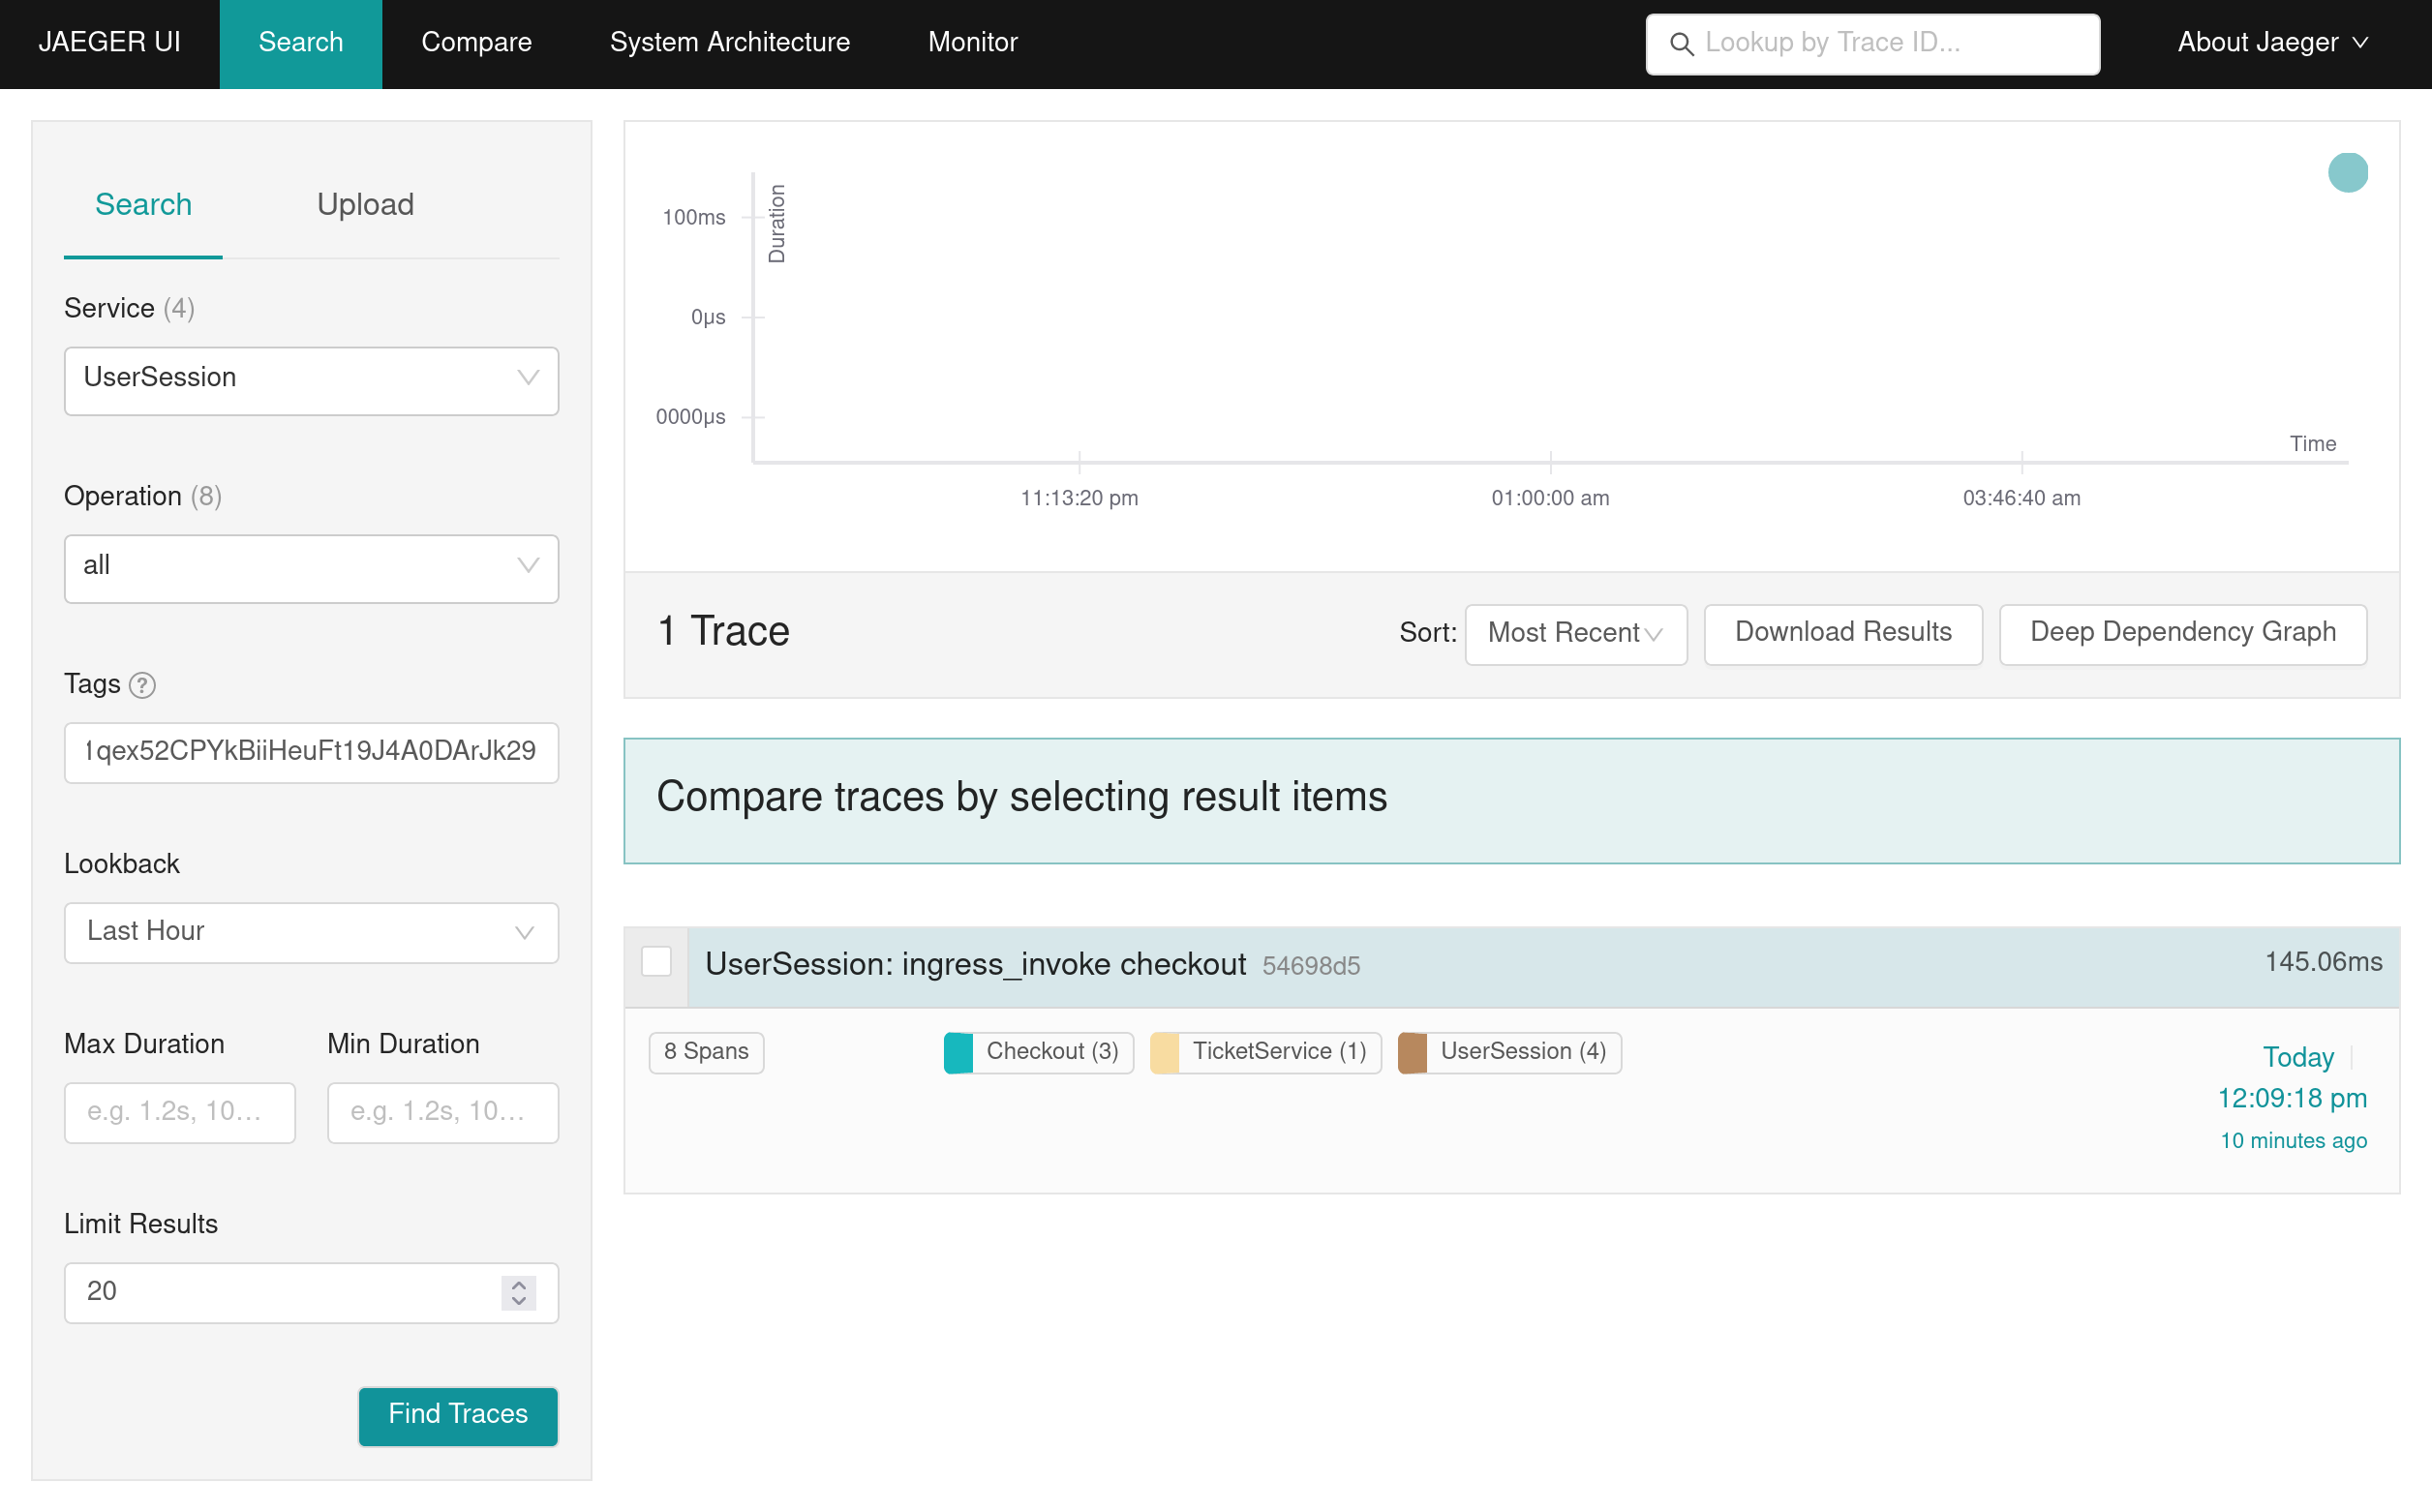
### Exporting traces to Jaeger
[Jaeger](https://www.jaegertracing.io/docs/2.4/deployment/) accepts OTLP trace data on port `4317` (gRPC) and `4318` (HTTP).
Start Jaeger locally with Docker, for example:
```shell theme={null}
docker run -d --name jaeger \
-p 4317:4317 -p 4318:4318 -p 16686:16686 \
jaegertracing/jaeger:2.4.0
```
Configure the tracing endpoint in Restate as a valid URL:
```shell theme={null}
restate-server --tracing-endpoint http://localhost:4317 # for gRPC
restate-server --tracing-endpoint otlp+http://localhost:4318/v1/traces # for HTTP (note /v1/traces)
```
If you run Restate in Docker, then instead add the environment variable `-e RESTATE_TRACING_ENDPOINT=http://host.docker.internal:4317`.
If you now spin up your services and send requests to them, you will see the traces appear in the Jaeger UI at [http://localhost:16686](http://localhost:16686)
# Tracing
Source: https://restate-6d46e1dc-update-go-sdk.mintlify.app/server/monitoring/tracing
Export OTEL traces of your invocations.
Restate supports the following tracing features:
* Runtime execution tracing per invocation
* Exporting traces to OTLP-compatible systems (e.g. Jaeger)
* Correlating parent traces of incoming HTTP requests, using the [W3C TraceContext](https://github.com/w3c/trace-context) specification.
## Setting up OTLP exporter
Set up the [OTLP exporter](https://github.com/open-telemetry/opentelemetry-collector/blob/main/exporter/otlpexporter/README.md) by pointing the configuration entry `tracing-endpoint` to your trace collector.
By default, a `tracing-endpoint` using the `http://` or `https://` scheme will emit trace data in the OTLP/gRPC format.
Restate also supports the `otlp+http://` and `otlp+https://` schemes, to emit trace data in the OTLP/HTTP format.
Note that when using OTLP/HTTP, the `tracing-endpoint` URI usually needs to include an e.g. `/v1/traces` path.
### Exporting traces to Jaeger
[Jaeger](https://www.jaegertracing.io/docs/2.4/deployment/) accepts OTLP trace data on port `4317` (gRPC) and `4318` (HTTP).
Start Jaeger locally with Docker, for example:
```shell theme={null}
docker run -d --name jaeger \
-p 4317:4317 -p 4318:4318 -p 16686:16686 \
jaegertracing/jaeger:2.4.0
```
Configure the tracing endpoint in Restate as a valid URL:
```shell theme={null}
restate-server --tracing-endpoint http://localhost:4317 # for gRPC
restate-server --tracing-endpoint otlp+http://localhost:4318/v1/traces # for HTTP (note /v1/traces)
```
If you run Restate in Docker, then instead add the environment variable `-e RESTATE_TRACING_ENDPOINT=http://host.docker.internal:4317`.
If you now spin up your services and send requests to them, you will see the traces appear in the Jaeger UI at [http://localhost:16686](http://localhost:16686)
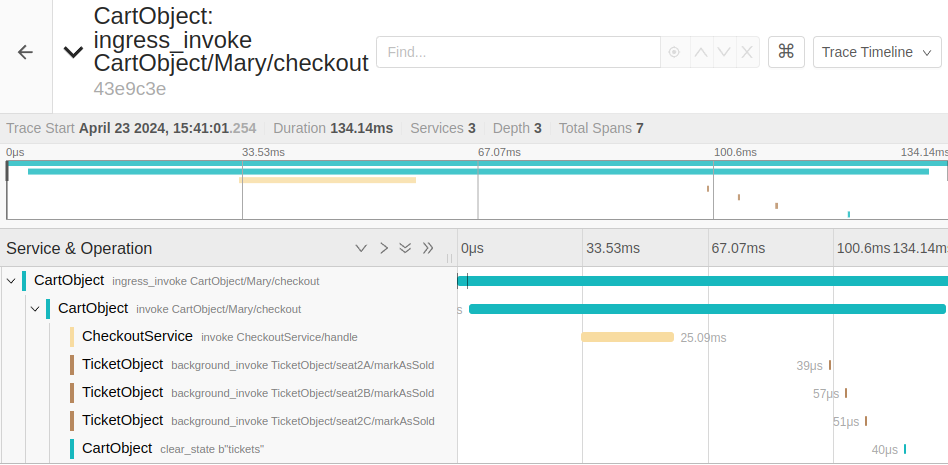
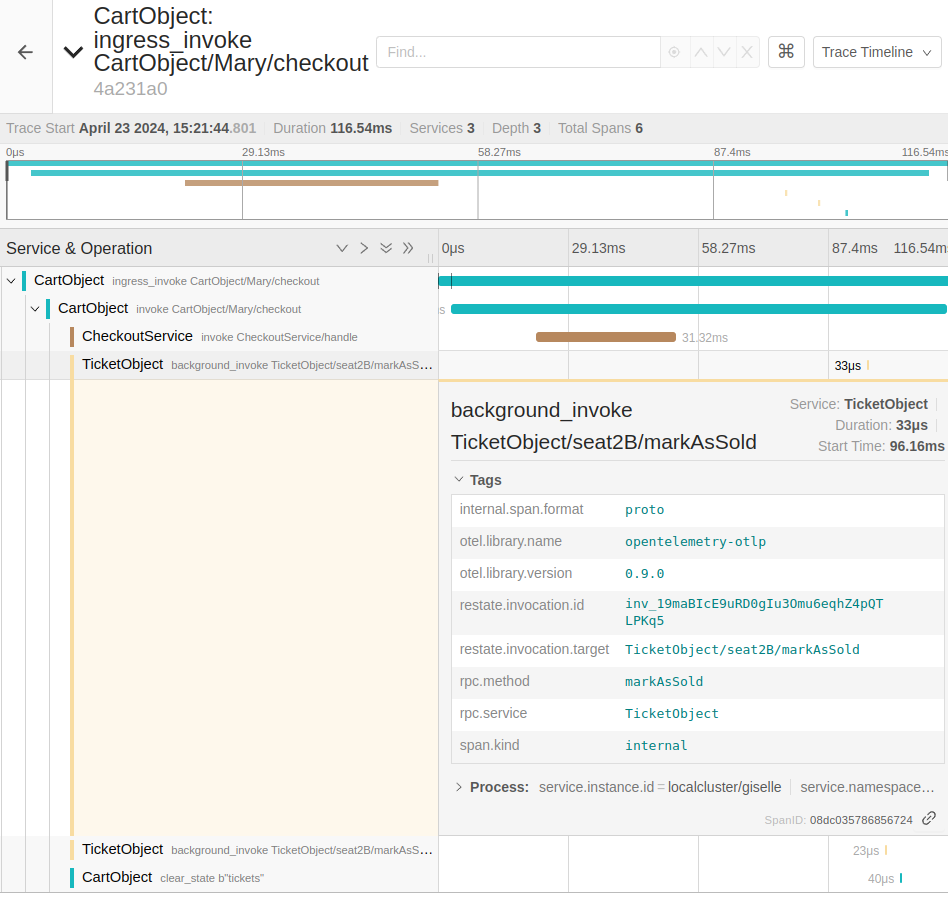 The initial `ingress_invoke` spans show when the HTTP request was received by Restate. The `invoke` span beneath it shows when Restate invoked the service deployment to process the request.
The tags of the spans contain the metadata of the context calls (e.g. call arguments, invocation id).
The initial `ingress_invoke` spans show when the HTTP request was received by Restate. The `invoke` span beneath it shows when Restate invoked the service deployment to process the request.
The tags of the spans contain the metadata of the context calls (e.g. call arguments, invocation id).
 # Snapshots & Backups
Source: https://restate-6d46e1dc-update-go-sdk.mintlify.app/server/snapshots
Understanding and configuring snapshots and data backups in Restate clusters
Restate provides two different mechanisms for data persistence and recovery, each serving distinct purposes: snapshots and backups.
# Snapshots & Backups
Source: https://restate-6d46e1dc-update-go-sdk.mintlify.app/server/snapshots
Understanding and configuring snapshots and data backups in Restate clusters
Restate provides two different mechanisms for data persistence and recovery, each serving distinct purposes: snapshots and backups.
 * Enable [Protection Bypass for Automation](https://vercel.com/docs/deployment-protection/methods-to-bypass-deployment-protection/protection-bypass-automation). This makes the URLs accessible only if the `x-vercel-protection-bypass` header is provided with the right value.
## Register the service to Restate
In order for Restate to push requests to your services, you need to [register the service to Restate](/services/versioning) using the CLI or UI.
Make sure to register the [Commit URL](https://vercel.com/docs/deployments/generated-urls#generated-from-git) so that Restate can address specific Vercel deployments:
```shell theme={null}
npx @restatedev/restate deployments register \
--use-http1.1 \
https://
* Enable [Protection Bypass for Automation](https://vercel.com/docs/deployment-protection/methods-to-bypass-deployment-protection/protection-bypass-automation). This makes the URLs accessible only if the `x-vercel-protection-bypass` header is provided with the right value.
## Register the service to Restate
In order for Restate to push requests to your services, you need to [register the service to Restate](/services/versioning) using the CLI or UI.
Make sure to register the [Commit URL](https://vercel.com/docs/deployments/generated-urls#generated-from-git) so that Restate can address specific Vercel deployments:
```shell theme={null}
npx @restatedev/restate deployments register \
--use-http1.1 \
https://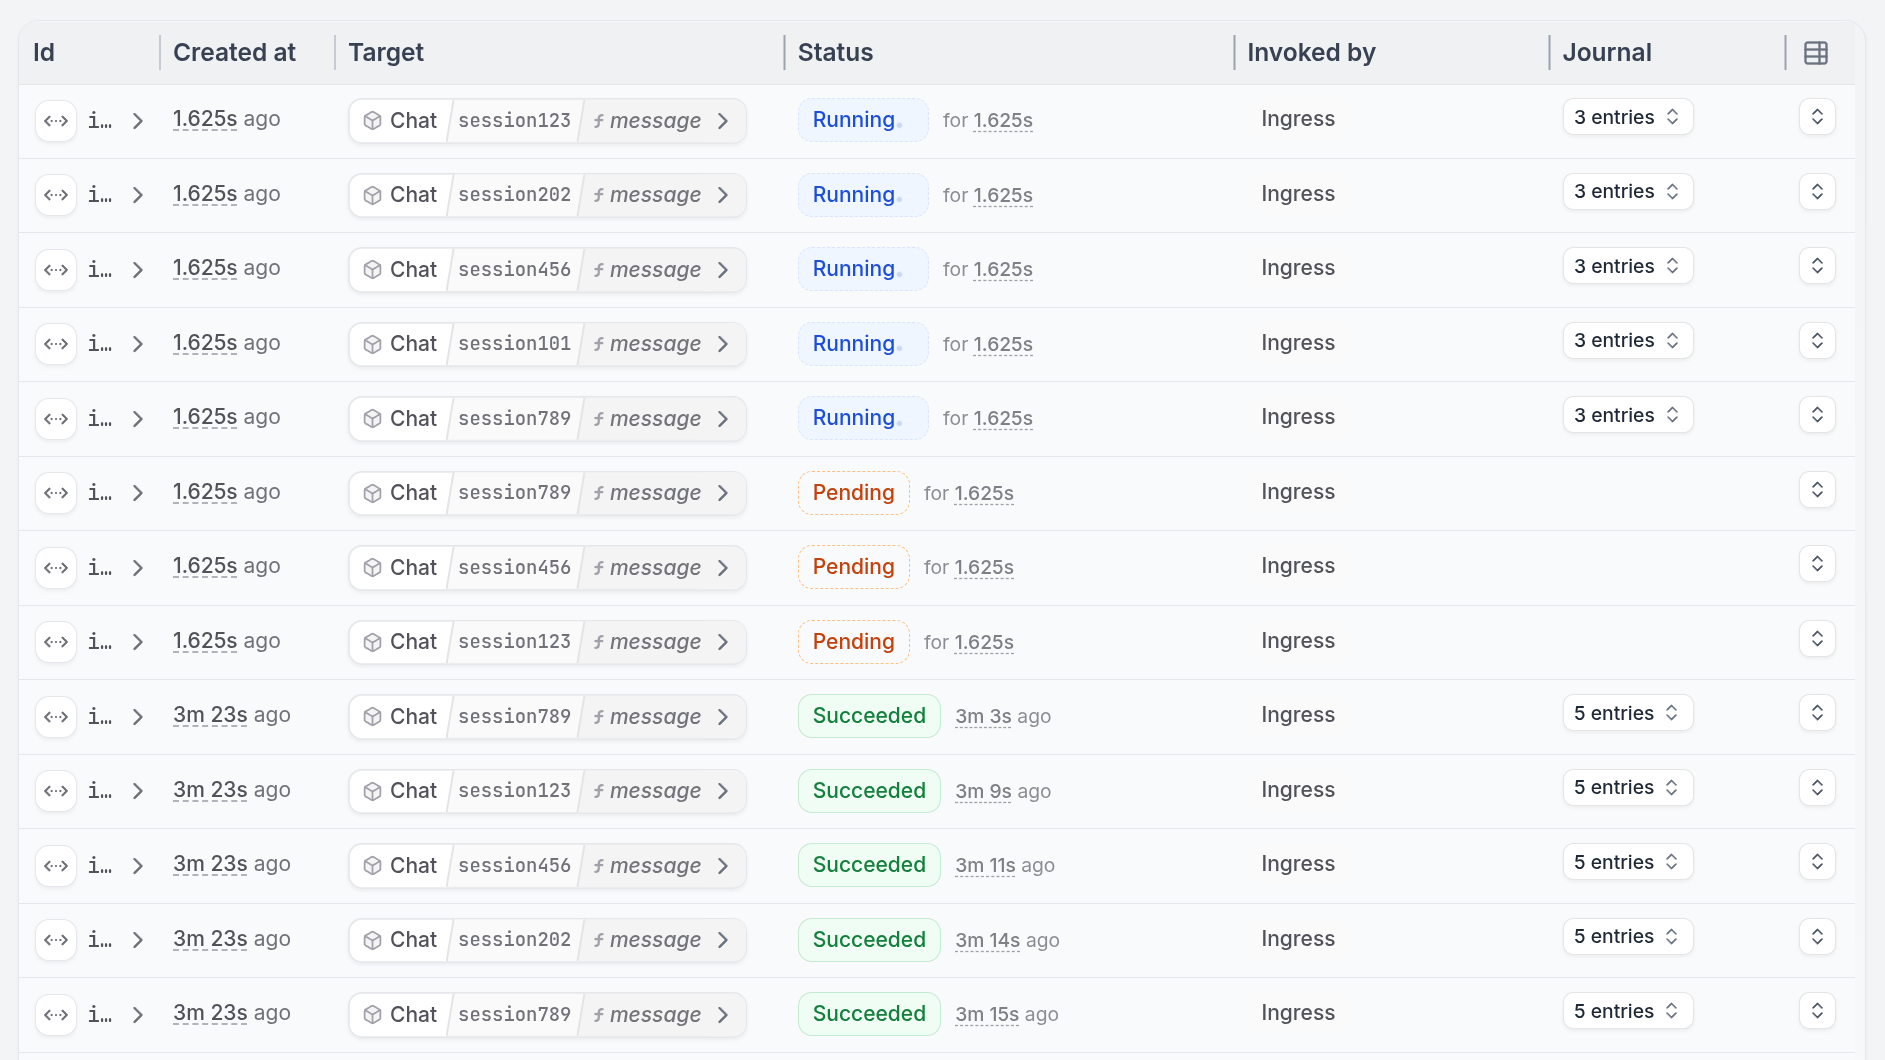 ## Invocation ID
*Invocations* have a unique **Invocation ID** starting with `inv_`. You can find this ID in every place where an invocation is mentioned:
* The invocations page of the [Restate UI](/installation#restate-ui)
* Logs and traces (`restate.invocation.id`), both in Restate and SDKs
* In CLI commands such as `restate invocation ls`
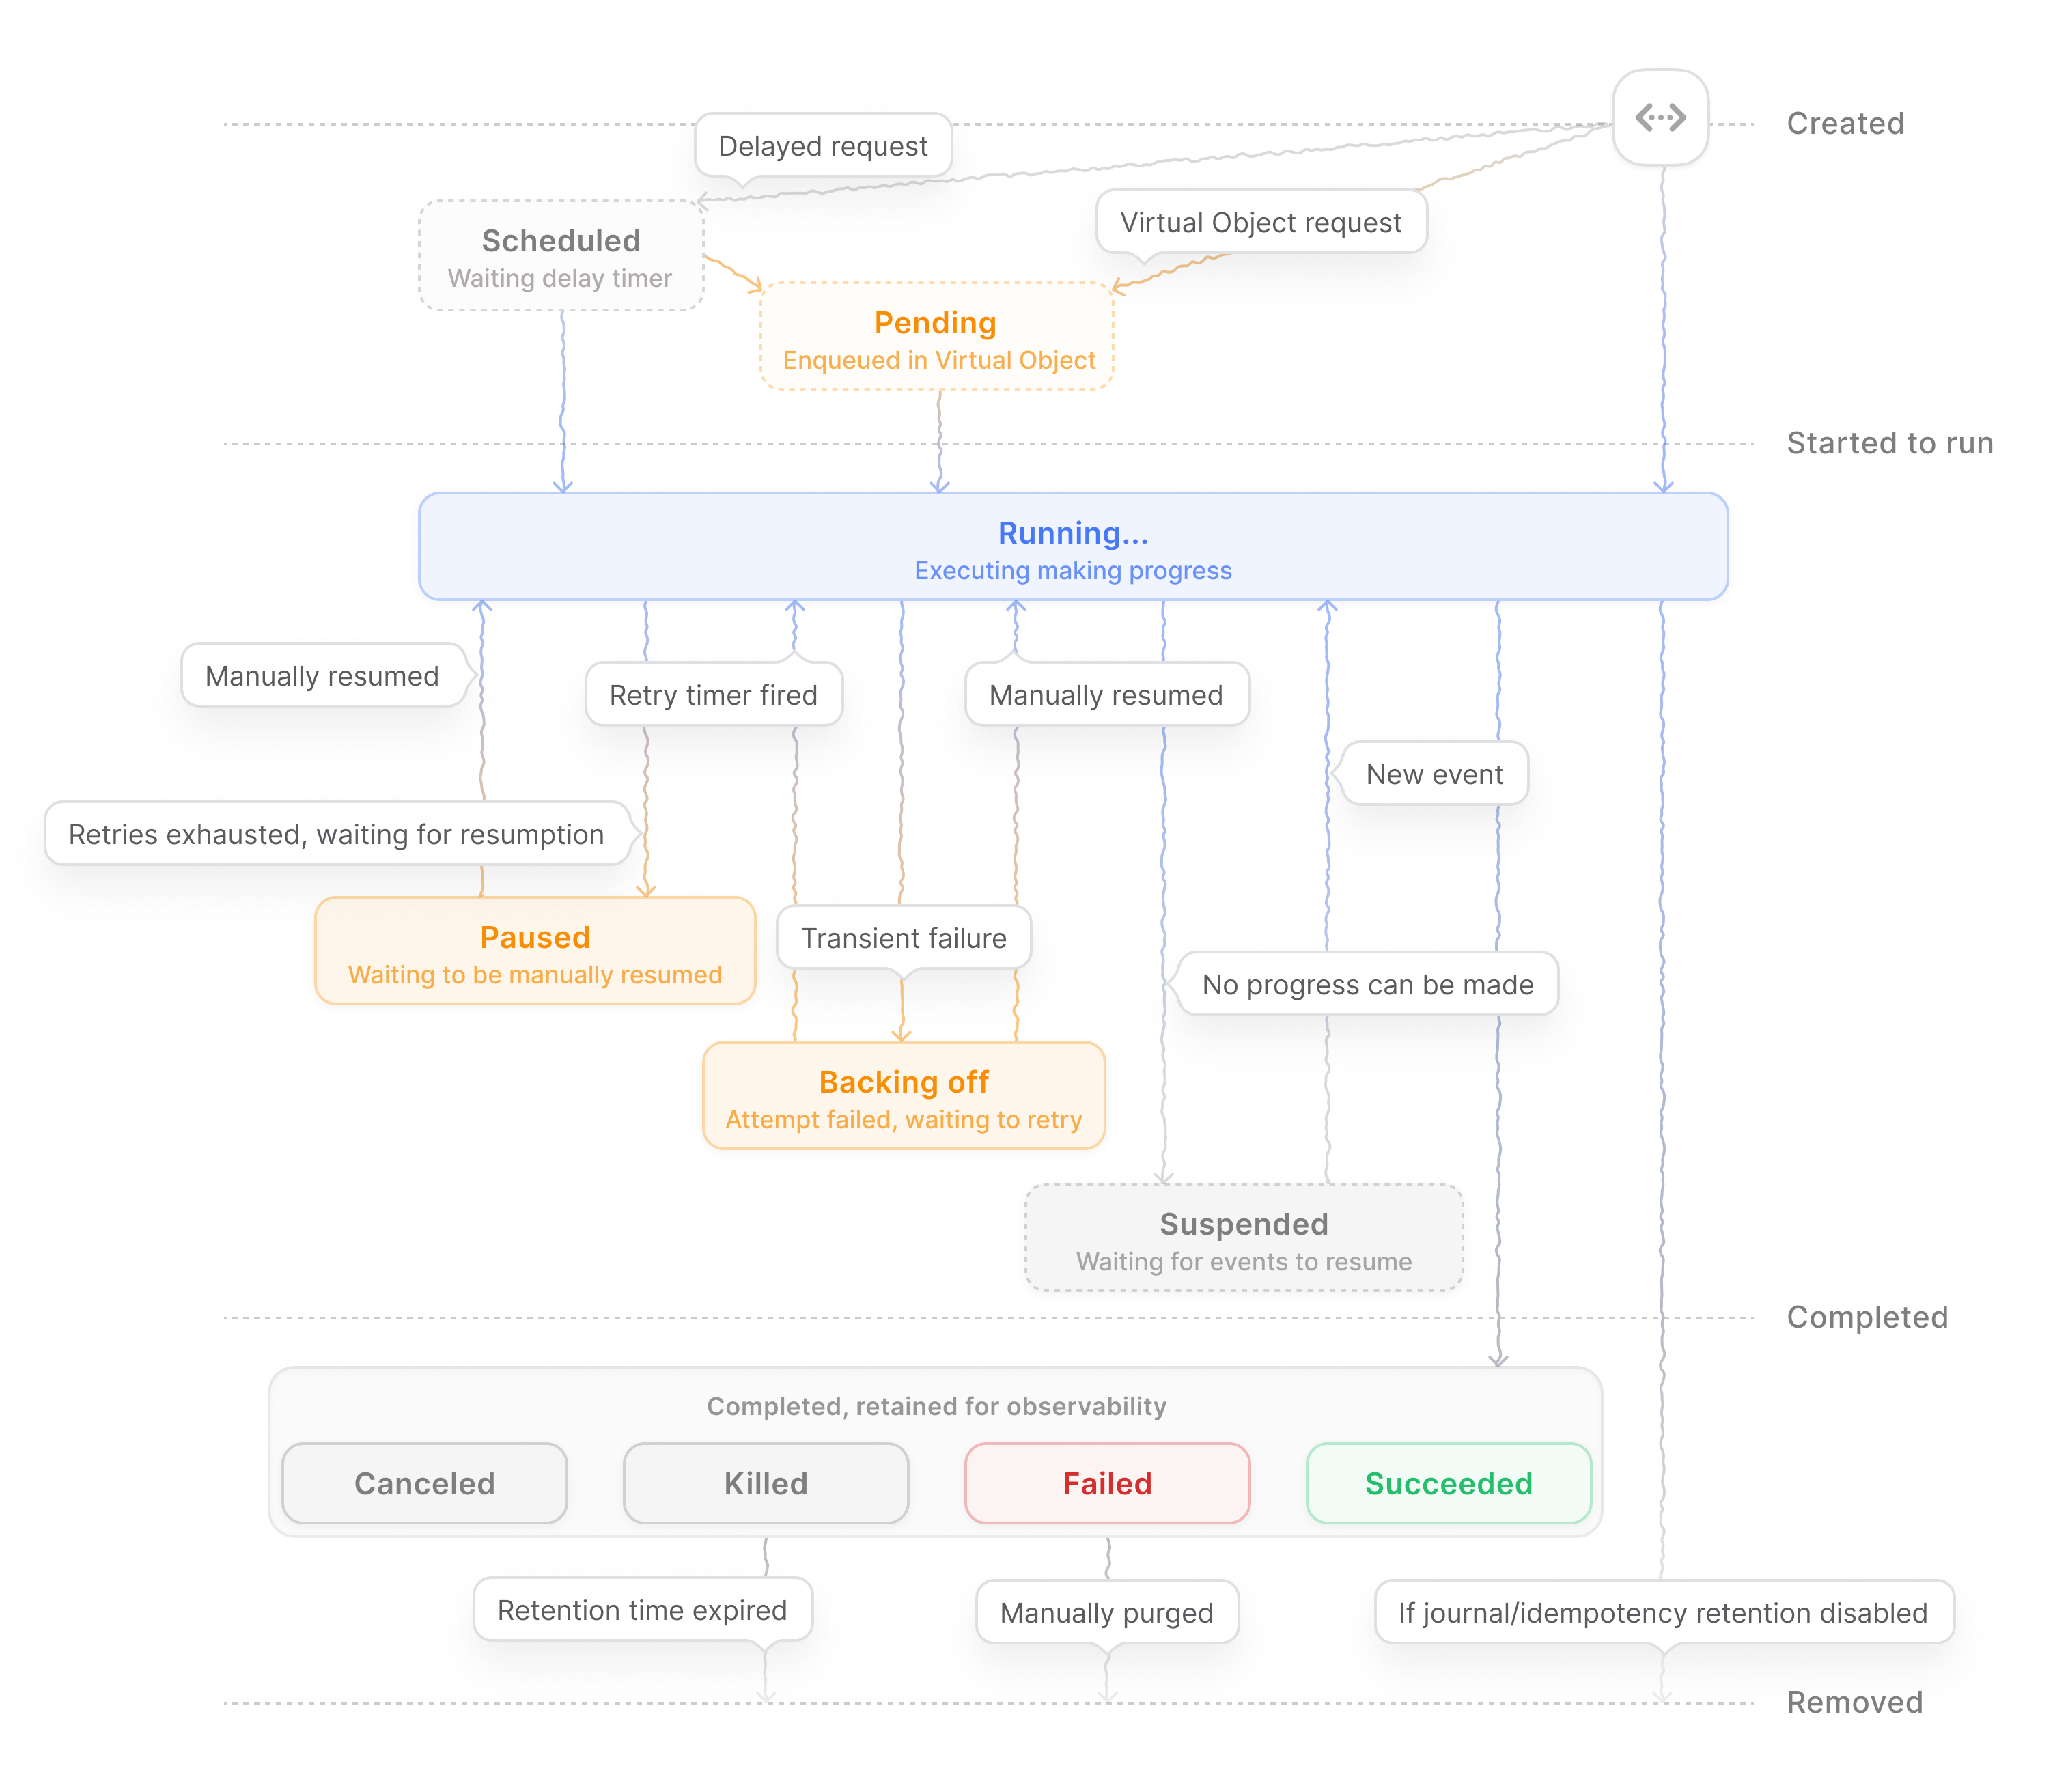
## Lifecycle
Invocations follow a well-defined lifecycle:
## Invocation ID
*Invocations* have a unique **Invocation ID** starting with `inv_`. You can find this ID in every place where an invocation is mentioned:
* The invocations page of the [Restate UI](/installation#restate-ui)
* Logs and traces (`restate.invocation.id`), both in Restate and SDKs
* In CLI commands such as `restate invocation ls`
## Lifecycle
Invocations follow a well-defined lifecycle:
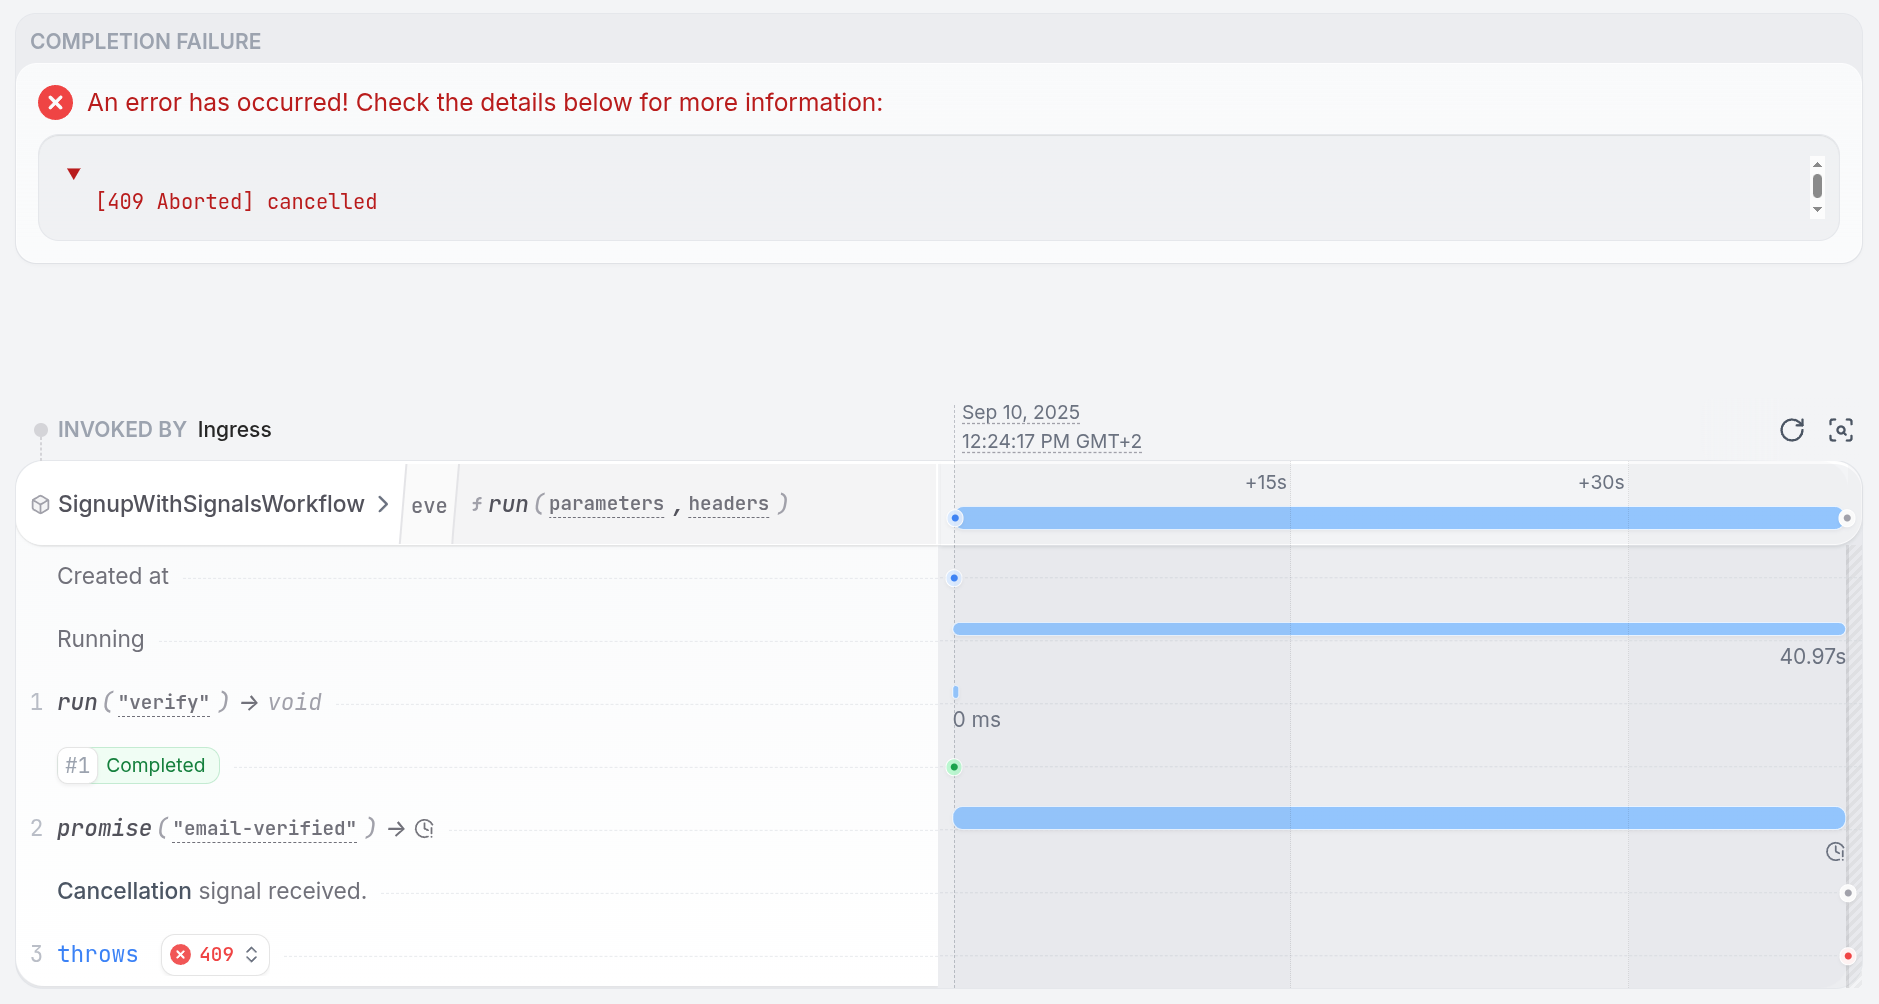
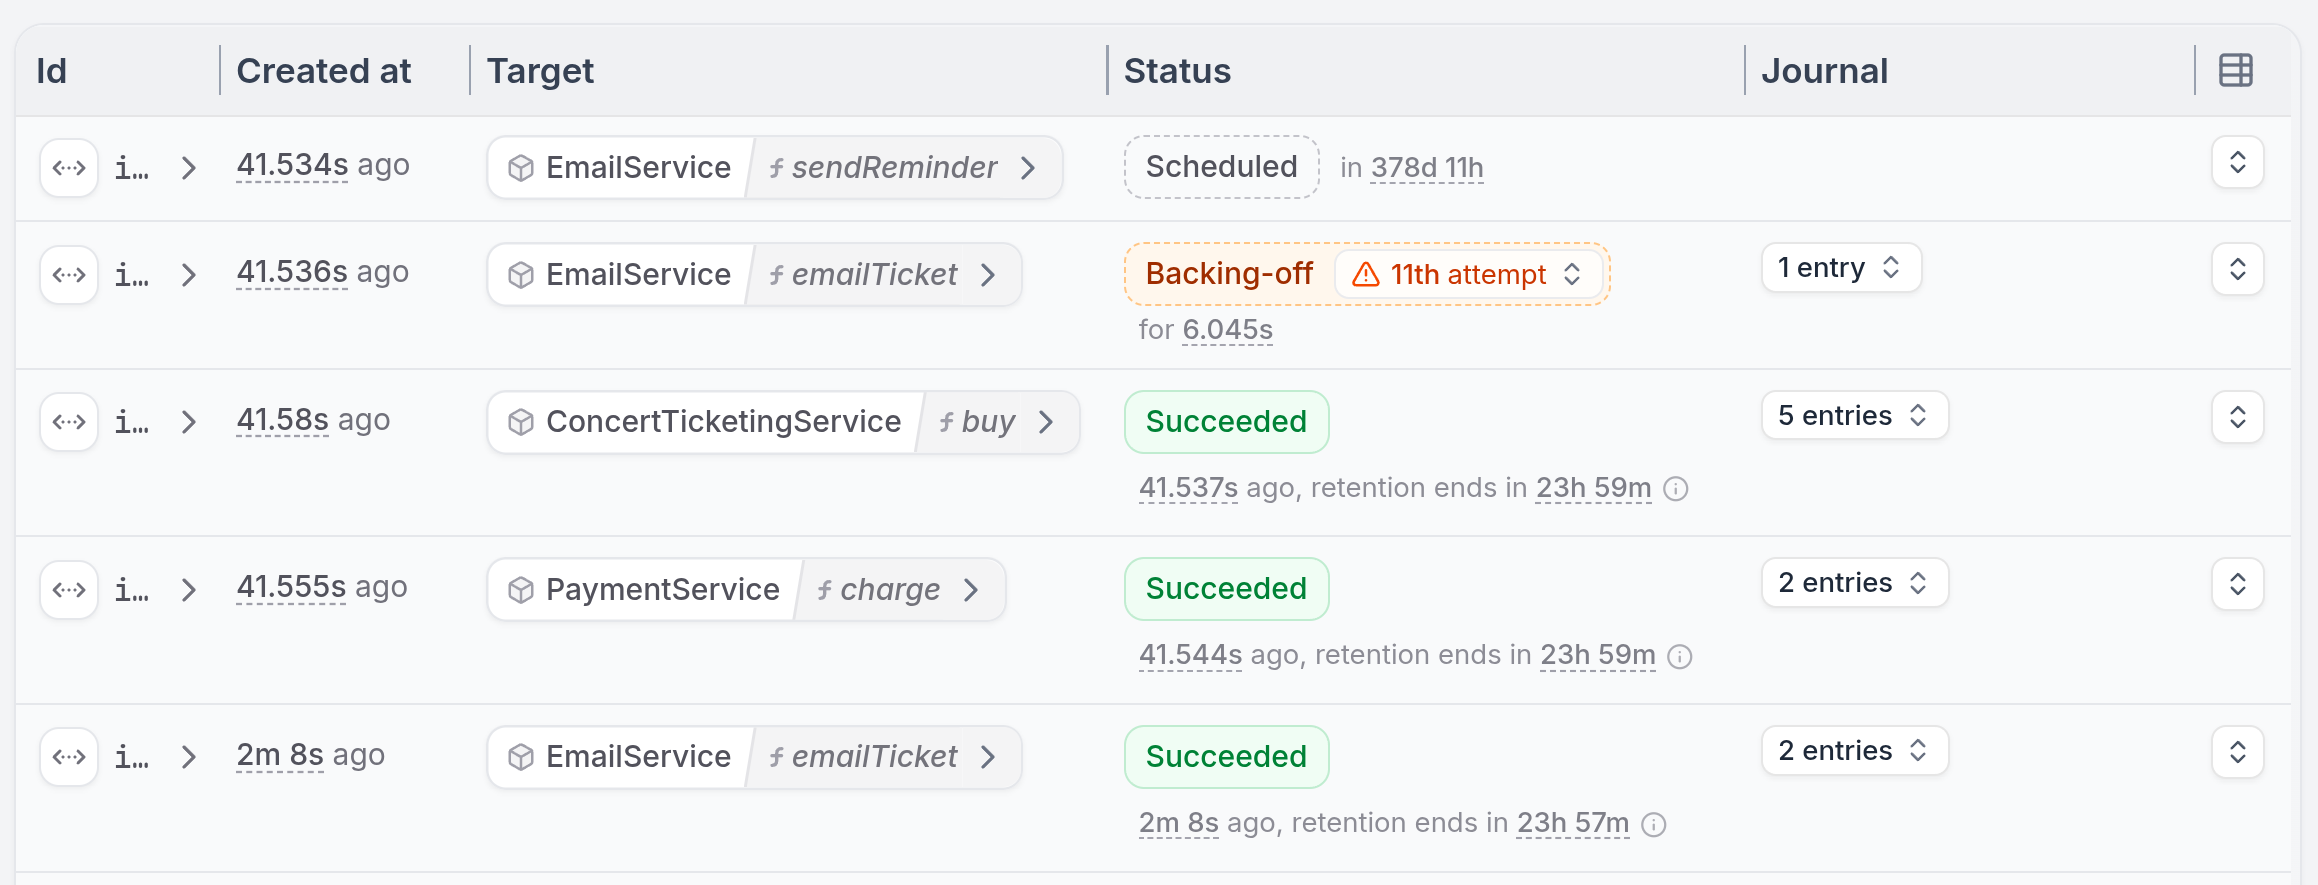
 This page describes how to manage invocations in different states.
## Cancel
You can cancel an invocation at any point in its lifecycle.
Cancellation has the following characteristics:
* Frees held resources
* Cooperates with your handler code to roll back any changes made so far
* Allows proper cleanup
This page describes how to manage invocations in different states.
## Cancel
You can cancel an invocation at any point in its lifecycle.
Cancellation has the following characteristics:
* Frees held resources
* Cooperates with your handler code to roll back any changes made so far
* Allows proper cleanup
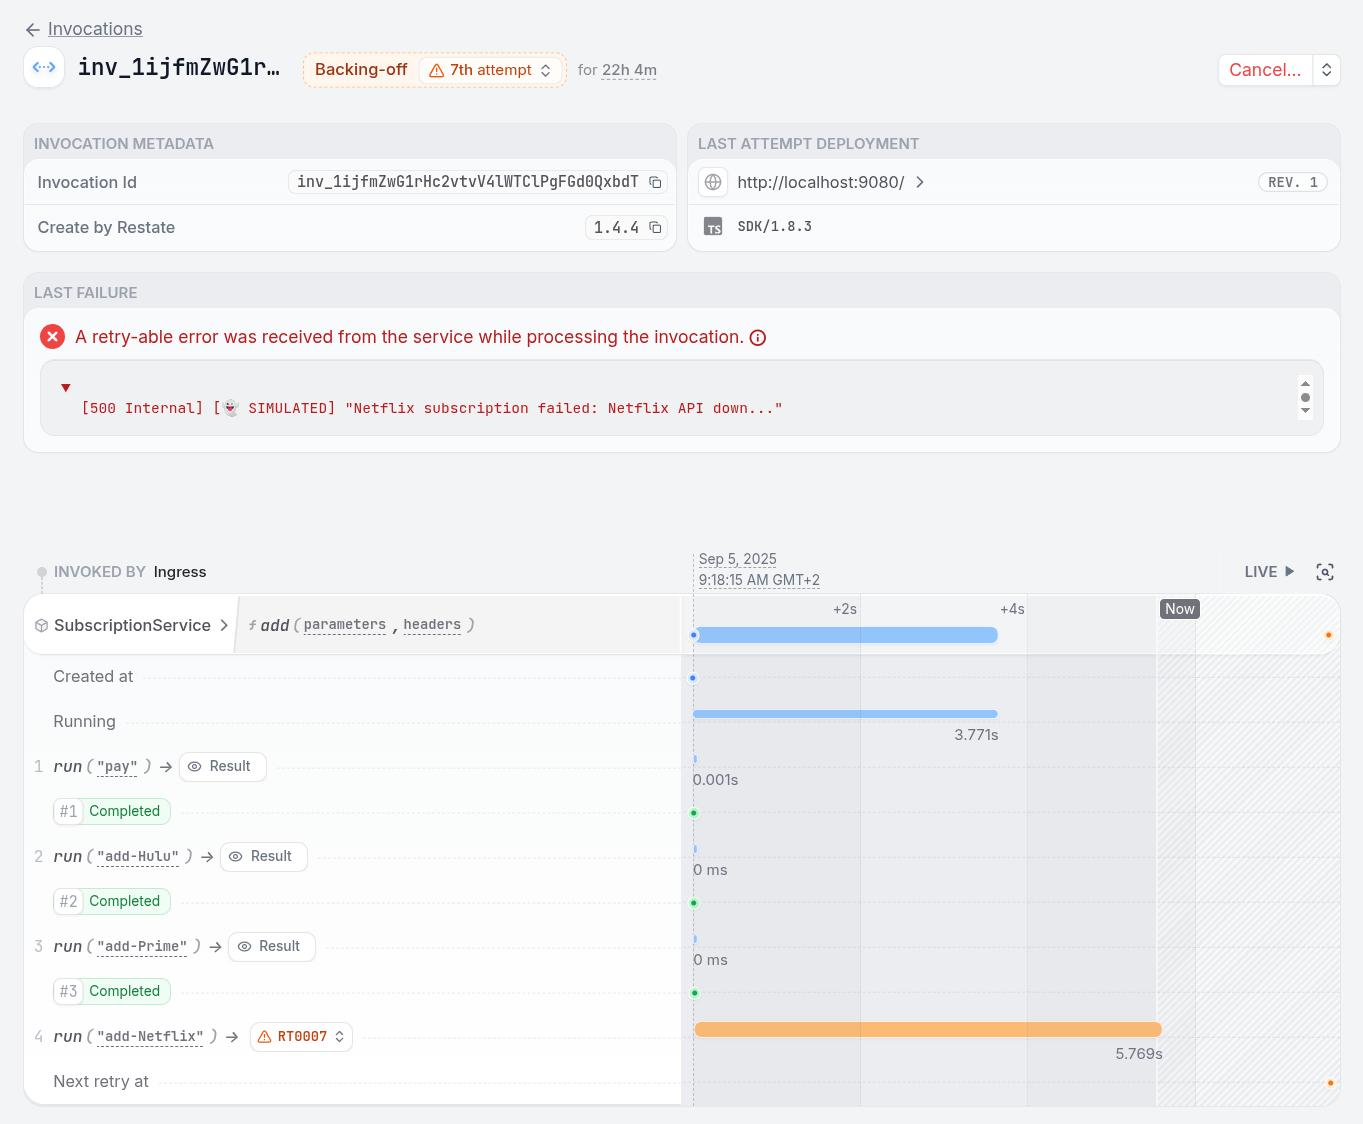
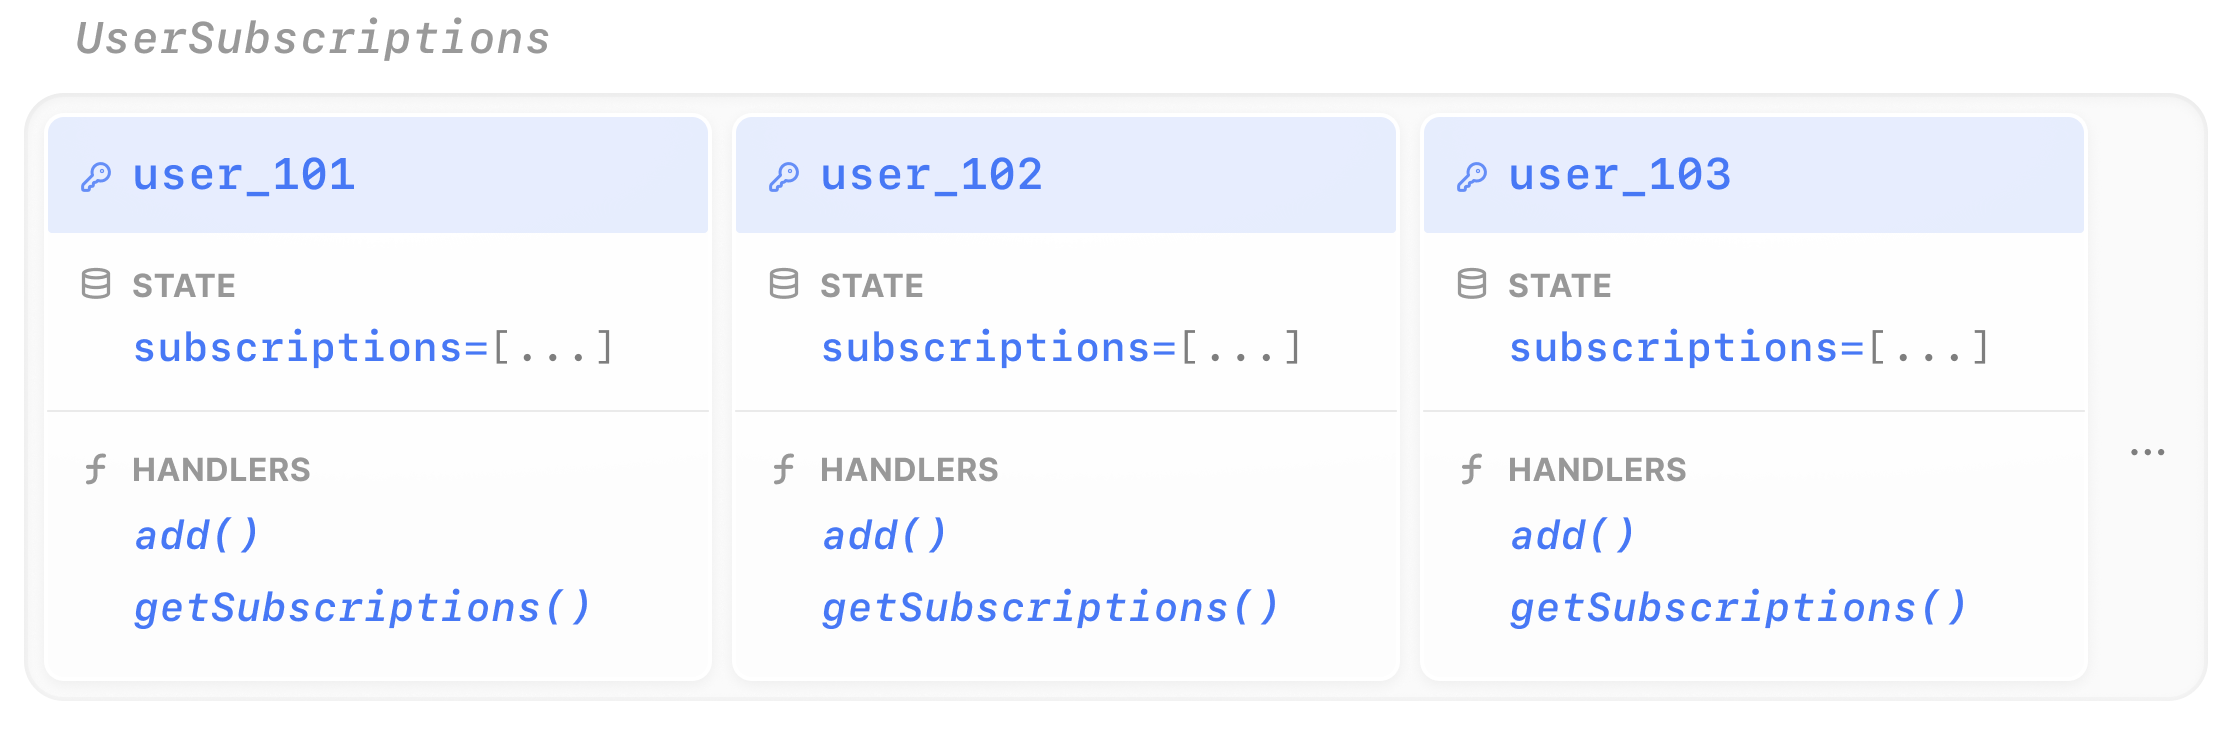
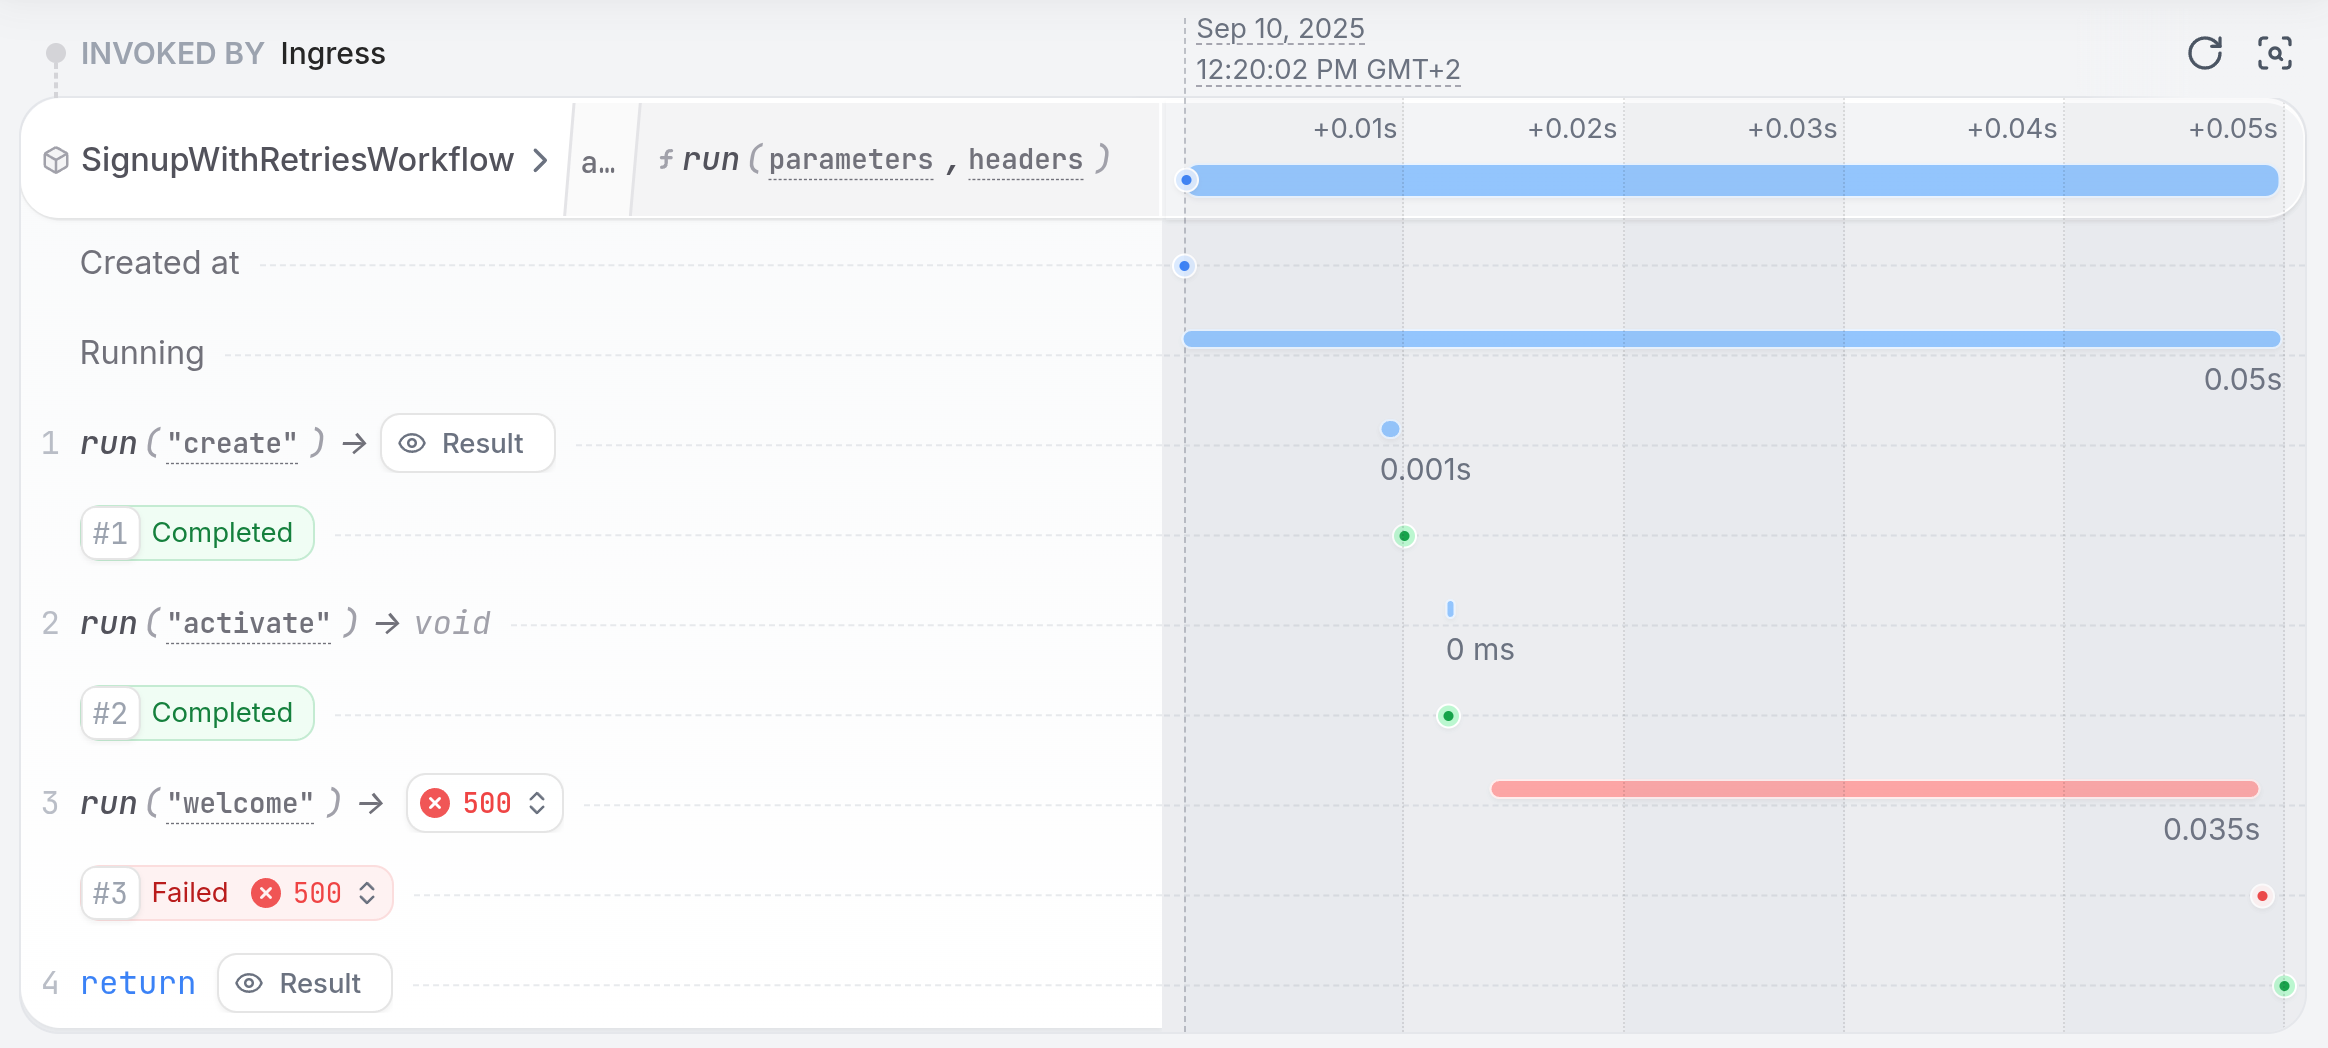
 A basic subscription service orchestration looks like this:
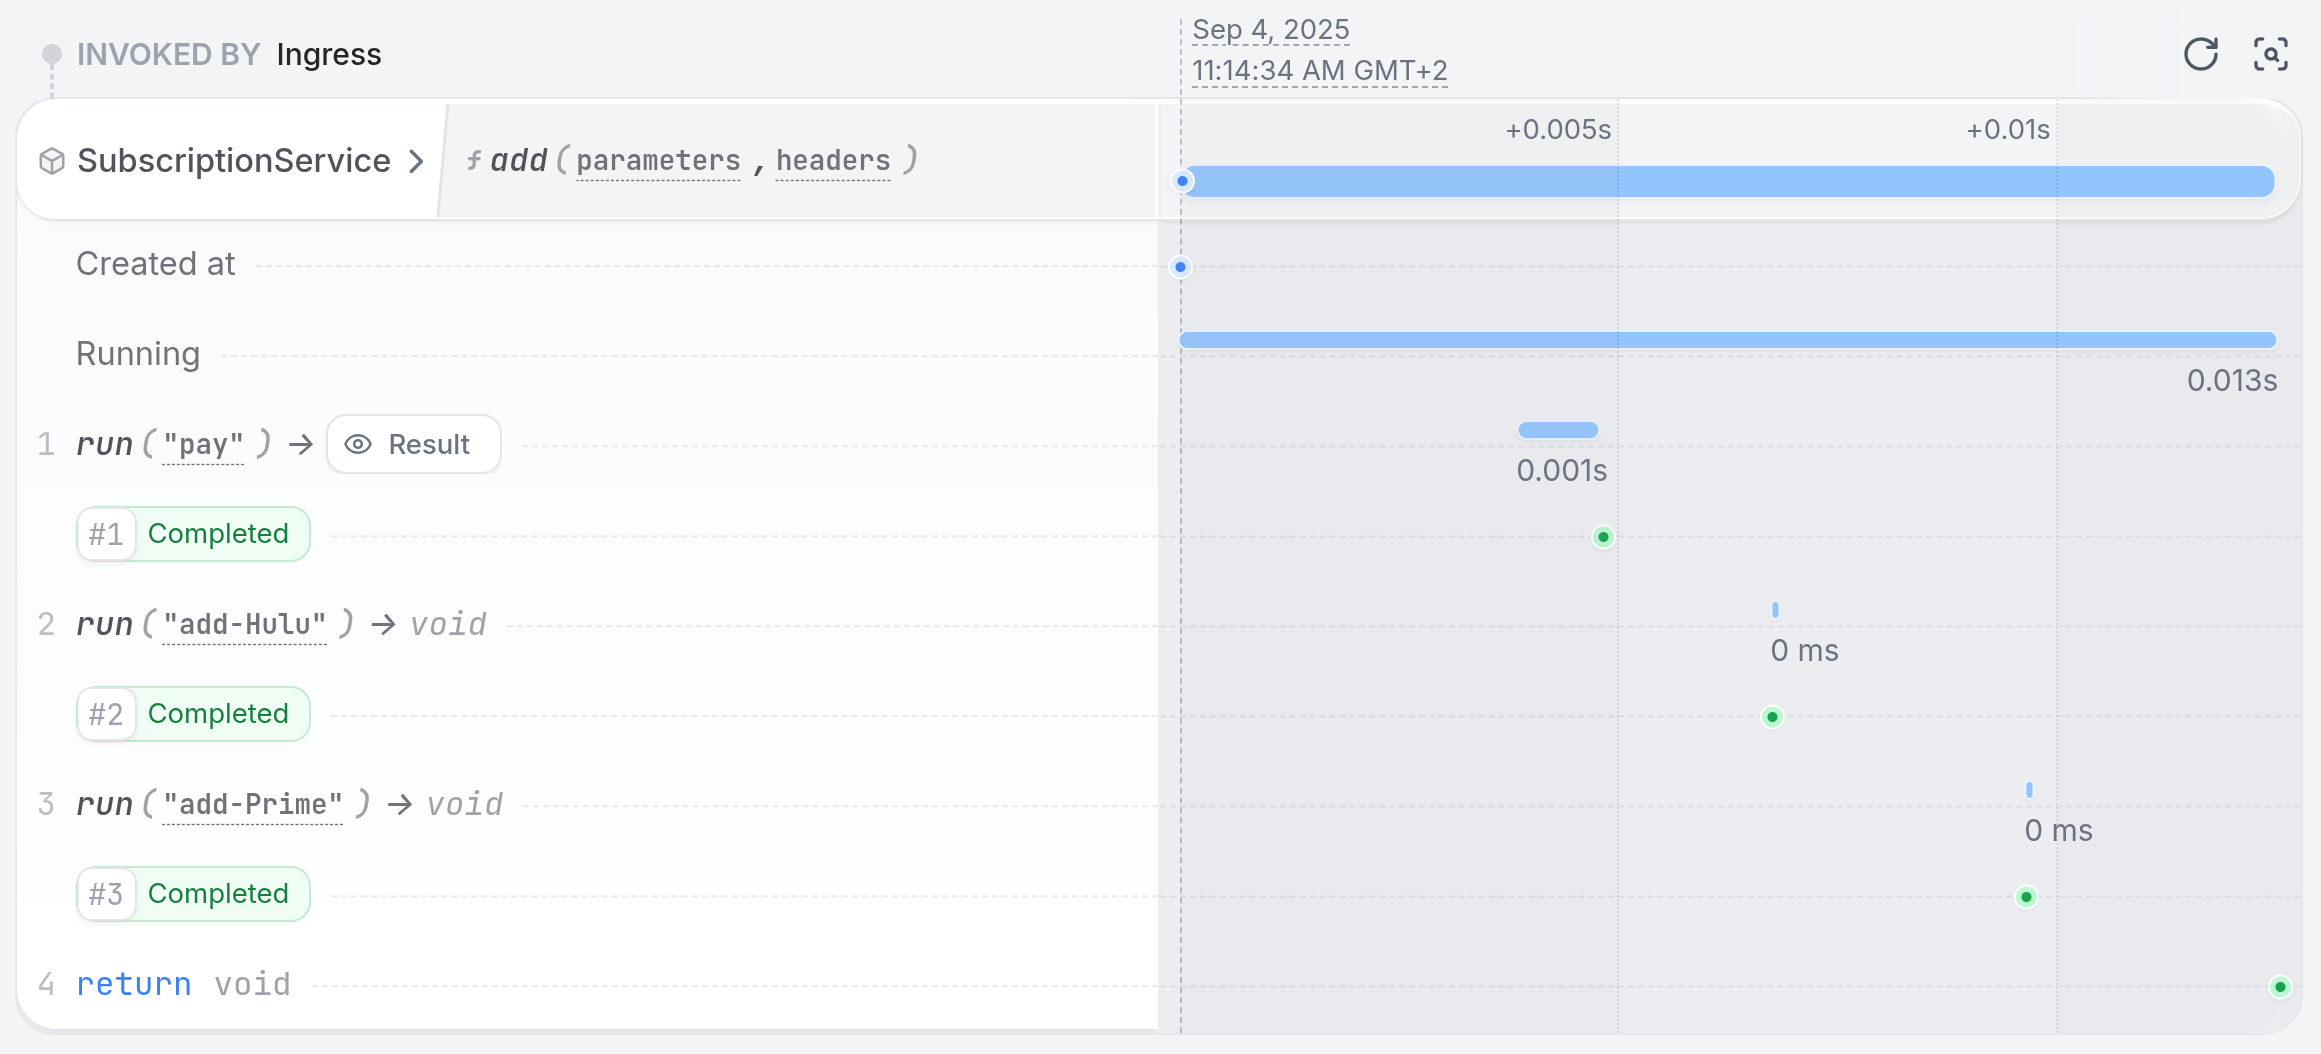 ## Durable Execution
Restate uses Durable Execution to ensure your orchestration logic survives failures and restarts.
Whenever a handler executes an action with the Restate `Context`, this gets send over to the Restate Server and persisted in a log.
On a failure or a crash, the Restate Server sends a retry request that contains the log of the actions that were executed so far.
The service then replays the log to restore state and continues executing the remaining actions.
This process continues until the handler runs till completion.
## Durable Execution
Restate uses Durable Execution to ensure your orchestration logic survives failures and restarts.
Whenever a handler executes an action with the Restate `Context`, this gets send over to the Restate Server and persisted in a log.
On a failure or a crash, the Restate Server sends a retry request that contains the log of the actions that were executed so far.
The service then replays the log to restore state and continues executing the remaining actions.
This process continues until the handler runs till completion.
 **Key Benefits:**
* Context `run` actions make external calls or non-deterministic operations durable. They get replayed on failures.
* If the service crashes after payment creation, it resumes at the subscription step
* Deterministic IDs logged with the context ensure operations are idempotent
* Full execution traces for debugging and monitoring
**Key Benefits:**
* Context `run` actions make external calls or non-deterministic operations durable. They get replayed on failures.
* If the service crashes after payment creation, it resumes at the subscription step
* Deterministic IDs logged with the context ensure operations are idempotent
* Full execution traces for debugging and monitoring
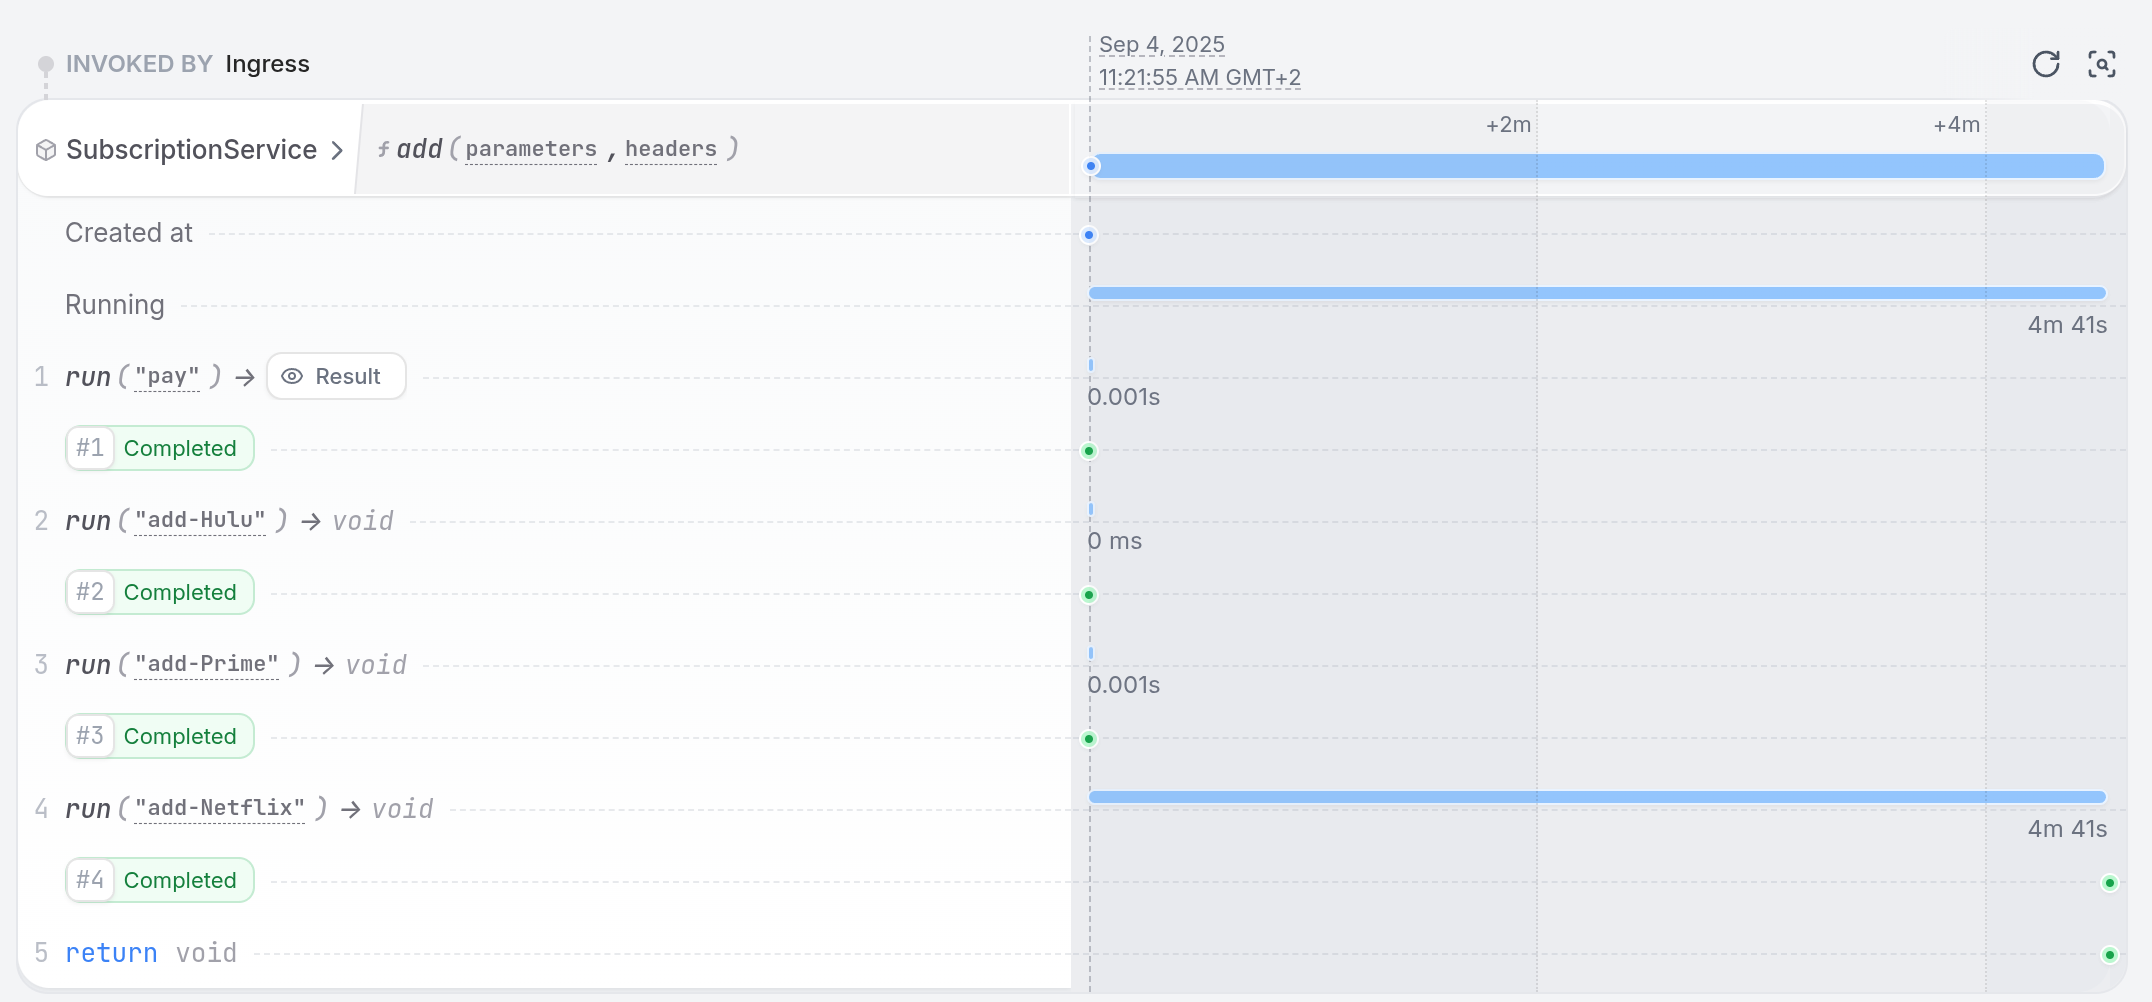
 To fix the problem, remove the line `failOnNetflix` from the `createSubscription` function in the `utils.ts` file:
```ts {"CODE_LOAD::https://raw.githubusercontent.com/restatedev/examples/refs/heads/main/typescript/tutorials/tour-of-orchestration-typescript/src/utils.ts#subscription"} theme={null}
export function createSubscription(
userId: string,
subscription: string,
_paymentRef: string,
): string {
failOnNetflix(subscription);
terminalErrorOnDisney(subscription);
console.log(`>>> Created subscription ${subscription} for user ${userId}`);
return "SUCCESS";
}
```
To fix the problem, remove the line `failOnNetflix` from the `createSubscription` function in the `utils.ts` file:
```ts {"CODE_LOAD::https://raw.githubusercontent.com/restatedev/examples/refs/heads/main/typescript/tutorials/tour-of-orchestration-typescript/src/utils.ts#subscription"} theme={null}
export function createSubscription(
userId: string,
subscription: string,
_paymentRef: string,
): string {
failOnNetflix(subscription);
terminalErrorOnDisney(subscription);
console.log(`>>> Created subscription ${subscription} for user ${userId}`);
return "SUCCESS";
}
```
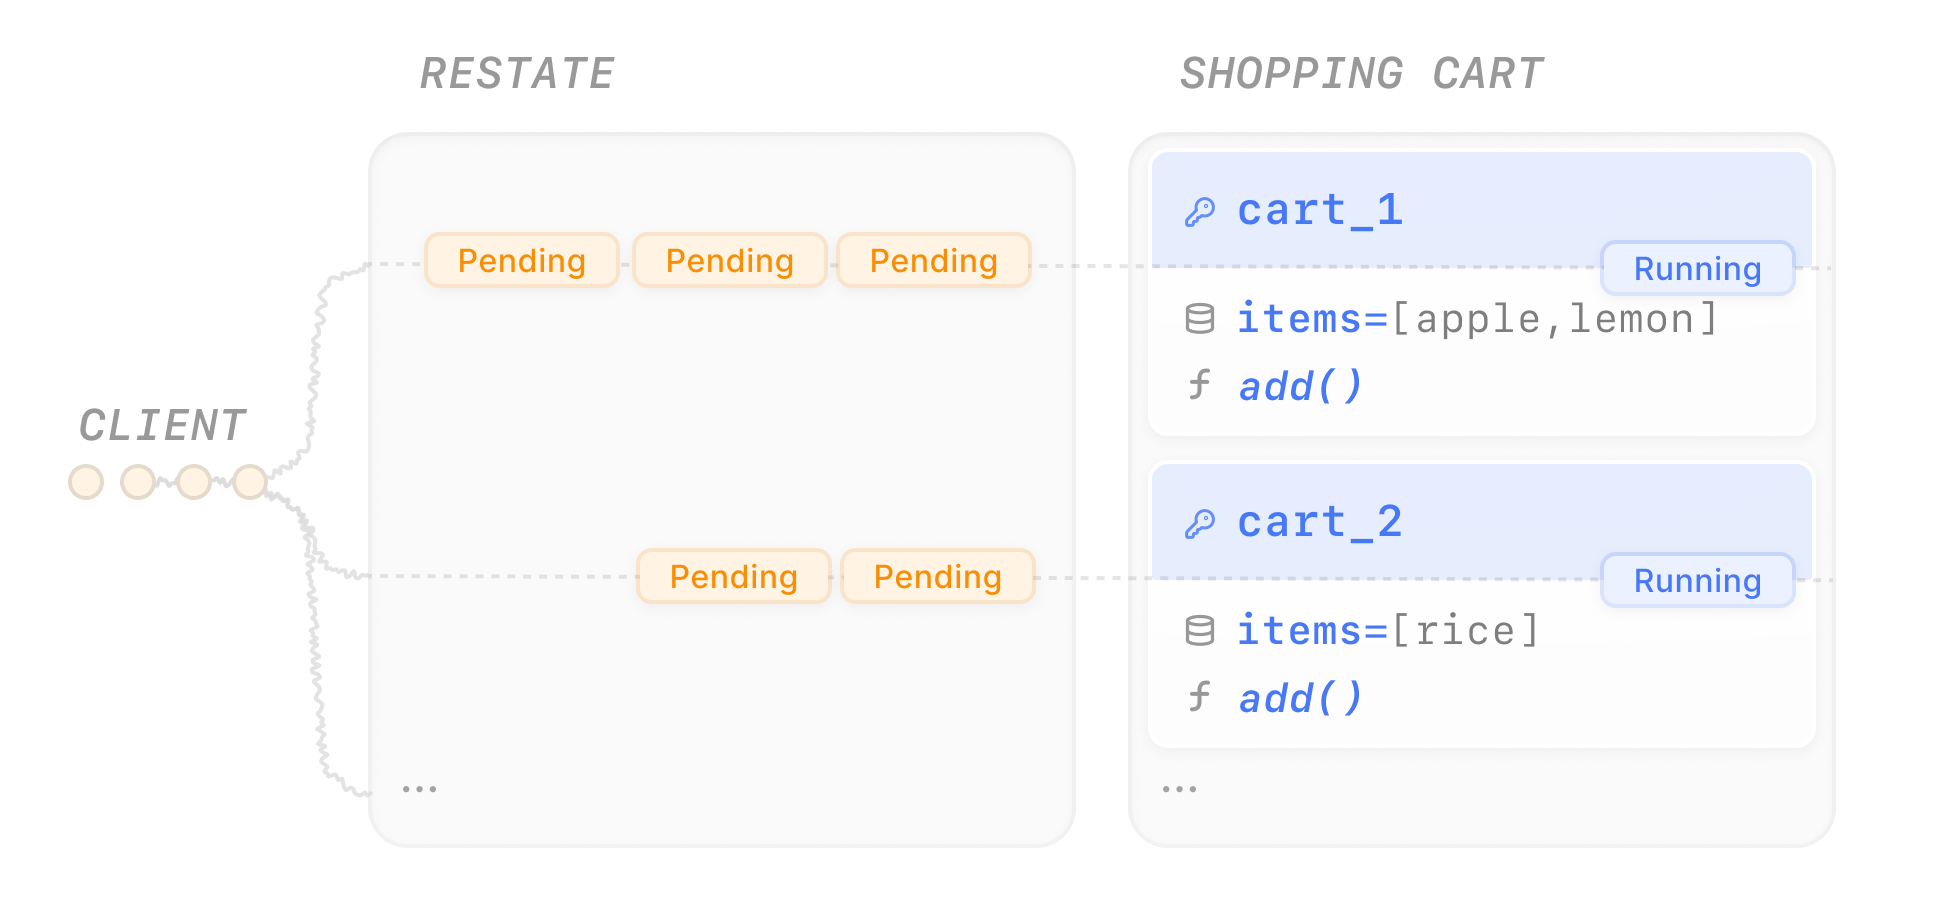
 * **Built-in concurrency control**: Restate’s Virtual Objects have built-in queuing and consistency guarantees per object key. Handlers either have read-write access (`ObjectContext`) or read-only access (shared object context).
* Only one handler with write access can run at a time per object key to prevent concurrent/lost writes or race conditions.
* Handlers with read-only access can run concurrently to the write-access handlers.
* **Built-in concurrency control**: Restate’s Virtual Objects have built-in queuing and consistency guarantees per object key. Handlers either have read-write access (`ObjectContext`) or read-only access (shared object context).
* Only one handler with write access can run at a time per object key to prevent concurrent/lost writes or race conditions.
* Handlers with read-only access can run concurrently to the write-access handlers.


 Restate works with how you already deploy your agents, whether that's in Docker, on Kubernetes, or via serverless platforms (Modal, AWS Lambda...). You don't need to run your agents in any special way.
Let's run an example locally to get a better feel for how it works.
### Run the agent
[Install Restate](/installation) and launch it:
```bash theme={null}
restate-server
```
Get the example:
```bash theme={null}
git clone git@github.com:restatedev/ai-examples.git
cd ai-examples/openai-agents/tour-of-agents
```
Restate works with how you already deploy your agents, whether that's in Docker, on Kubernetes, or via serverless platforms (Modal, AWS Lambda...). You don't need to run your agents in any special way.
Let's run an example locally to get a better feel for how it works.
### Run the agent
[Install Restate](/installation) and launch it:
```bash theme={null}
restate-server
```
Get the example:
```bash theme={null}
git clone git@github.com:restatedev/ai-examples.git
cd ai-examples/openai-agents/tour-of-agents
```
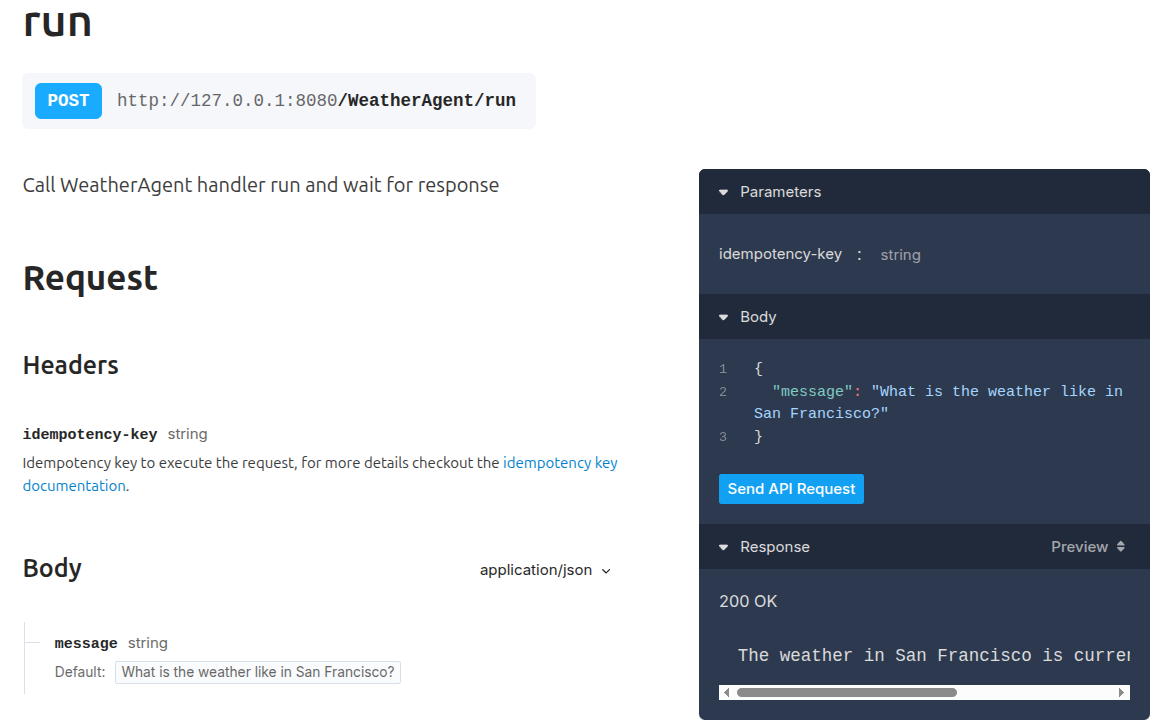 Or via `curl`:
```bash theme={null}
curl localhost:8080/WeatherAgent/run \
--json '{"message": "What is the weather like in San Francisco?"}'
```
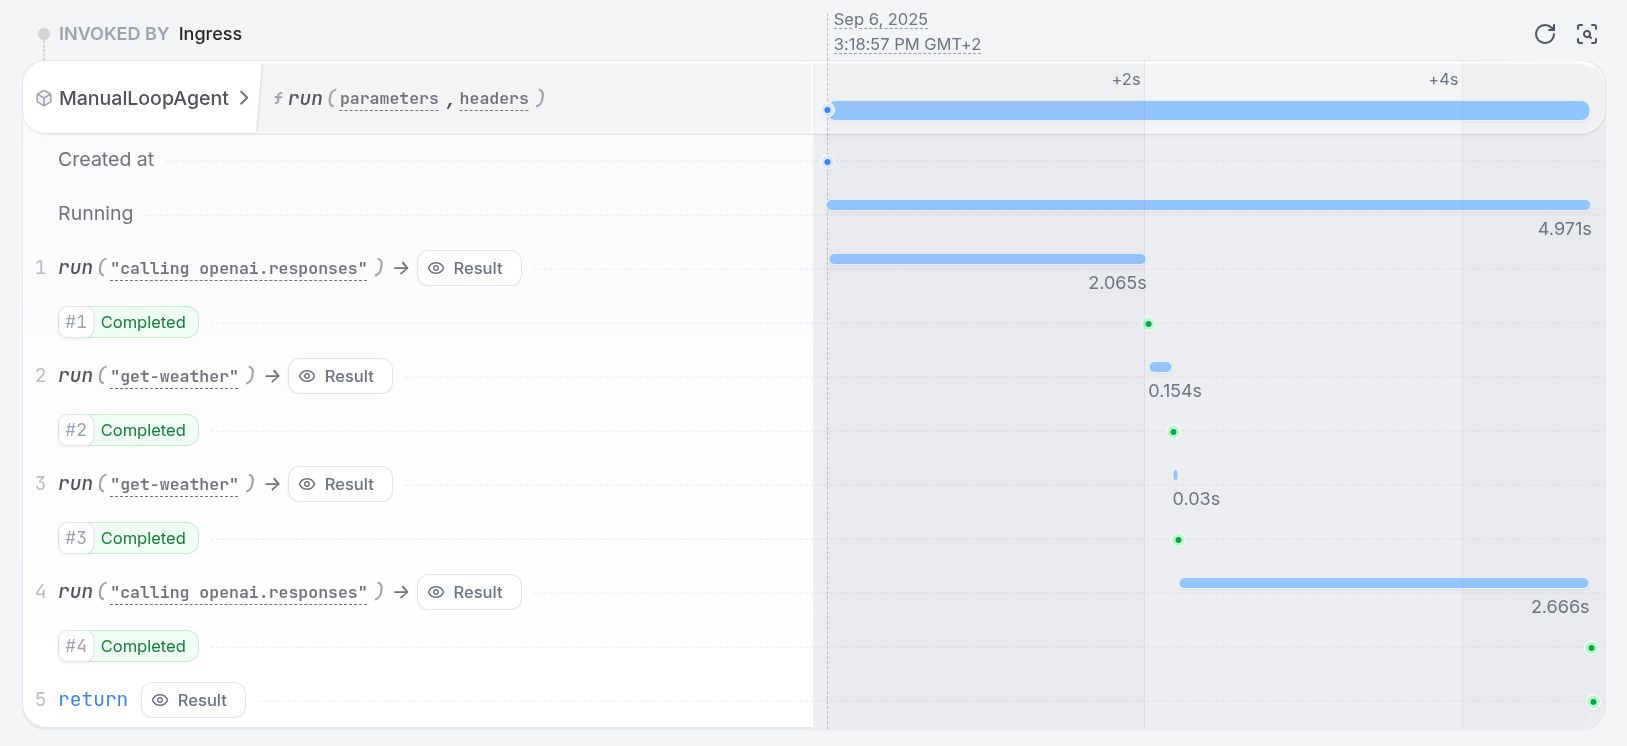
You should see the weather information printed in the terminal.
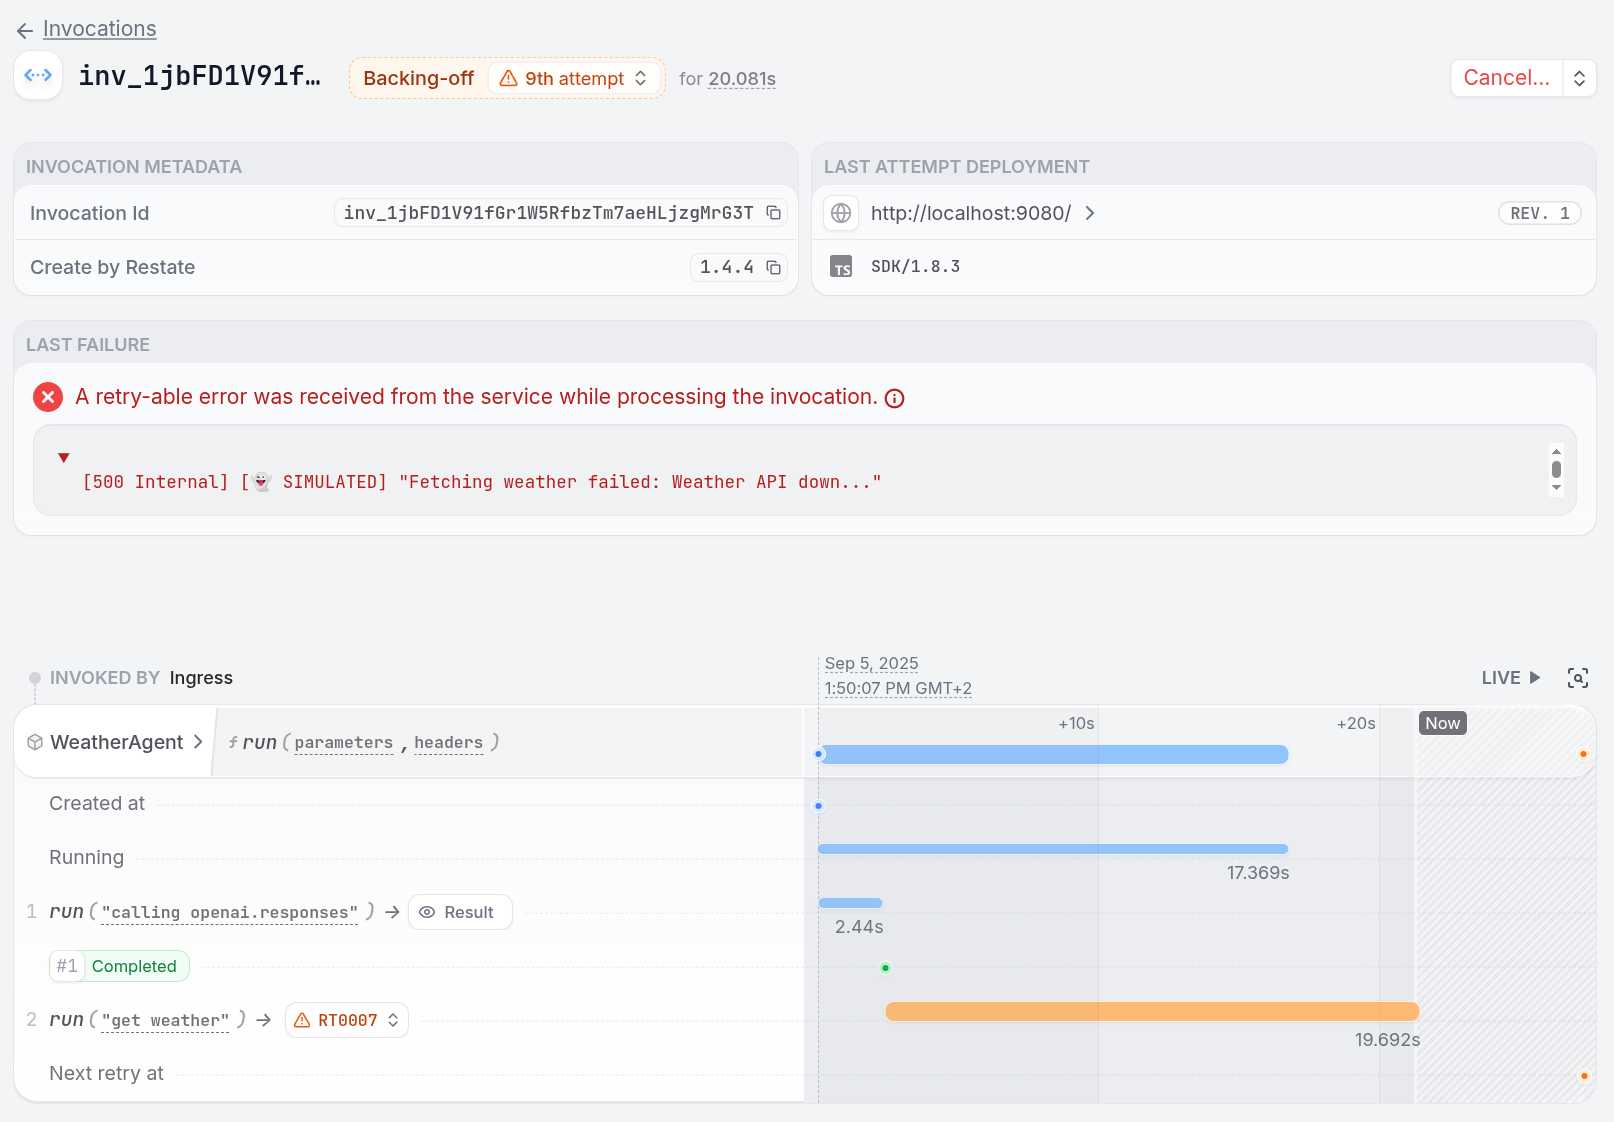
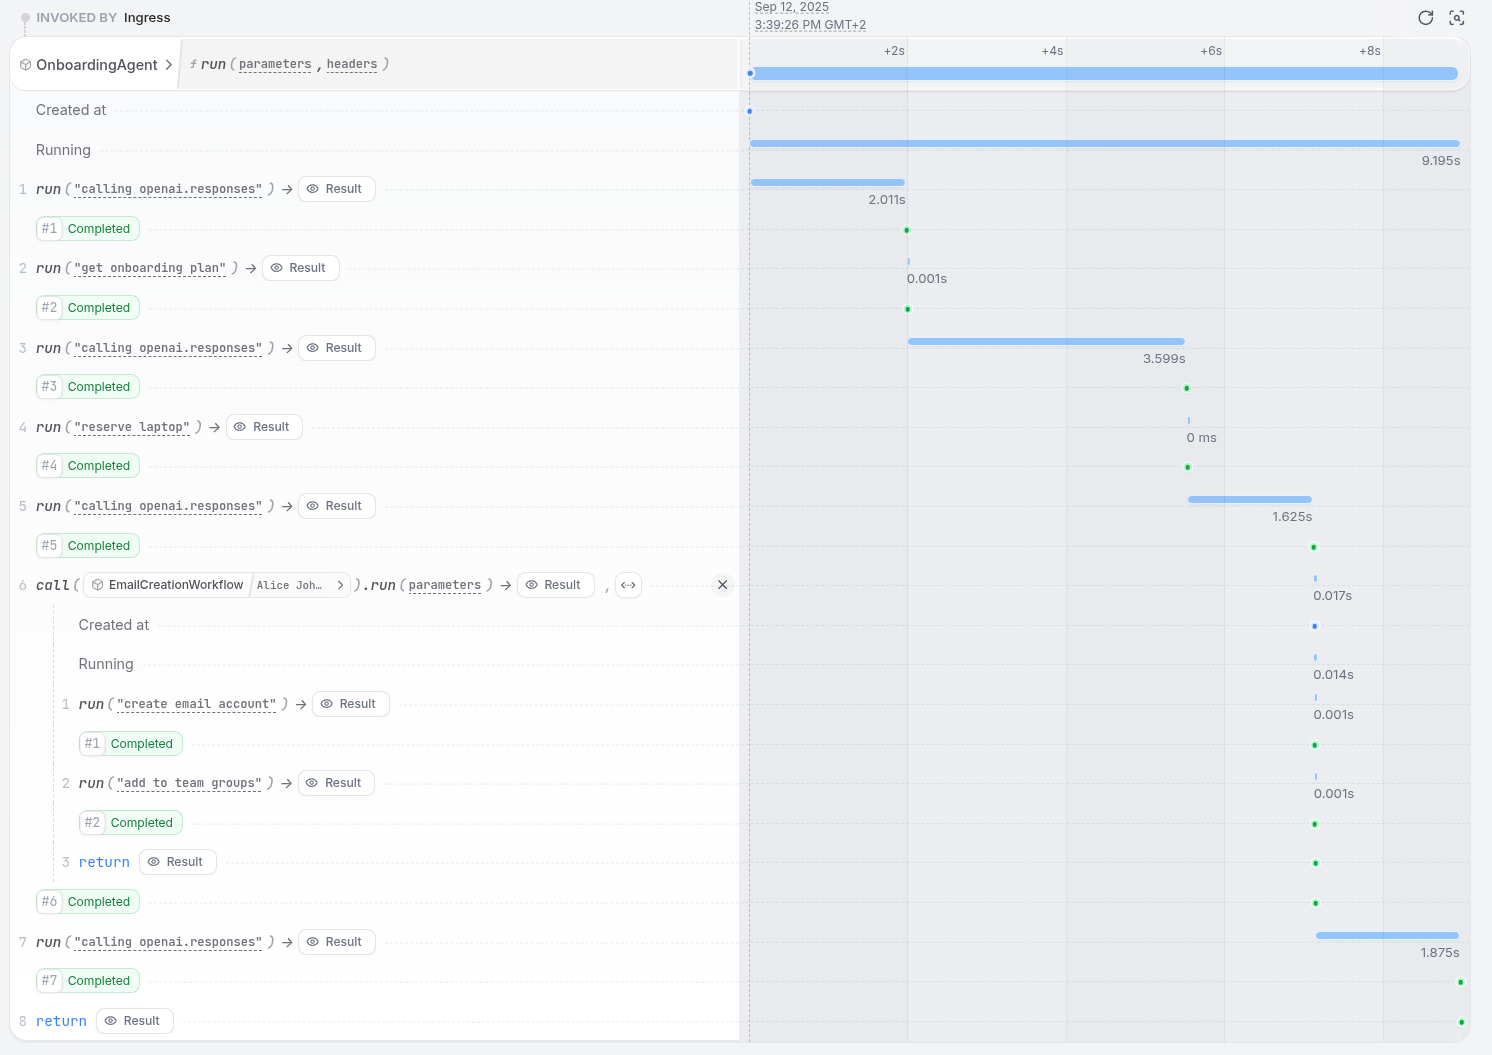
Let's have a look at what happened under the hood to make your agents resilient.
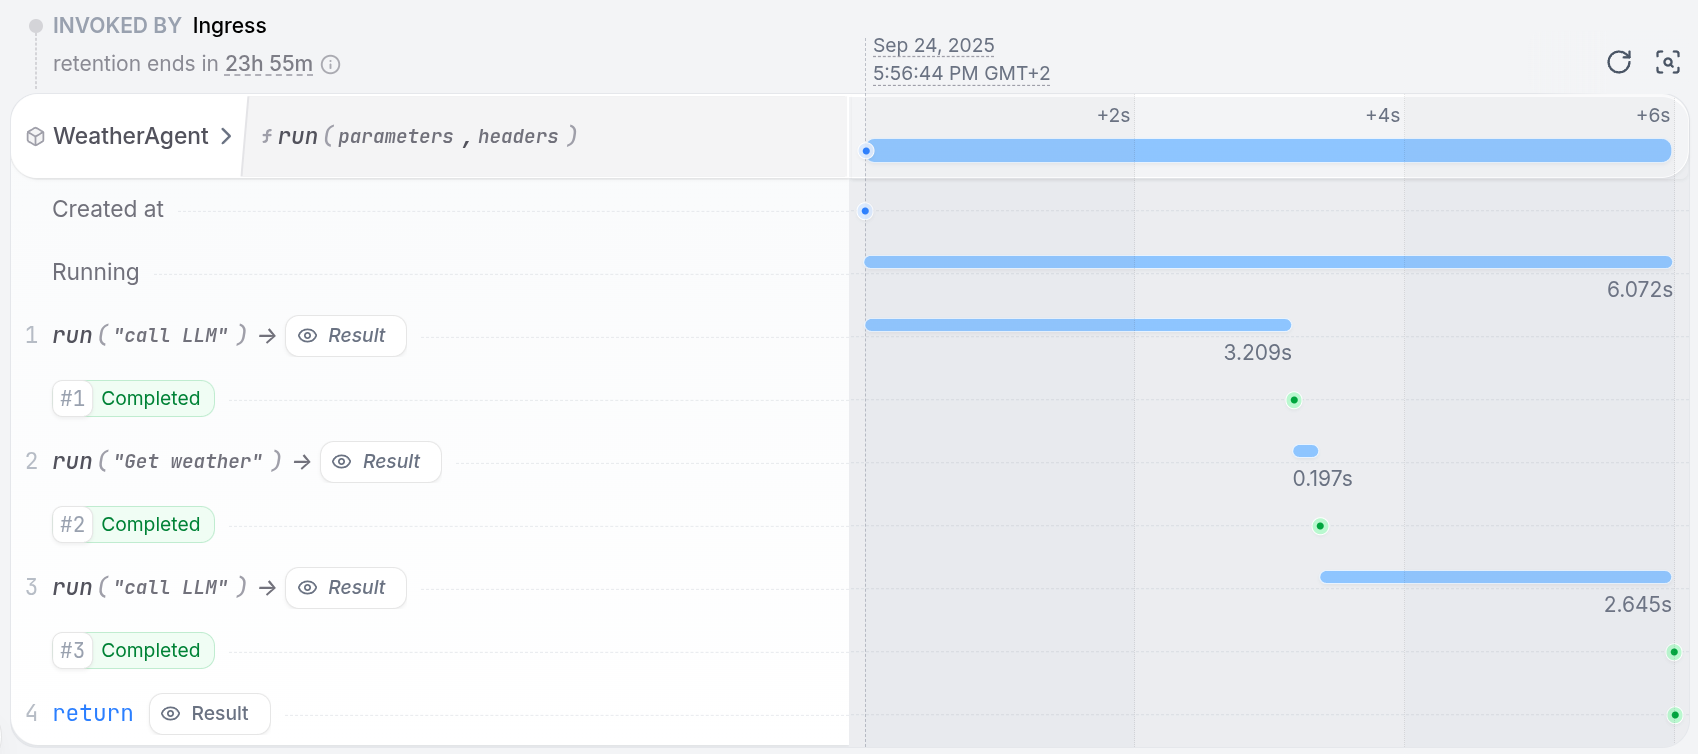
## Durable Execution
AI agents make multiple LLM calls and tool executions that can fail due to rate limits, network issues, or service outages.
Restate uses Durable Execution to make your agents withstand failures without losing progress.
The Restate SDK records the steps the agent executes in a log and replays them if the process crashes or is restarted:
Or via `curl`:
```bash theme={null}
curl localhost:8080/WeatherAgent/run \
--json '{"message": "What is the weather like in San Francisco?"}'
```
You should see the weather information printed in the terminal.
Let's have a look at what happened under the hood to make your agents resilient.
## Durable Execution
AI agents make multiple LLM calls and tool executions that can fail due to rate limits, network issues, or service outages.
Restate uses Durable Execution to make your agents withstand failures without losing progress.
The Restate SDK records the steps the agent executes in a log and replays them if the process crashes or is restarted:
 Durable Execution is the basis of how Restate makes your agents resilient to failures.
Restate offers durable execution primitives via its SDK.
## Creating a Durable Agent
To implement a durable agent, you can use the Restate SDK in combination with the OpenAI Agent SDK.
Here's the implementation of the durable weather agent you just invoked:
```python durable_agent.py {"CODE_LOAD::https://raw.githubusercontent.com/restatedev/ai-examples/refs/heads/main/openai-agents/tour-of-agents/app/durable_agent.py?collapse_imports"} theme={null}
@function_tool(failure_error_function=raise_restate_errors)
async def get_weather(
wrapper: RunContextWrapper[restate.Context], req: WeatherRequest
) -> WeatherResponse:
"""Get the current weather for a given city."""
# Do durable steps using the Restate context
restate_context = wrapper.context
return await restate_context.run_typed("Get weather", fetch_weather, city=req.city)
weather_agent = Agent[restate.Context](
name="WeatherAgent",
instructions="You are a helpful agent that provides weather updates.",
tools=[get_weather],
)
agent_service = restate.Service("WeatherAgent")
@agent_service.handler()
async def run(restate_context: restate.Context, prompt: WeatherPrompt) -> str:
result = await Runner.run(
weather_agent,
input=prompt.message,
# Pass the Restate context to tools to make tool execution steps durable
context=restate_context,
# Choose any model and let Restate persist your calls
run_config=RunConfig(
model="gpt-4o",
model_provider=DurableModelCalls(restate_context),
model_settings=ModelSettings(parallel_tool_calls=False),
),
)
return result.final_output
```
Durable Execution is the basis of how Restate makes your agents resilient to failures.
Restate offers durable execution primitives via its SDK.
## Creating a Durable Agent
To implement a durable agent, you can use the Restate SDK in combination with the OpenAI Agent SDK.
Here's the implementation of the durable weather agent you just invoked:
```python durable_agent.py {"CODE_LOAD::https://raw.githubusercontent.com/restatedev/ai-examples/refs/heads/main/openai-agents/tour-of-agents/app/durable_agent.py?collapse_imports"} theme={null}
@function_tool(failure_error_function=raise_restate_errors)
async def get_weather(
wrapper: RunContextWrapper[restate.Context], req: WeatherRequest
) -> WeatherResponse:
"""Get the current weather for a given city."""
# Do durable steps using the Restate context
restate_context = wrapper.context
return await restate_context.run_typed("Get weather", fetch_weather, city=req.city)
weather_agent = Agent[restate.Context](
name="WeatherAgent",
instructions="You are a helpful agent that provides weather updates.",
tools=[get_weather],
)
agent_service = restate.Service("WeatherAgent")
@agent_service.handler()
async def run(restate_context: restate.Context, prompt: WeatherPrompt) -> str:
result = await Runner.run(
weather_agent,
input=prompt.message,
# Pass the Restate context to tools to make tool execution steps durable
context=restate_context,
# Choose any model and let Restate persist your calls
run_config=RunConfig(
model="gpt-4o",
model_provider=DurableModelCalls(restate_context),
model_settings=ModelSettings(parallel_tool_calls=False),
),
)
return result.final_output
```
 To fix the problem, remove the line `fail_on_denver` from the `fetch_weather` function in the `app/utils/utils.py` file:
```python utils/utils.py {"CODE_LOAD::https://raw.githubusercontent.com/restatedev/ai-examples/refs/heads/main/openai-agents/tour-of-agents/app/utils/utils.py#weather"} theme={null}
async def fetch_weather(city: str) -> WeatherResponse:
fail_on_denver(city)
weather_data = await call_weather_api(city)
return parse_weather_data(weather_data)
```
Once you restart the service, the workflow finishes successfully.
To fix the problem, remove the line `fail_on_denver` from the `fetch_weather` function in the `app/utils/utils.py` file:
```python utils/utils.py {"CODE_LOAD::https://raw.githubusercontent.com/restatedev/ai-examples/refs/heads/main/openai-agents/tour-of-agents/app/utils/utils.py#weather"} theme={null}
async def fetch_weather(city: str) -> WeatherResponse:
fail_on_denver(city)
weather_data = await call_weather_api(city)
return parse_weather_data(weather_data)
```
Once you restart the service, the workflow finishes successfully.
 ```python chat.py {"CODE_LOAD::https://raw.githubusercontent.com/restatedev/ai-examples/refs/heads/main/openai-agents/tour-of-agents/app/chat.py?collapse_imports"} theme={null}
chat = VirtualObject("Chat")
@chat.handler()
async def message(restate_context: ObjectContext, chat_message: ChatMessage) -> dict:
restate_session = await RestateSession.create(
session_id=restate_context.key(), ctx=restate_context
)
result = await Runner.run(
Agent(name="Assistant", instructions="You are a helpful assistant."),
input=chat_message.message,
run_config=RunConfig(
model="gpt-4o",
model_provider=DurableModelCalls(restate_context),
model_settings=ModelSettings(parallel_tool_calls=False),
),
session=restate_session,
)
return result.final_output
@chat.handler(kind="shared")
async def get_history(ctx: ObjectSharedContext):
return await ctx.get("items") or []
```
```python chat.py {"CODE_LOAD::https://raw.githubusercontent.com/restatedev/ai-examples/refs/heads/main/openai-agents/tour-of-agents/app/chat.py?collapse_imports"} theme={null}
chat = VirtualObject("Chat")
@chat.handler()
async def message(restate_context: ObjectContext, chat_message: ChatMessage) -> dict:
restate_session = await RestateSession.create(
session_id=restate_context.key(), ctx=restate_context
)
result = await Runner.run(
Agent(name="Assistant", instructions="You are a helpful assistant."),
input=chat_message.message,
run_config=RunConfig(
model="gpt-4o",
model_provider=DurableModelCalls(restate_context),
model_settings=ModelSettings(parallel_tool_calls=False),
),
session=restate_session,
)
return result.final_output
@chat.handler(kind="shared")
async def get_history(ctx: ObjectSharedContext):
return await ctx.get("items") or []
```
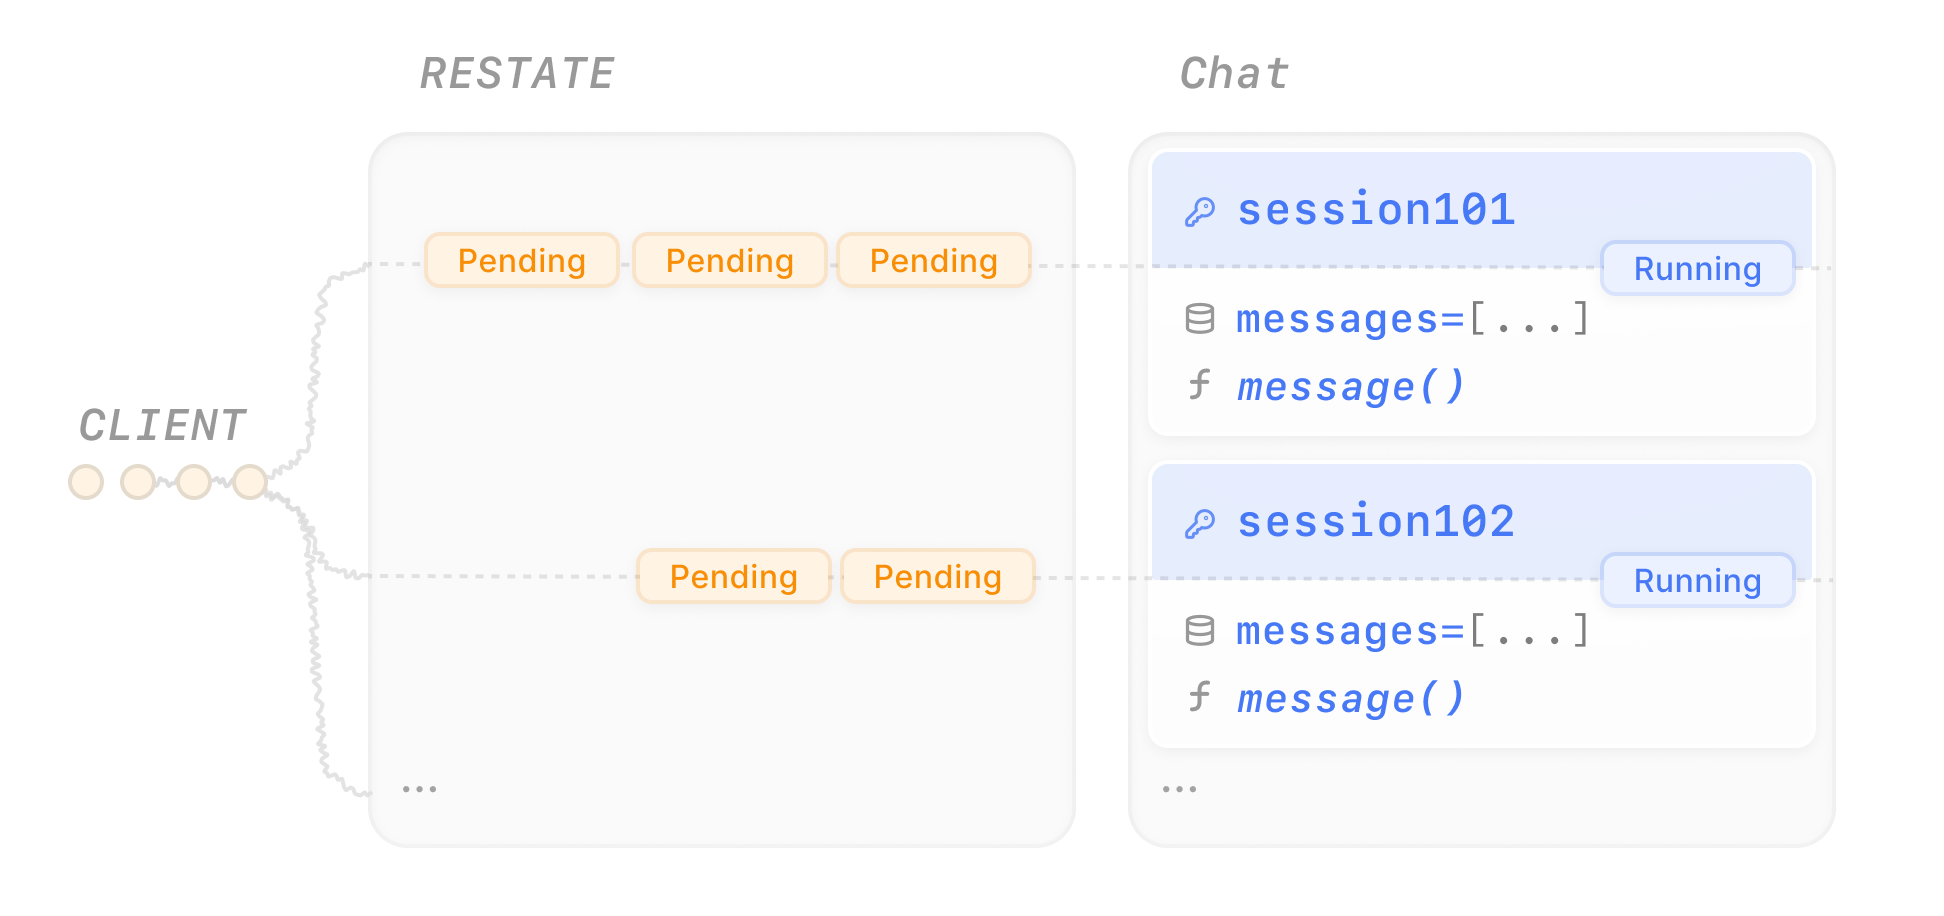
 * **Built-in concurrency control**: Restate’s Virtual Objects have built-in queuing and consistency guarantees per object key. Handlers either have read-write access (`ObjectContext`) or read-only access (shared object context).
* Only one handler with write access can run at a time per object key to prevent concurrent/lost writes or race conditions (for example `message()`).
* Handlers with read-only access can run concurrently to the write-access handlers (for example `get_history()`).
* **Built-in concurrency control**: Restate’s Virtual Objects have built-in queuing and consistency guarantees per object key. Handlers either have read-write access (`ObjectContext`) or read-only access (shared object context).
* Only one handler with write access can run at a time per object key to prevent concurrent/lost writes or race conditions (for example `message()`).
* Handlers with read-only access can run concurrently to the write-access handlers (for example `get_history()`).

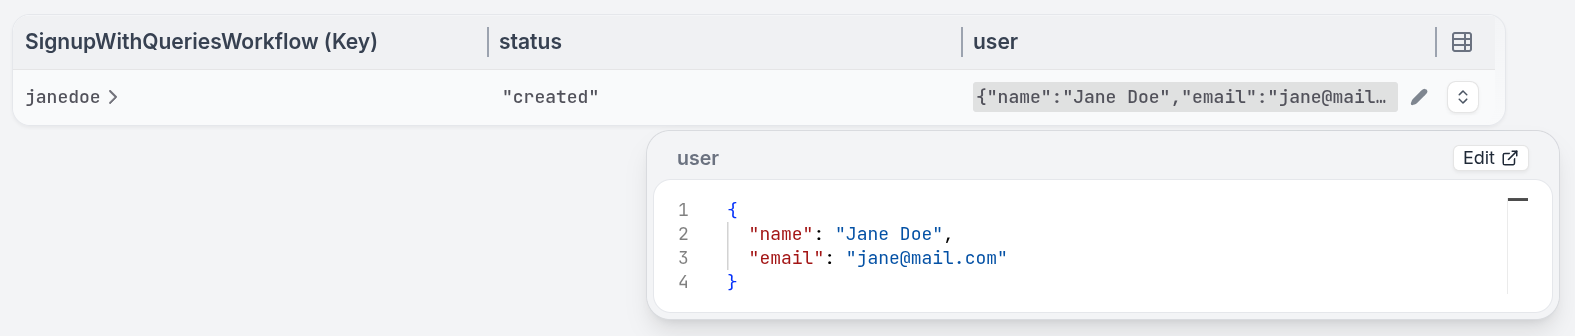
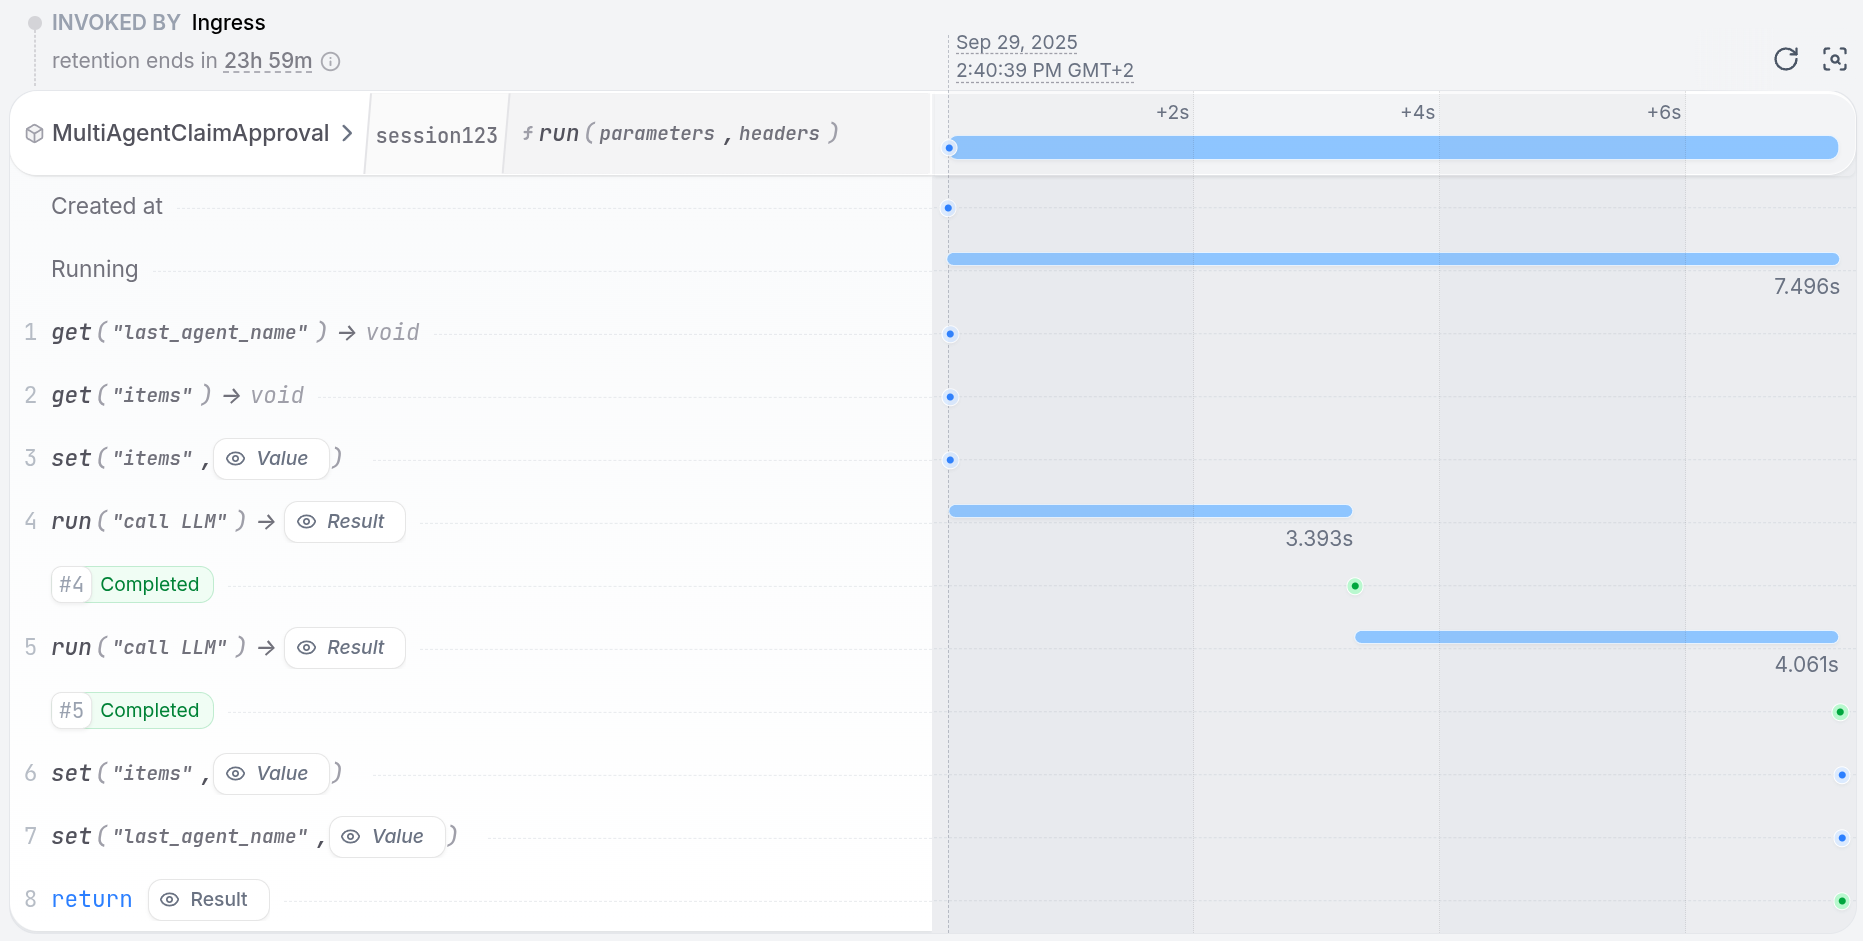 The state now contains the last agent that was called, so you can continue the conversation directly with the same agent:

 To fix the problem, remove the line `failOnDenver` from the `fetchWeather` function in the `utils.ts` file:
```ts {"CODE_LOAD::https://raw.githubusercontent.com/restatedev/ai-examples/refs/heads/main/vercel-ai/tour-of-agents/src/utils.ts#weather"} theme={null}
export async function fetchWeather(city: string) {
failOnDenver(city);
const output = await fetchWeatherFromAPI(city);
return parseWeatherResponse(output);
}
```
Once you restart the service, the workflow finishes successfully.
To fix the problem, remove the line `failOnDenver` from the `fetchWeather` function in the `utils.ts` file:
```ts {"CODE_LOAD::https://raw.githubusercontent.com/restatedev/ai-examples/refs/heads/main/vercel-ai/tour-of-agents/src/utils.ts#weather"} theme={null}
export async function fetchWeather(city: string) {
failOnDenver(city);
const output = await fetchWeatherFromAPI(city);
return parseWeatherResponse(output);
}
```
Once you restart the service, the workflow finishes successfully.
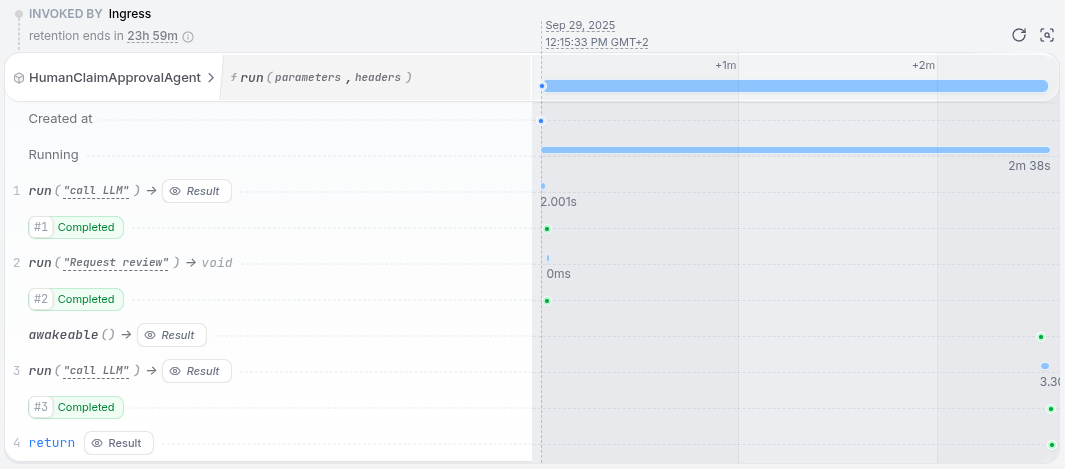
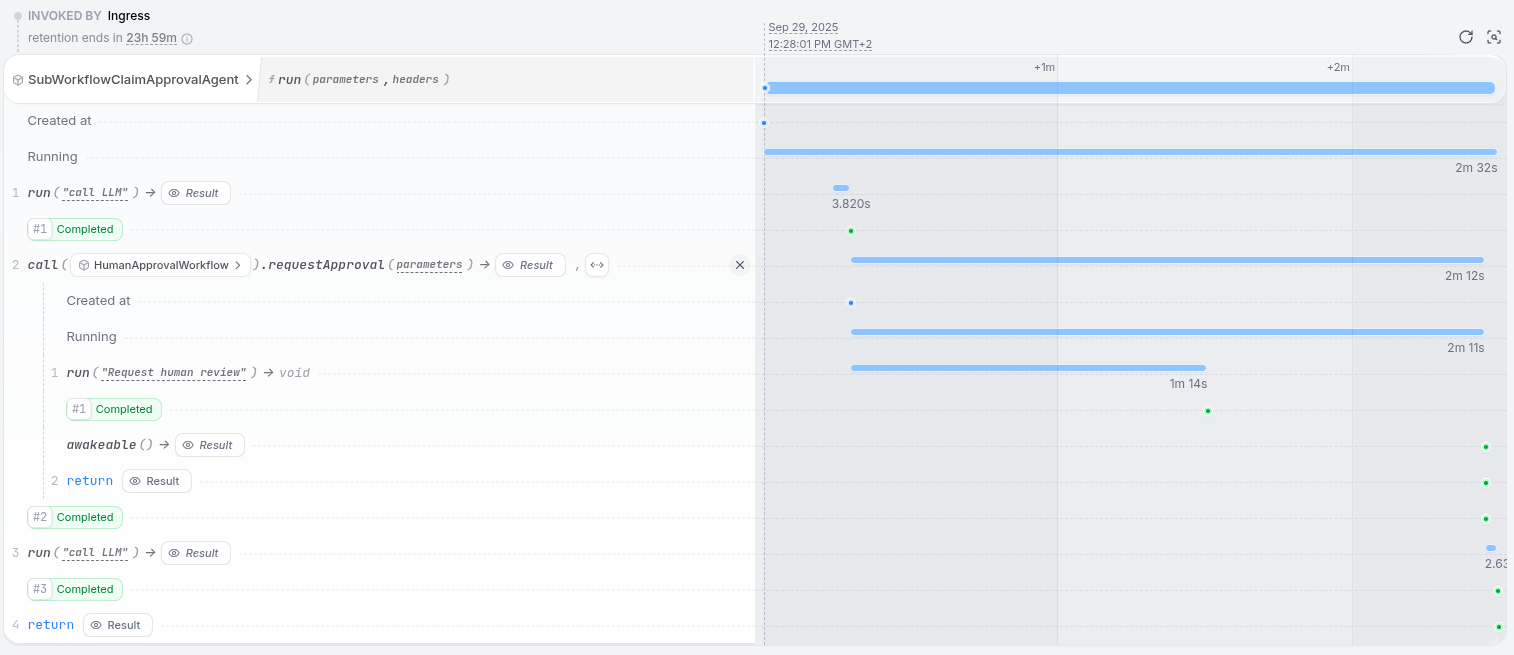
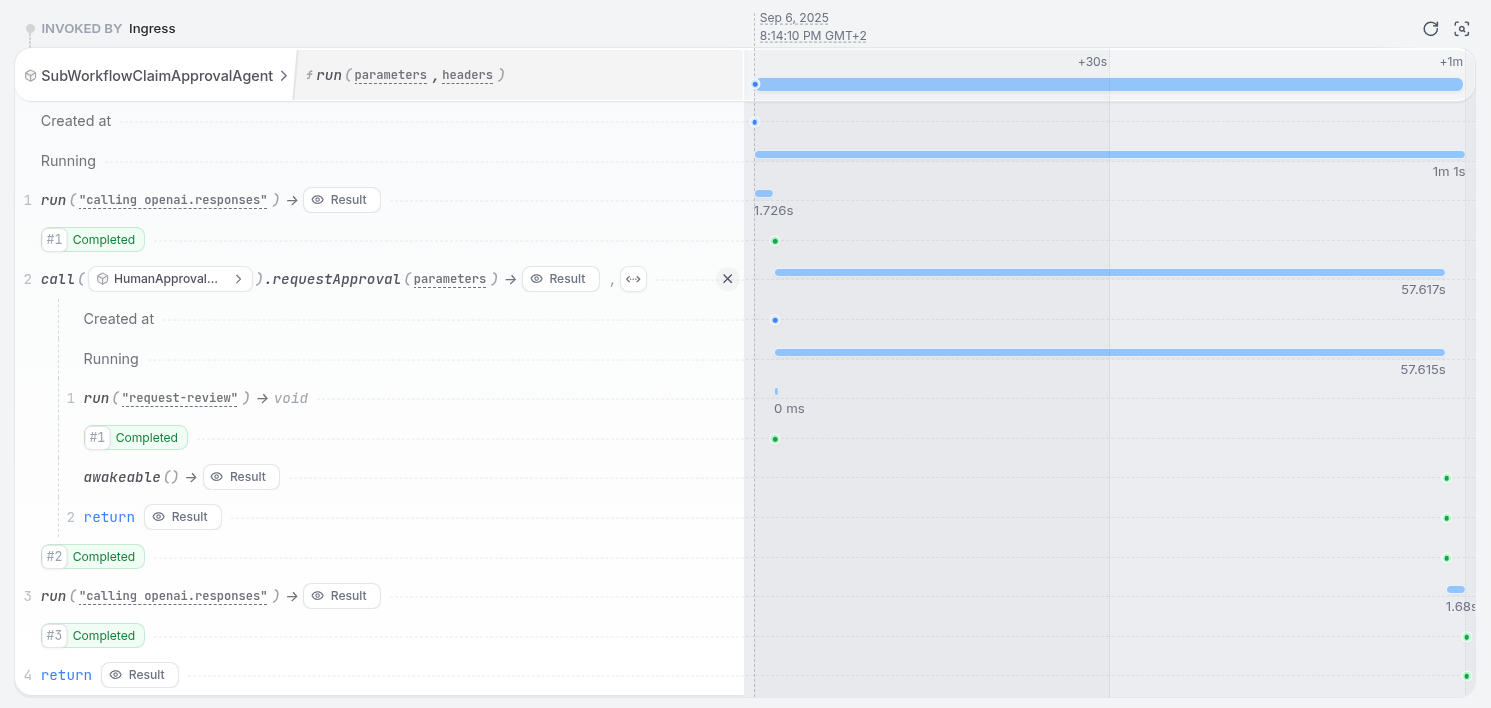
 Simulate approving the claim by executing the **curl request that was printed in the service logs**, similar to:
```bash theme={null}
curl localhost:8080/restate/awakeables/sign_1M28aqY6ZfuwBmRnmyP/resolve --json 'true'
```
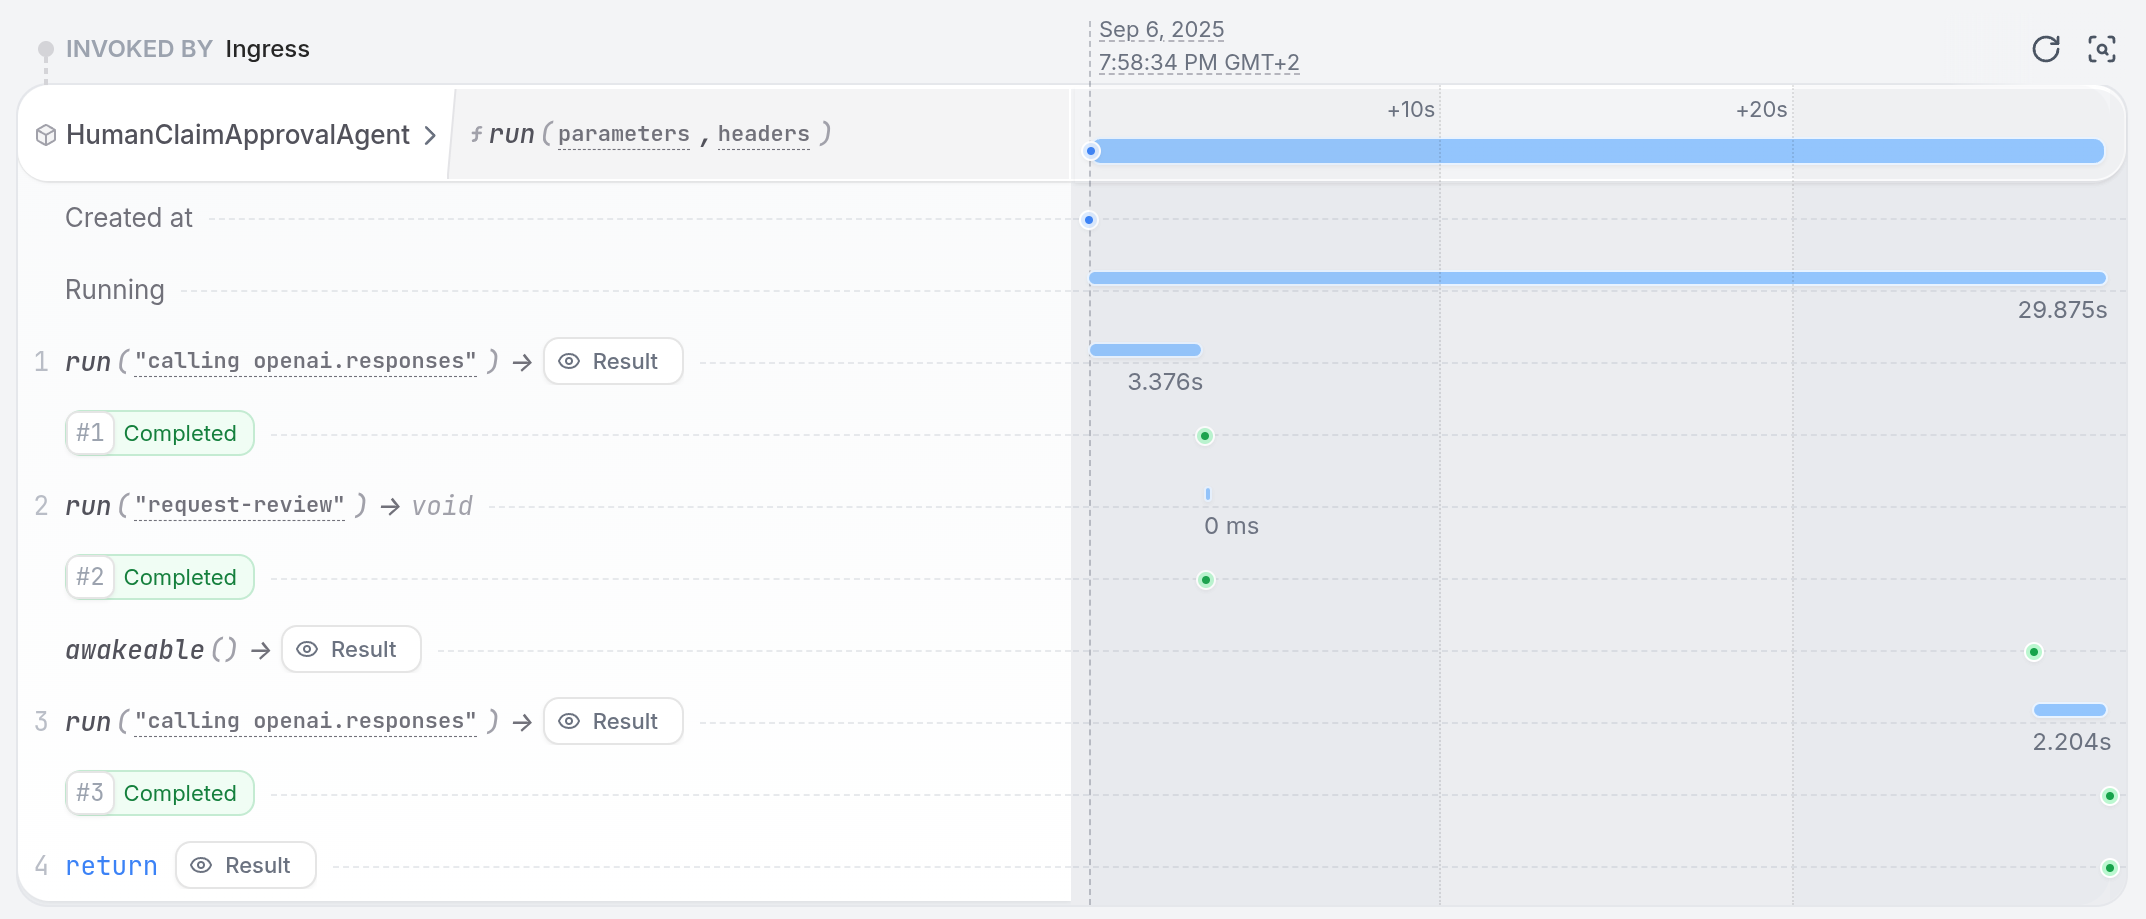
See in the UI how the workflow resumes and finishes after the approval.
Simulate approving the claim by executing the **curl request that was printed in the service logs**, similar to:
```bash theme={null}
curl localhost:8080/restate/awakeables/sign_1M28aqY6ZfuwBmRnmyP/resolve --json 'true'
```
See in the UI how the workflow resumes and finishes after the approval.

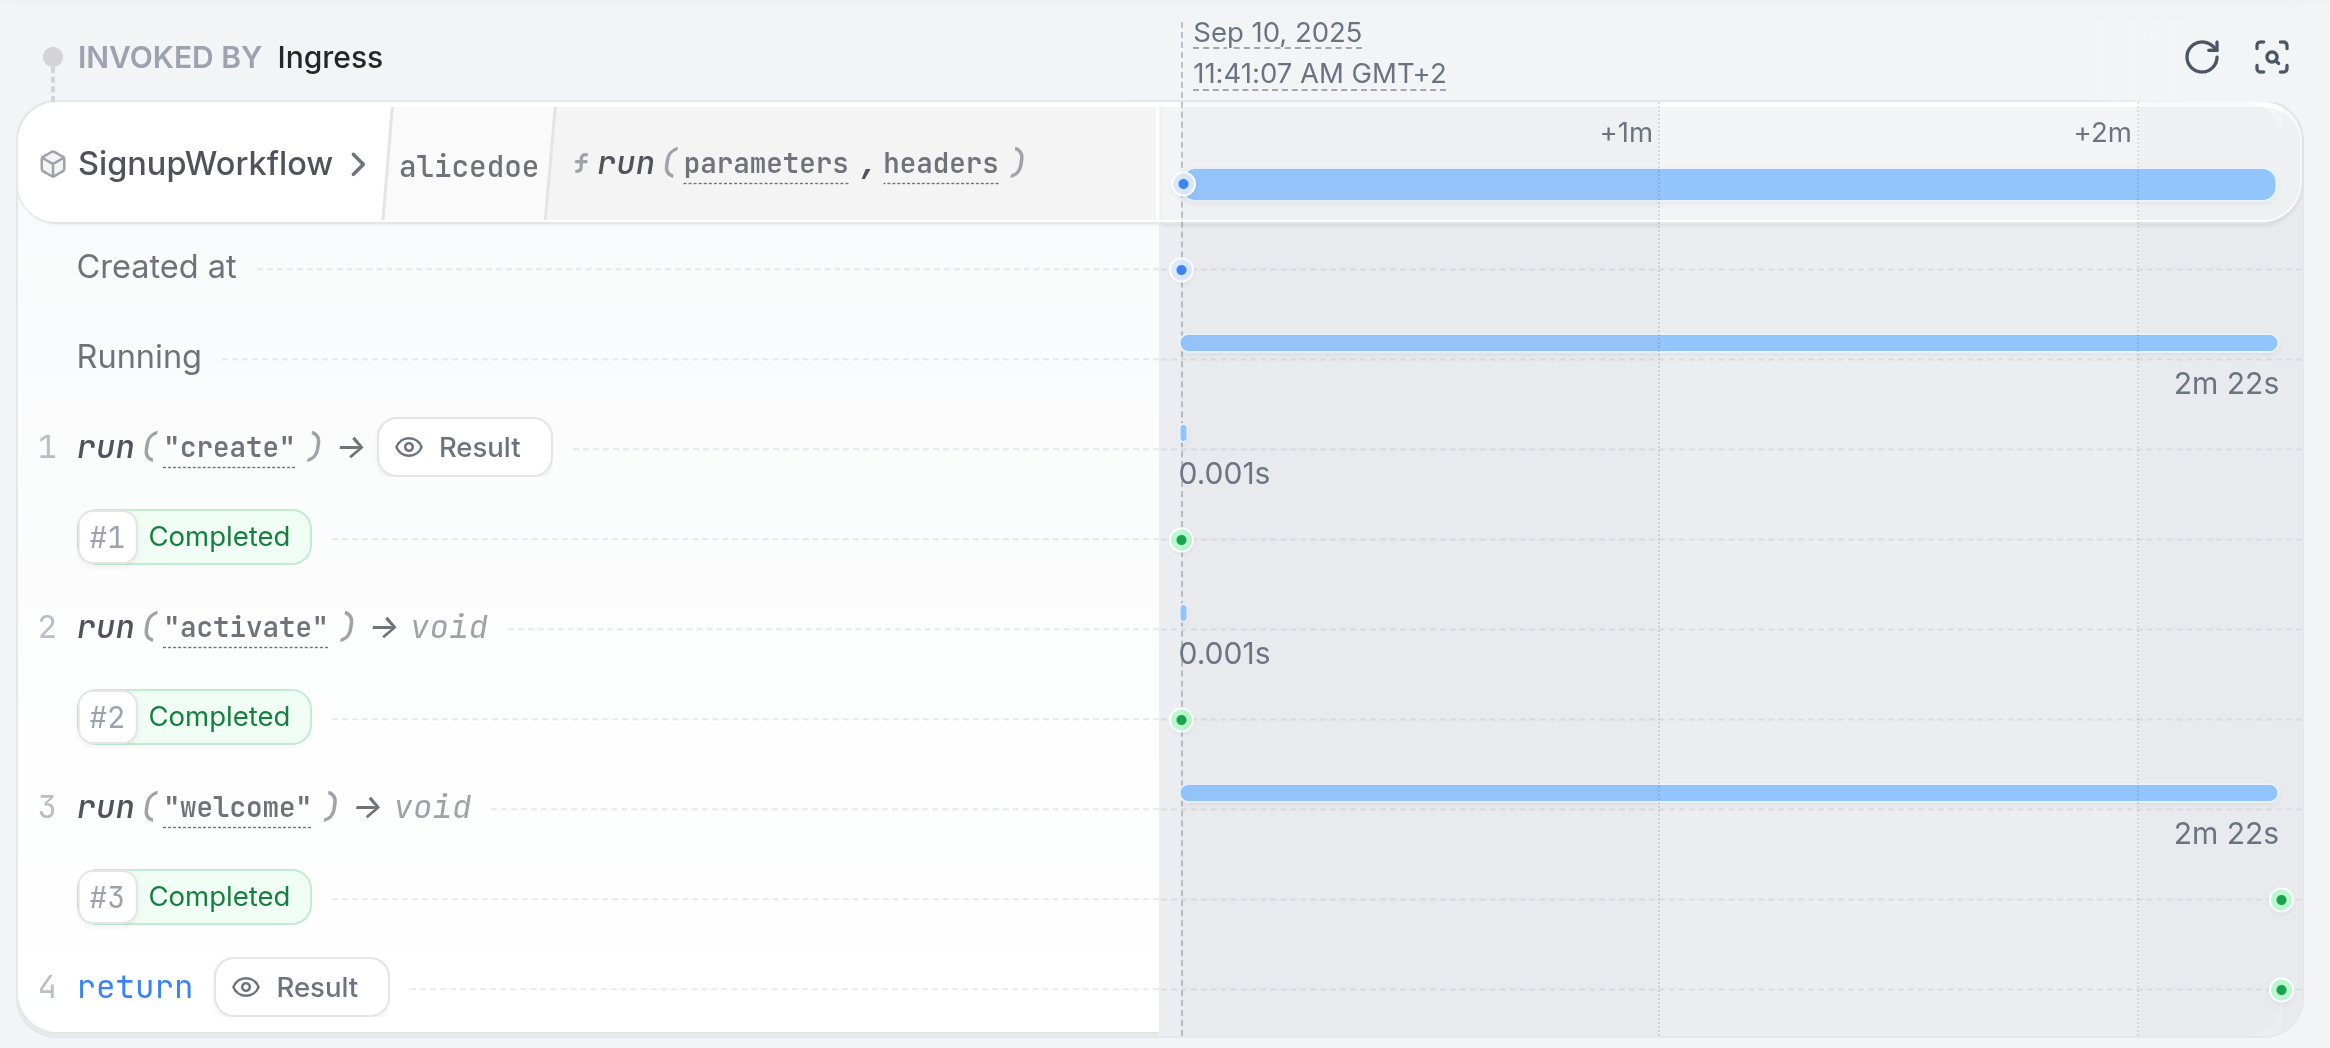
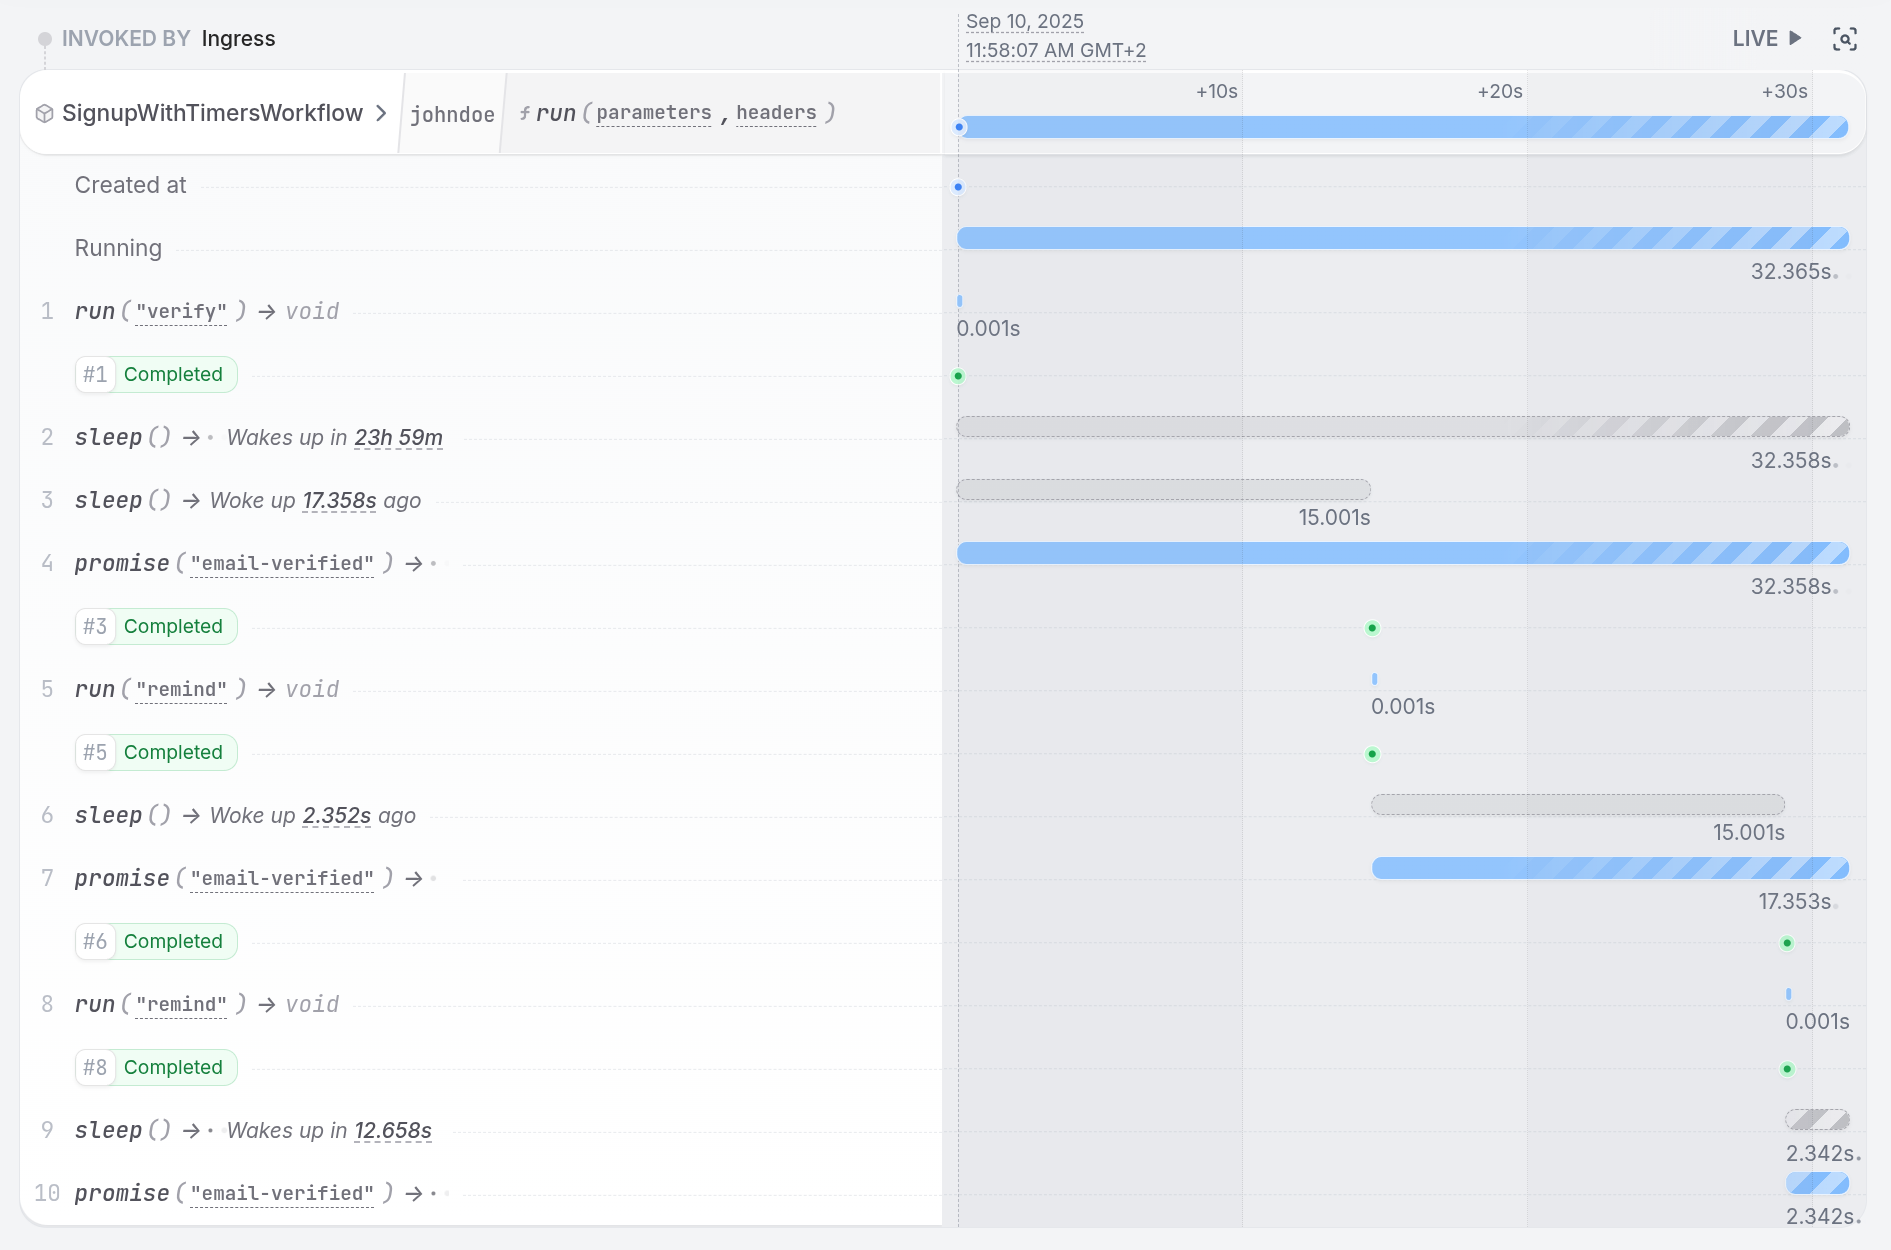
 A basic signup workflow looks like this:
 To persist a workflow step, you use the `WorkflowContext` actions:
* **Durable Steps**: Restate's run actions ensures non-deterministic operations like database writes or external API calls are persisted
* **Progress Recovery**: If the workflow crashes after user creation, it resumes at the email step
* **Observability**: Full execution traces for debugging and monitoring
To persist a workflow step, you use the `WorkflowContext` actions:
* **Durable Steps**: Restate's run actions ensures non-deterministic operations like database writes or external API calls are persisted
* **Progress Recovery**: If the workflow crashes after user creation, it resumes at the email step
* **Observability**: Full execution traces for debugging and monitoring
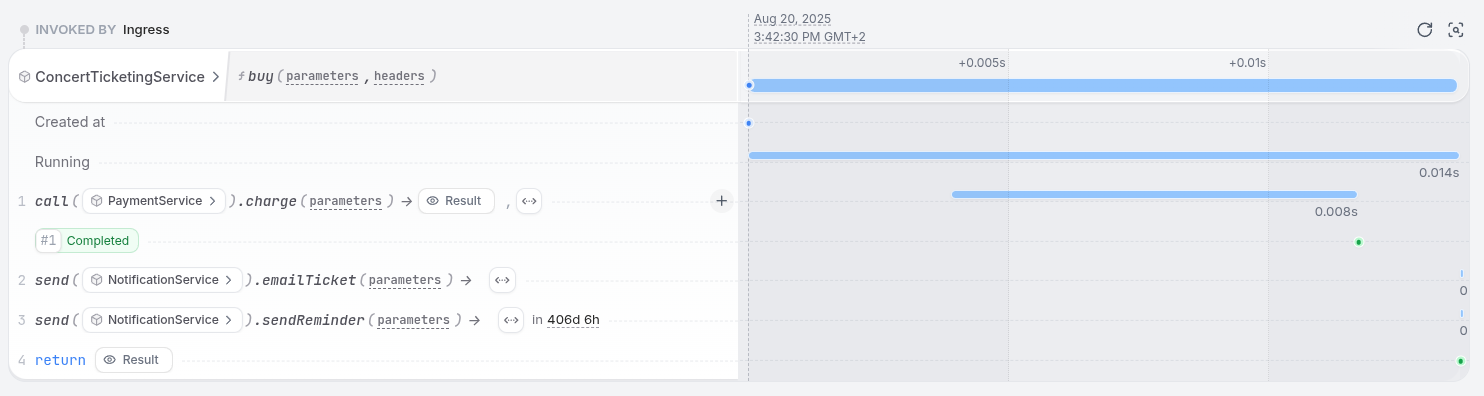
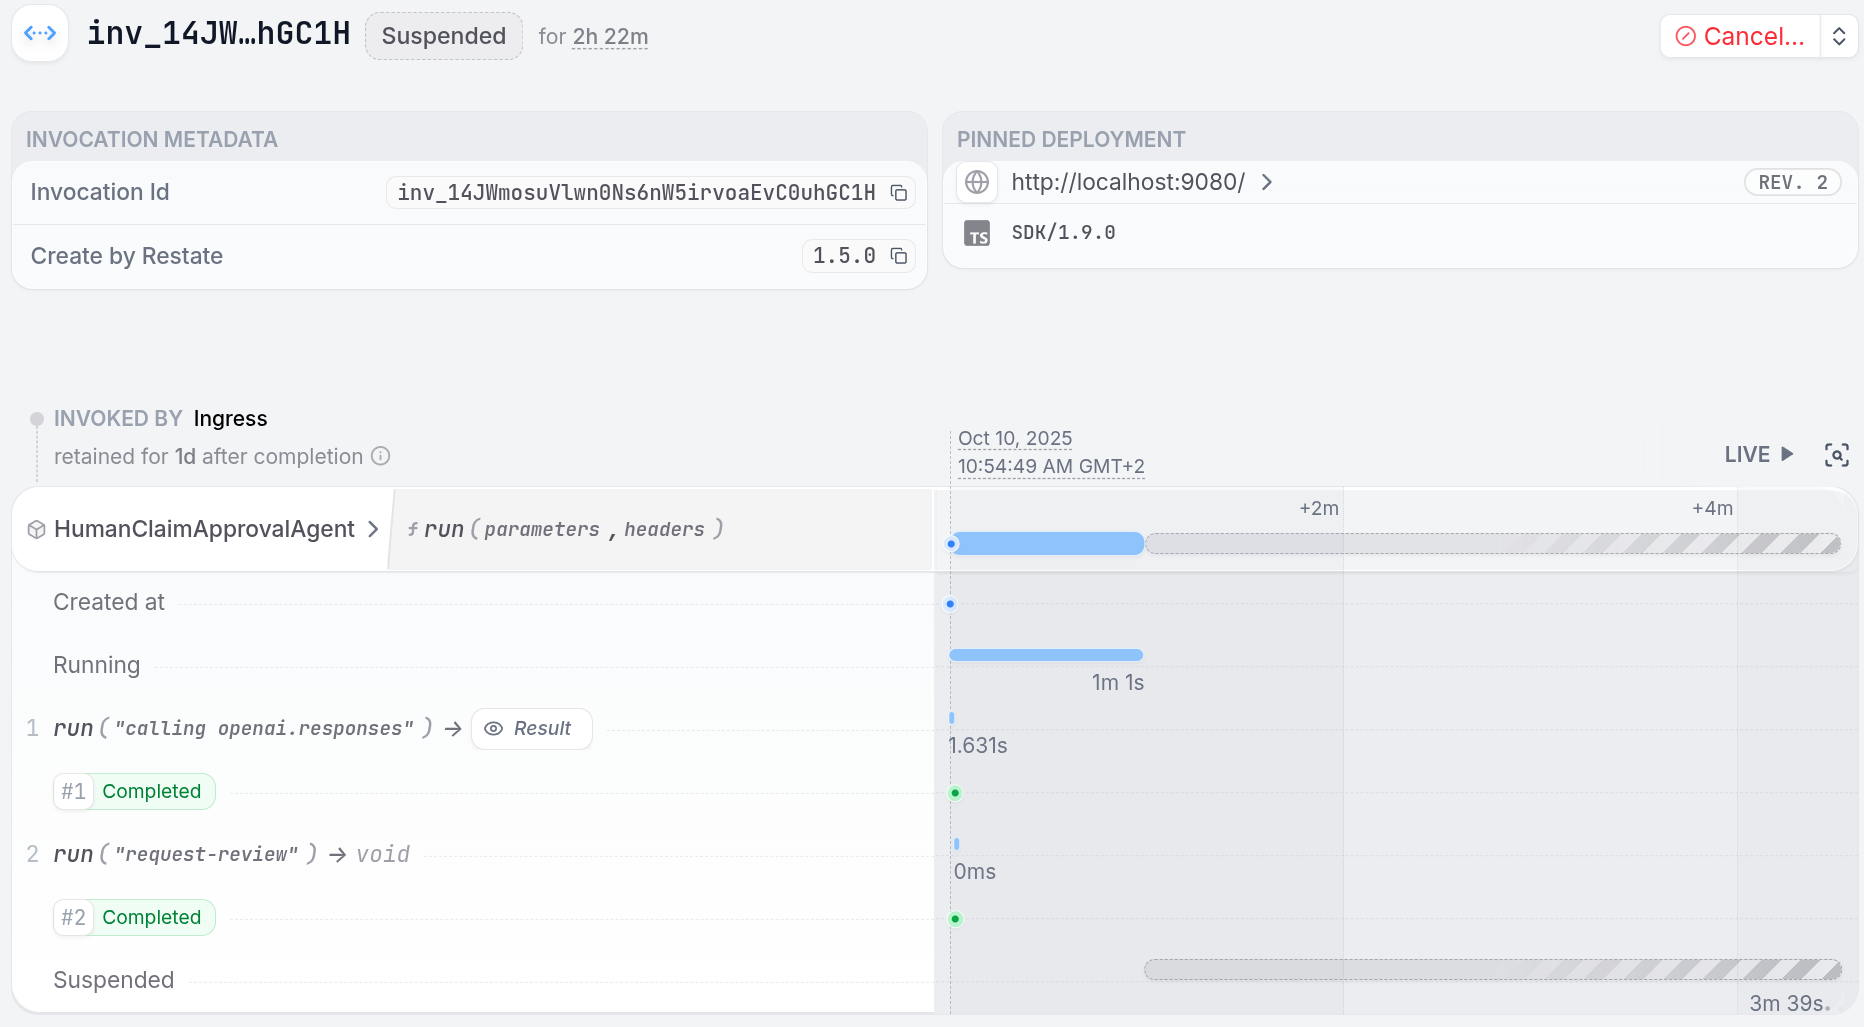
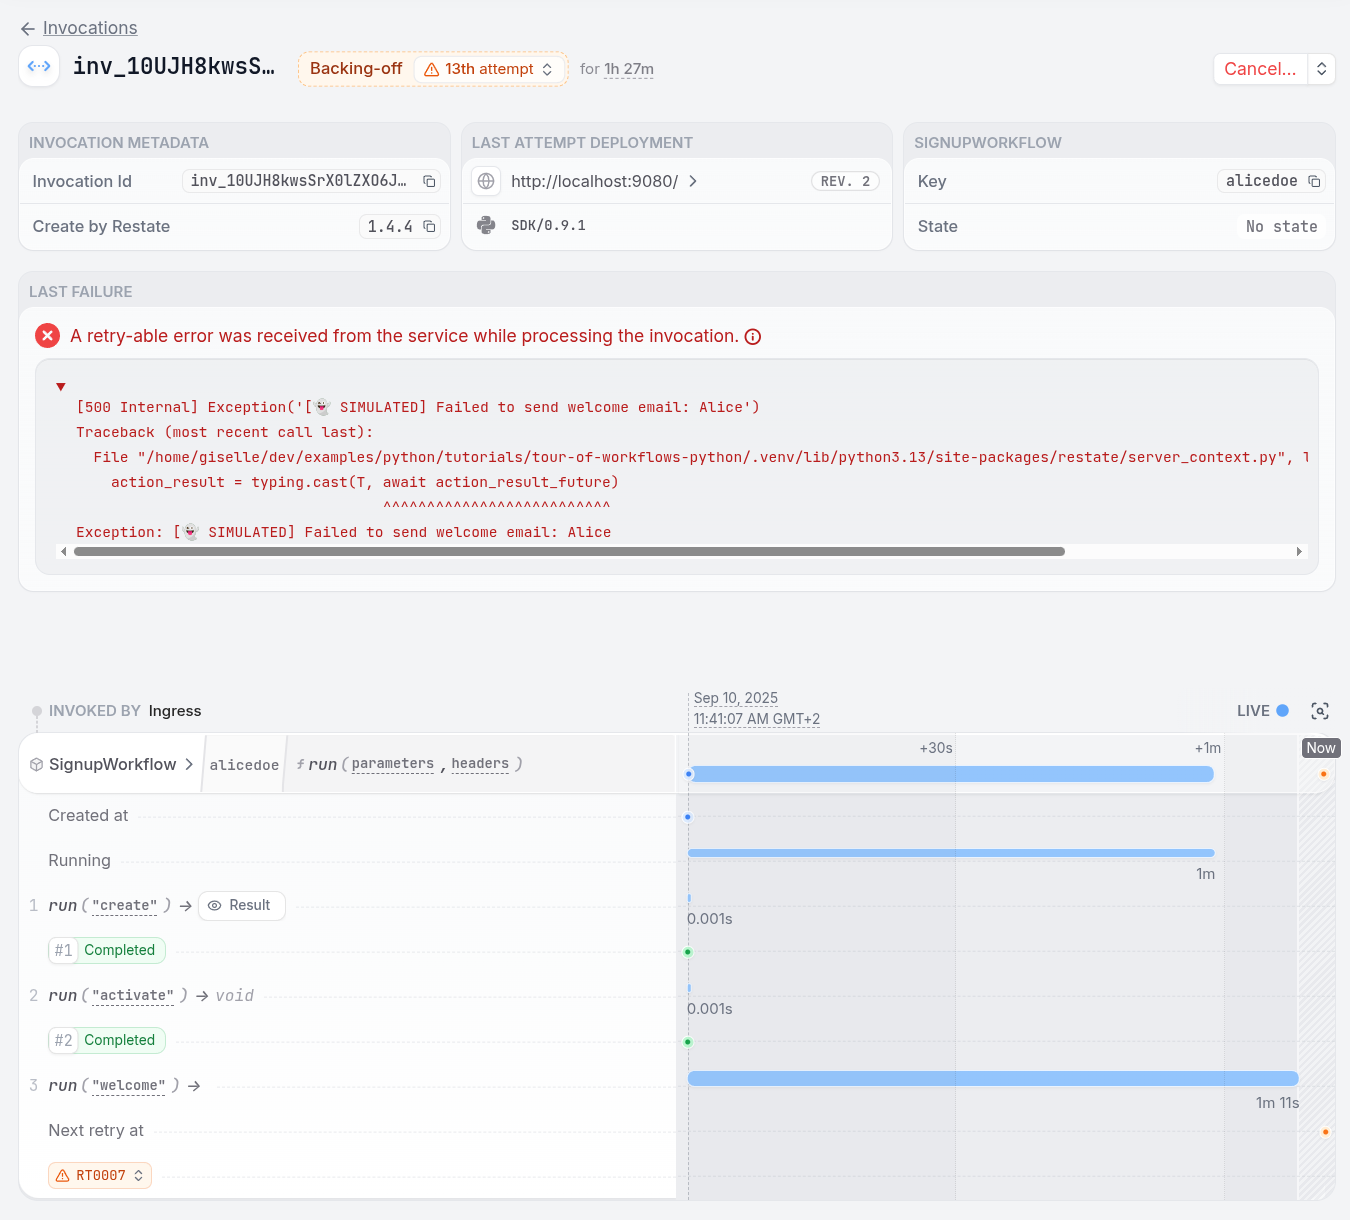 You see how the invocation went through the steps of the workflow, and how it is stuck on retrying to send the welcome email.

 Try killing the service and restarting it. The workflow will continue waiting for the promise to be resolved.
To resolve the promise, **copy over the curl request from the service logs**, which looks like this:
Try killing the service and restarting it. The workflow will continue waiting for the promise to be resolved.
To resolve the promise, **copy over the curl request from the service logs**, which looks like this:
 Try killing the service and restarting it. The workflow will continue sending reminders as if it never stopped.
To resolve the promise, **copy over the curl request from the service logs**, which looks like this:
Try killing the service and restarting it. The workflow will continue sending reminders as if it never stopped.
To resolve the promise, **copy over the curl request from the service logs**, which looks like this:
 * **Automatically retry transient errors** like rate limits and network failures
* **Persist steps** (LLM calls, tools) and recover previous progress after failures
* **Suspend long-running agents** when idle to save costs
## Plugs into Popular SDKs
Restate works independently of any SDK and specific AI stack, but its lightweight programming abstraction integrates easily into many popular SDKs. A few lines turn your agent into a durable agent.
```typescript {"CODE_LOAD::ts/src/usecases/agents/weather-agent.ts#here"} theme={null}
const model = wrapLanguageModel({
model: openai("gpt-4o"),
middleware: durableCalls(restateContext, { maxRetryAttempts: 3 }),
});
```
Works with Vercel AI SDK, OpenAI, and others.
## Human-in-the-Loop and Workflow Patterns
Restate's workflows-as-code and building blocks make it easy to reliably implement:
* **Automatically retry transient errors** like rate limits and network failures
* **Persist steps** (LLM calls, tools) and recover previous progress after failures
* **Suspend long-running agents** when idle to save costs
## Plugs into Popular SDKs
Restate works independently of any SDK and specific AI stack, but its lightweight programming abstraction integrates easily into many popular SDKs. A few lines turn your agent into a durable agent.
```typescript {"CODE_LOAD::ts/src/usecases/agents/weather-agent.ts#here"} theme={null}
const model = wrapLanguageModel({
model: openai("gpt-4o"),
middleware: durableCalls(restateContext, { maxRetryAttempts: 3 }),
});
```
Works with Vercel AI SDK, OpenAI, and others.
## Human-in-the-Loop and Workflow Patterns
Restate's workflows-as-code and building blocks make it easy to reliably implement:
 * **Complete execution timeline**: Every LLM call and tool execution
* **Debug failed agents**: Inspect exactly where and why agents failed
* **Agent control**: Pause, resume, restart agents during development and production
## End-to-End Resilient Applications
Agents are just a part of your application. Restate covers the plumbing around your agents:
* **Complete execution timeline**: Every LLM call and tool execution
* **Debug failed agents**: Inspect exactly where and why agents failed
* **Agent control**: Pause, resume, restart agents during development and production
## End-to-End Resilient Applications
Agents are just a part of your application. Restate covers the plumbing around your agents:
 * **Queuing, state, session management**: Built-in primitives for reliable agent coordination
* **Deterministic workflows**: Complement agents with structured business logic
* **Reliable asynchronous tasks**: Handle background work and inter-service communication
## Flexible Deployments and Scalability
Restate's durable execution runtime lets you run your durable code where you want at the scale you want:
* **Queuing, state, session management**: Built-in primitives for reliable agent coordination
* **Deterministic workflows**: Complement agents with structured business logic
* **Reliable asynchronous tasks**: Handle background work and inter-service communication
## Flexible Deployments and Scalability
Restate's durable execution runtime lets you run your durable code where you want at the scale you want:
 * **Scale to millions** of concurrent agent executions
* **Deploy your agents** on FaaS or containers
* **You own the infrastructure**: Run on Restate Cloud or self-host
## Getting Started
* **Scale to millions** of concurrent agent executions
* **Deploy your agents** on FaaS or containers
* **You own the infrastructure**: Run on Restate Cloud or self-host
## Getting Started
 * **Zero message loss**: All service communication is durably logged
* **Built-in retries**: Automatic exponential backoff for transient failures
* **Scheduling**: Delay messages for future processing
* **Request deduplication**: Idempotency keys prevent duplicate processing
* **Zero message loss**: All service communication is durably logged
* **Built-in retries**: Automatic exponential backoff for transient failures
* **Scheduling**: Delay messages for future processing
* **Request deduplication**: Idempotency keys prevent duplicate processing
 * **Durable persistence**: Application state survives crashes and deployments
* **Simple concurrency model**: Single-writer semantics prevent consistency issues and race conditions
* **Horizontal scaling**: Each object has its own message queue. Different entity keys process independently
* **Built-in querying**: Access state via UI and APIs
* **Durable persistence**: Application state survives crashes and deployments
* **Simple concurrency model**: Single-writer semantics prevent consistency issues and race conditions
* **Horizontal scaling**: Each object has its own message queue. Different entity keys process independently
* **Built-in querying**: Access state via UI and APIs
 ## Key Orchestration Patterns
 **Restate Server**: Restate is packaged as a single binary with built-in persistence and messaging. Run it as a single instance or in a high-availability cluster.
**Service Deployment**: Deploy your workflows using your existing deployment pipeline: containers, Kubernetes, serverless functions, or any HTTP-capable platform.
On FaaS, Restate suspends workflows while they are waiting (e.g. timer) to reduce costs.
## Key Workflow Patterns
**Restate Server**: Restate is packaged as a single binary with built-in persistence and messaging. Run it as a single instance or in a high-availability cluster.
**Service Deployment**: Deploy your workflows using your existing deployment pipeline: containers, Kubernetes, serverless functions, or any HTTP-capable platform.
On FaaS, Restate suspends workflows while they are waiting (e.g. timer) to reduce costs.
## Key Workflow Patterns